
Preserving your delicious homemade jams, pickles, and other creations requires more than just the perfect recipe. Ensuring the safety and longevity of your canned goods starts with properly sterilized jars. So, how to sterilize jars properly? This guide will walk you through the essential steps of sterilizing jars, from understanding the "why" behind them to the tools you'll need and the different methods you can choose from.
- Glass Or Plastic Jar: Which Is Better for Food Storage?
- How to Measure The Jar Lids? Guide to Buying Canning Jar Lid
- Round Vs Square Glass Jars: Which Is the Best for Your Needs?
- Keeping Strawberries In a Glass Jar: Step By Step to Store Strawberries Last Longer
Why Need to Sterilize Jars?
Sterilization of jars is an essential step in the canning process for food businesses and restaurants. This practice eliminates the presence of harmful microorganisms, including bacteria, yeasts, and molds, which can lead to:
- Product spoilage: These organisms rapidly decompose food, rendering it unfit for consumption and potentially causing significant financial losses.
- Foodborne illness outbreaks: Certain bacteria and molds produce toxins that, when ingested, can cause severe health consequences for consumers, leading to potential legal ramifications and reputational damage.
Therefore, thorough jar sterilization ensures a safe and sterile environment for your food products, guaranteeing their long-term storage and mitigating the risks associated with foodborne illnesses. So what you need to sterilize jars? Explore in the next section.
What You Need to Sterilize Jars
When it comes to sterilize jars, here are thíngs need to be prepared:
Essential:
- Jars: Glass jars with lids and rings in good condition (no cracks or chips).
- Large pot: Big enough to hold all your jars and water to fully submerge them.
- Water: Enough to fill the pot and cover the jars by at least 1 inch.
- Tongs or jar lifter: To safely remove hot jars from the water.
- Clean dish towel or drying rack: For placing the sterilized jars.
Optional (depending on method):
- Oven: If using the oven method for sterilization.
- Baking sheet: For placing jars in the oven.
- Dishwashing machine: If using the dishwasher method (requires a high-temperature setting or steam function).
- White vinegar: For an additional cleaning step before sterilization.
All items above are for different methods but they should be clean and free of any contaminants. Now, let’s delve into how to sterilize jars step by step in the next part.
How to Sterilize Jars - Step by Step Guide
There are different ways to sterilize jars, including boiling water method, oven method, and diswahser method. Let’s discover step by step of each method below.
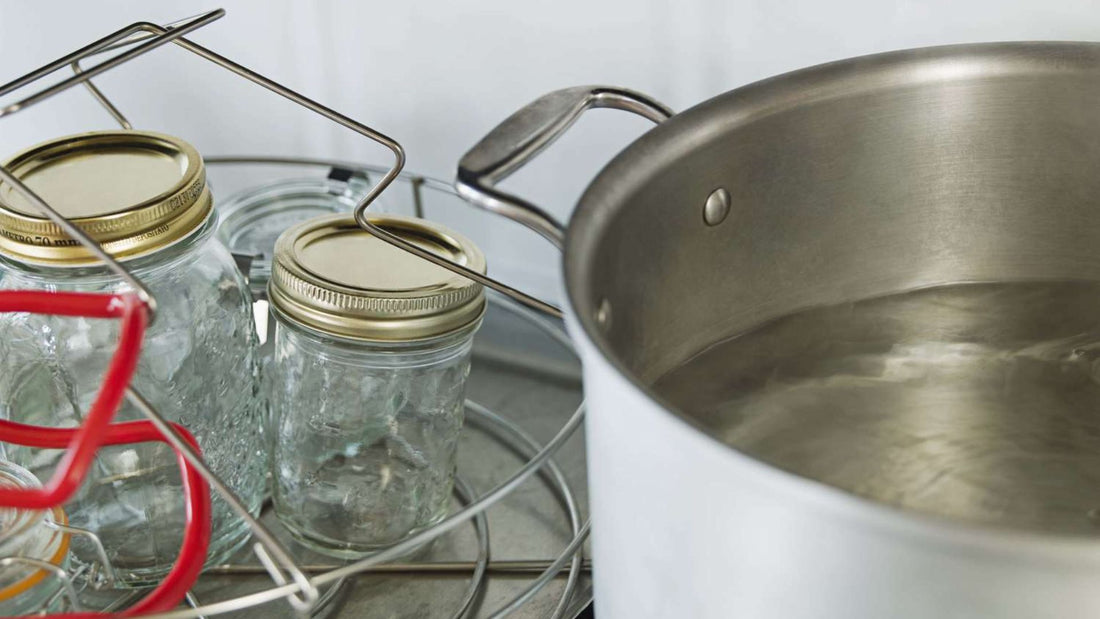
Boiling Water Method
Let's focus on answering how to sterilize jars in boiling water and how long to sterilize jars in boiling water with KimEcopak!
Step by step of boiling water method:
- Step 1: Wash jars and lids thoroughly. Wash jars and lids in hot soapy water, rinse well, and inspect for cracks or chips. Discard any damaged jars.
- Step 2: Fill a large pot with water. Fill a pot large enough to hold all your jars comfortably with water, ensuring they are fully submerged by at least 1 inch.
- Step3: Bring water to a rolling boil. Place the pot on the stove and bring the water to a full, rolling boil.
- Step 4: Add jars and simmer. Carefully lower the jars into the boiling water using tongs or a jar lifter. Ensure they are completely covered by water.
- Step 5: Boil for the recommended time.
- At sea level, boil for 10 minutes.
- Adjust boiling time based on your altitude (see "Adapting to Altitude" section for reference).
- Step 6: Turn off heat and remove jars. After the boiling time, turn off the heat and carefully remove the jars from the water with tongs or a jar lifter.
- Step 7: Air-dry or keep warm: Place the sterilized jars upside down on a clean dish towel or drying rack to air-dry. Alternatively, you can leave them in the hot water until you're ready to fill them.

As mentioned in the step 5, for the boiling water method, there are also important altitude consideration. In fact, living at high altitudes affects water boiling temperature, which in turn impacts sterilization times. Here's how to adjust the jar sterilization process for different elevations: Increase boiling time: For every 1,000 feet above sea level, add 1 minute to the standard sterilization time (usually 10 minutes).
Here's a quick reference:
- 1,001-3,000 feet: Increase sterilization time by 5 minutes.
- 3,001-6,000 feet: Increase sterilization time by 10 minutes.
- 6,001-8,000 feet: Increase sterilization time by 15 minutes.
Oven Method - How to Sterilize Mason Jars in Oven
Oven method is another popular ways to sterilize jars for canning. Here is a guide step by step:
- Step 1: Wash and dry jars. Wash and dry jars thoroughly as described above.
- Step 2: Preheat oven to 275°F (135°C). Preheat your oven to the desired temperature.
- Step 3: Place jars in oven. Place the clean, dry jars upside down on a baking sheet and carefully transfer them to the preheated oven.
- Step 4: Sterilize for 15 minutes. Leave the jars in the oven for at least 15 minutes.
- Step 5: Turn off oven and let cool. Turn off the oven and leave the jars inside to cool completely before using.

Dishwasher Method
If the boiling water and oven method is not suitable for your food business, how to sanitize mason jars? You can apply the dishwasher method by step as below:
- Step 1: Wash jars and lids. Wash jars and lids thoroughly as described in the boiling water method.
- Step 2: Load jars and lids in dishwasher. Place the clean jars and lids on the top rack of your dishwasher, ensuring they are not touching each other.
- Step 3: Run a high-temperature cycle. Choose a dishwasher cycle with the highest heat setting (ideally with a sanitizing or steam function).
- Step 4: Air-dry jars: Once the cycle is complete, carefully remove the jars and lids and allow them to air-dry completely on a clean dish towel or drying rack.
Regardless of the method used, remember to keep the sterilized jars hot until you fill them with your prepared food product. This helps maintain a sterile environment and prevent contamination.

Cleaning the Lids and Rings
While jars require sterilization, lids and rings demand meticulous cleaning prior to use. This process ensures the integrity of the seal and minimizes the risk of contamination:
- Wash with Hot, Soapy Water: Thoroughly wash lids and rings in hot, soapy water to remove any food residue or debris.
- Rinse Well: Rinse the lids and rings meticulously under running water to eliminate any soap residue.
- Simmering (Optional): While not strictly necessary for sterilization, many experts recommend simmering the lids and rings in the cooled (approximately 180°F / 80°C) water used to boil the jars. These further cleanses and softens the sealing compound on the lids, potentially enhancing the seal quality.
- Air-Drying or Maintaining Warmth: Place the cleaned lids and rings on a clean dish towel or drying rack for complete air-drying. Alternatively, they can remain in the hot water until ready for use.
Overall, cleaning lids and rings are also important as cleaning the jars.
Conclusion
Jar sterilization is fundamental for foodservice operations. By eliminating harmful microorganisms and ensuring a sterile environment, food businesses can guarantee the quality and longevity of their preserved products, minimizing the risk of spoilage and foodborne illness outbreaks. This practice safeguards both public health and the integrity of your foodservice establishment.


