
Cherry butter is the preserve that convinced me I could actually be a home canner. Unlike intimidating jam recipes with precise temperatures and pectin measurements, this velvety fruit butter forgives, adapts, and rewards you with the most intensely flavored spread you've ever tasted. Made from whole cherries slow-cooked until they surrender into a spreadable, butter-smooth consistency, this recipe turns summer's cherry abundance into year-round breakfast luxury. You don't need water bath canning experience though I'll teach you that too because cherry butter keeps beautifully in the refrigerator or freezer. Whether you're a preserving beginner or a seasoned canner seeking a new stone fruit project, this cherry butter recipe will become your summer ritual.
What Is Cherry Butter? (Understanding This Luxurious Fruit Spread)
Cherry butter belongs to the family of fruit butters, preserves made by cooking fruit down into a smooth, concentrated spread with a consistency similar to dairy butter. Unlike cherry jam, which contains visible fruit pieces and relies on pectin for thickening, cherry butter achieves its velvety texture through slow reduction and pureeing. The entire cherry gets cooked down until soft, then blended smooth before continuing to simmer until thick enough to spread without running.
The name "butter" might confuse first-time makers since there's no dairy involved whatsoever. The term simply describes the spreadable, butter-like consistency and the way it melts into warm bread. Historically, American and European cooks created fruit butters as a way to preserve abundant harvests without expensive sugar, the long cooking time concentrated natural sugars enough to act as a preservative. Apple butter remains the most famous example, but cherry, pear, plum, and peach butters all deserve equal attention.
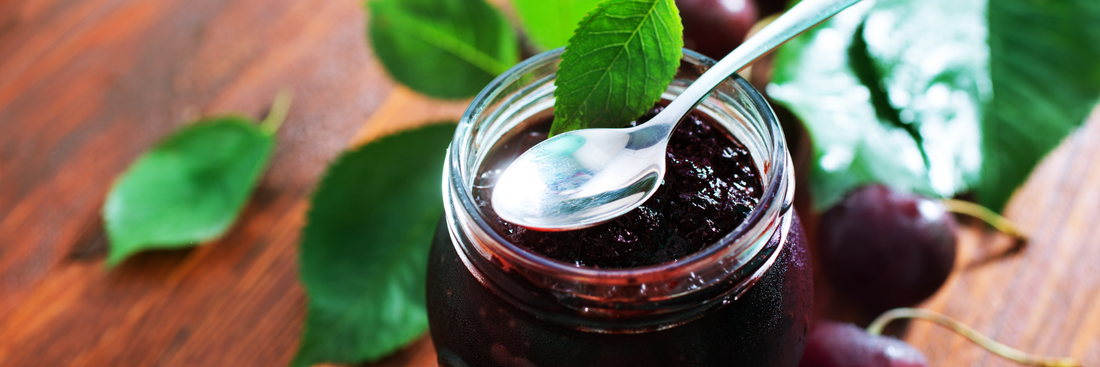
What sets cherry butter apart from other cherry preserves is its intensity. Because the mixture reduces significantly during cooking, the cherry flavor becomes deeply concentrated almost like eating the essence of a dozen cherries in each spoonful. The texture is absolutely smooth, with no seeds, skins, or fruit chunks. When properly made, it should hold its shape on a spoon but spread easily when applied to bread. The color is typically a deep, dark red, sometimes almost burgundy, depending on the cherry variety you choose.
Why You'll Fall in Love with Homemade Cherry Butter
Homemade cherry butter offers an intensity of flavor that no store-bought preserve can match. When you control the ingredients, choosing ripe, seasonal cherries at their peak and adjusting sweetness to your preference you create something truly artisan. The slow cooking process caramelizes the fruit's natural sugars, developing complex flavor notes you simply can't achieve with quick-cook commercial methods. Each bite delivers pure cherry goodness without artificial colors, high-fructose corn syrup, or unnecessary additives.
The versatility of cherry butter makes it worth the Sunday afternoon spent stirring the pot. Yes, it's spectacular on morning toast or folded into hot oatmeal, but it also shines in unexpected places. I've used it as a glaze for roasted pork tenderloin, where its sweet-tart profile complements the meat beautifully. It makes an elegant addition to cheese boards, particularly with sharp cheddar or creamy brie. Swirled into vanilla ice cream or spooned over pound cake, it becomes an instant dessert. My favorite discovery? Using cherry butter as the filling for thumbprint cookies, the concentrated flavor holds up beautifully during baking.
There's also something deeply satisfying about putting up jars of homemade preserves. When cherry season arrives each summer and the farmers market overflows with glossy fruit, making cherry butter becomes my ritual. The kitchen fills with the aroma of simmering cherries and cinnamon, and by evening, I have a dozen jars cooling on the counter, some for our pantry, others destined to become gifts. Friends and family have learned to expect these jars during holidays, birthdays, and thank-you occasions. A jar of homemade cherry butter, especially with a handwritten label and fabric-covered lid, communicates care in a way store-bought items simply cannot.
The Magic of Cherry Season in a Jar
Cherry season is fleeting usually just a few weeks in early to mid-summer, depending on your region. When those weeks arrive, fresh cherries appear in abundance at farmers markets and orchards, often at prices far more reasonable than you'll find the rest of the year. This creates the perfect opportunity to buy in bulk and preserve. Making cherry butter transforms ten pounds of cherries that might go bad in days into shelf-stable jars that last months or even years.
There's something emotionally resonant about eating cherry butter in December and tasting July's sunshine. It's a small act of defiance against industrial food systems that ship fruit thousands of miles and expect us to accept flavorless, out-of-season produce. When you open a jar of cherry butter you made last summer, you're connected to a specific time and place perhaps the Saturday morning you spent at the orchard, or the afternoon your children helped pit cherries at the kitchen table, their fingers stained red.
This connection to seasons and traditions is why I keep making cherry butter year after year, even though I could easily buy fruit spreads at the store. My grandmother made cherry butter each summer in her tiny kitchen, the windows fogged from steam, jars lined up like soldiers on every available surface. She'd carefully write the date on each label in her perfect cursive. When I follow her recipe now, I feel her presence, in the way I test thickness by dragging a spoon through the pot, in the precise way I wipe jar rims before sealing. Food preservation links us to our past while creating something tangible for our future.

Ingredients You'll Need for Perfect Cherry Butter
The beauty of cherry butter lies in its simplicity. The ingredient list is refreshingly short, letting the cherries themselves star in this preserve. You'll need fresh or frozen cherries (about 5 pounds for a standard batch, which yields roughly 6-8 half-pint jars), granulated sugar (typically 2-3 cups, depending on your cherries' sweetness and your preference), fresh lemon juice (1/4 cup, essential for both flavor balance and safe preservation), and optional spices like cinnamon sticks, vanilla extract, or almond extract for added complexity.
The sugar amount in cherry butter recipes is notably lower than in traditional jams because the long cooking time naturally concentrates the fruit's sugars. While jam might use nearly equal weights of fruit and sugar, cherry butter typically uses about one-third to one-half as much sugar as fruit. This makes it a healthier option and lets the cherry flavor shine through without cloying sweetness. That said, sugar does more than sweeten, it also acts as a preservative, so reducing it too much can affect shelf life. For long-term canned storage, I recommend staying close to the recipe's suggested amount. For refrigerator or freezer storage, feel free to reduce sugar by up to half.
Lemon juice serves multiple purposes in this recipe. Obviously, it adds brightness that balances the cherries' sweetness, but it also provides acidity crucial for safe canning. The pH level of your cherry butter must be low enough (acidic enough) to prevent botulism when preserved through water bath canning. Lemon juice ensures you reach that safety threshold. Never skip the lemon juice or substitute with less acidic options when canning. If you're only making refrigerator cherry butter, you have slightly more flexibility, but I still recommend including it for flavor.
The equipment list is equally straightforward: a large, heavy-bottomed pot (at least 6-quart capacity to prevent boil-overs), an immersion blender or standard blender for pureeing, a wooden spoon for stirring, mason jars with new lids, and basic canning equipment if you plan to preserve for shelf stability. Don't have fancy canning tools? A large stockpot for the water bath, a kitchen towel to line the bottom, and metal tongs will work perfectly fine.
Choosing the Right Cherries
Cherry variety significantly impacts your butter's final flavor profile. Sweet cherries like Bing, Rainier, or Lambert create a dessert-like butter with deep, almost wine-like notes. Tart cherries such as Montmorency produce a brighter, more acidic butter that pairs beautifully with rich foods like pork or cheese. Many experienced preserve-makers (including my grandmother) prefer a combination, perhaps two-thirds sweet cherries and one-third tart for balanced complexity.
Fresh cherries picked at peak ripeness obviously offer the best flavor, but frozen cherries work surprisingly well for cherry butter. Because you're cooking and pureeing the fruit, texture concerns that matter for fresh eating become irrelevant. Frozen cherries are often flash-frozen at peak ripeness, sometimes capturing better flavor than fresh cherries that were picked underripe for shipping. If using frozen cherries, there's no need to thaw them first, just add them directly to your pot and account for slightly longer cooking time as they release their juices.
The pitted versus unpitted question matters more for your convenience than the final product. Obviously, working with pre-pitted cherries (whether fresh or frozen) saves significant time and mess. If you're pitting fresh cherries yourself, invest in a simple cherry pitter, they cost under $15 and turn a tedious job into a manageable one. My childhood trick was using a chopstick to push pits through the stem end, but I'll be honest: after pitting a few pounds this way, your hand cramps. In a pinch, you can cook cherries with pits in, then puree and strain through a food mill to remove them, though this creates more work and some waste.

Step-by-Step Guide: How to Make Cherry Butter from Scratch
Preparing Your Cherries
Start by thoroughly washing your cherries, even if they're organic. Place them in a colander and rinse under cold running water, gently rubbing to remove any dirt or residue. If you're working with fresh cherries, inspect them carefully and discard any that are overly soft, bruised, or showing signs of mold. A few slightly imperfect cherries are fine, they'll cook down regardless but truly bad fruit can affect your butter's flavor.
Pitting is the most time-consuming part of preparation, but it's also meditative work that can involve the whole family. My children remember summer evenings sitting around the kitchen table with bowls of cherries, competing to see who could pit the most without staining their clothes (they always lost that competition). A handheld cherry pitter is your best tool, position each cherry over the pitter, press down, and watch the pit pop out. Work over a large bowl to catch both pitted cherries and the considerable amount of juice they'll release.
If you're measuring cherries by weight rather than volume, my preferred method for consistent results you want about 5 pounds after pitting. This typically requires purchasing 6-6.5 pounds of whole cherries to account for pit and stem weight. Don't stress over perfect accuracy; fruit butter is forgiving. A pound more or less simply means slightly longer or shorter cooking time to reach the desired consistency.
The Cooking Process
Combine your prepared cherries and about 1/2 cup of water in a large, heavy-bottomed pot. The water prevents sticking during the initial cooking phase before the cherries release their juices. Place the pot over medium heat and bring to a gentle simmer, stirring occasionally. Within 10-15 minutes, the cherries will begin breaking down and releasing liquid. Continue cooking, stirring more frequently now, until all cherries are completely soft and the mixture is bubbling about 20-25 minutes total for this initial phase.
Now comes the blending step that transforms fruit into butter. Remove the pot from heat and let it cool for about 10 minutes (blending scorching-hot liquid is dangerous). Using an immersion blender directly in the pot, puree the cherry mixture until completely smooth. No immersion blender? Carefully transfer to a standard blender in batches, remembering to vent the lid and cover it with a kitchen towel to prevent hot splatter. Blend until you have a uniformly smooth puree with no visible chunks. For the absolute silkiest texture, push the puree through a fine-mesh strainer to remove any remaining skin particles, though I rarely bother with this extra step.
Return the pureed cherry mixture to medium-low heat. This is where patience becomes your primary ingredient. The cherry butter needs to cook down slowly, reducing in volume by nearly half, until it reaches a thick, spreadable consistency. This takes anywhere from 45 minutes to 2 hours, depending on your cherries' water content, your heat level, and your pot's surface area. Stir frequently every 5-10 minutes at first, then nearly constantly toward the end because fruit butter can scorch on the bottom, and burnt butter is irredeemable.
About halfway through the reduction process, add your sugar and lemon juice. I used to add these at the beginning, but my grandmother taught me to wait cooking cherries down first concentrates their natural sweetness, so you can taste and adjust sugar more accurately. Stir until the sugar dissolves completely, then continue the slow reduction. If you're adding spices like cinnamon sticks or vanilla, add them now as well.
How do you know when cherry butter is done? I use the "spoon test": drag a wooden spoon through the butter in your pot. If the path stays clear for a moment before the butter flows back together, you're ready. Another test: place a spoonful on a chilled plate and let it cool for a minute. It should be thick enough to mound slightly and not run when you tilt the plate. The butter will thicken further as it cools, so slightly looser than you think is better than overdoing it.
Adding Sweetness and Spice
The sugar quantity in cherry butter recipes is a starting point, not a mandate. I always begin with less sugar than I think I'll need, maybe 2 cups for 5 pounds of cherries then taste and adjust after it's dissolved. Sweet cherry varieties need less added sugar than tart cherries. Your personal preference matters too; I like cherry butter on the less-sweet end so it works in savory applications, but my husband prefers it sweeter for his morning toast.
When adjusting sweetness, remember that flavors concentrate further as the butter cooks down and that sweetness seems less pronounced when food is hot. What tastes perfectly sweet in the pot might taste cloying when cooled. If you're uncertain, err on the side of less sugar, you can always stir more into finished butter destined for the refrigerator.
Spices transform cherry butter from simple to sophisticated. A cinnamon stick simmered during the reduction process adds warm depth without screaming "cinnamon." Vanilla extract (stir in 1-2 teaspoons at the very end) creates almost cherry pie-like notes. Almond extract (just 1/4 teaspoon, it's potent) emphasizes cherries' natural almond undertones that come from the pits. I've experimented with cardamom, star anise, and even black pepper, all with delicious results. Start conservatively with spices; you can always add more to your next batch, but you can't remove them once they're in.
My grandmother always added a single cinnamon stick to her cherry butter, the same weathered stick she'd been using for years. She'd fish it out at the end, rinse it, dry it, and tuck it back into her spice drawer for next summer. I do the same now with one of her cinnamon sticks that somehow made it to me. It's silly, perhaps, to think a cinnamon stick carries memory, but when I drop it into the pot of bubbling cherries, I feel her hand guiding mine.

Canning Cherry Butter for Long-Term Storage
Sterilizing Jars and Preparation
If you're preserving cherry butter for shelf-stable storage, proper jar sterilization is crucial. I run my mason jars through the dishwasher on the hottest cycle, timing it so they're still warm when I'm ready to fill them. Alternatively, place jars in a large pot, cover with water, bring to a boil, and boil for 10 minutes. Keep them in the hot water until you're ready to use them, hot butter going into hot jars prevents thermal shock that could crack the glass.
New lids are essential for each canning session the sealing compound on lids is designed for one-time use, and reusing old lids risks seal failure. Place your new lids in a small saucepan with water, bring just to a simmer (not a rolling boil, which can damage the sealing compound), then turn off the heat and let them sit in the hot water. The metal rings (bands) can be reused indefinitely as long as they're not bent or rusty just make sure they're clean and dry.
Set up your workspace efficiently before you begin filling jars. Lay out a clean kitchen towel on your counter where you'll place filled jars. Have your jar lifter, funnel, and clean cloth for wiping jar rims within easy reach. Fill your water bath canner or large stockpot about two-thirds full and begin heating it, you want it at a gentle simmer when your jars are ready to process. If using a stockpot rather than a dedicated canner, line the bottom with a kitchen towel or place a metal rack to prevent jars from direct contact with the pot bottom.
Water Bath Canning Method
Using a wide-mouth funnel (which prevents messy spills), ladle hot cherry butter into hot jars, leaving 1/4 inch of headspace at the top. Headspace matters for proper sealing, too little and butter may boil out during processing; too much and you might not get a vacuum seal. After filling each jar, run a non-metallic utensil (a chopstick or plastic spatula works perfectly) around the inside edge to release any air bubbles trapped in the thick butter.
Wipe each jar rim carefully with a clean, damp cloth, even a tiny bit of butter on the rim can prevent proper sealing. Center a lid on each jar, then screw on the band until fingertip-tight. Don't over-tighten; the bands only need to be snug enough to hold the lid in place. Air needs to escape during processing, and overtightening can prevent this.
Using your jar lifter, carefully lower filled jars into the simmering water bath, ensuring they're covered by at least 1-2 inches of water. If needed, add more hot water from a kettle. Bring the water to a full rolling boil, then process half-pint jars for 10 minutes (15 minutes for pint jars). Start timing only when the water reaches a full boil. If you're at altitudes above 1,000 feet, you'll need to adjust processing time, add 1 additional minute for every 1,000 feet of elevation.
When processing time is complete, turn off the heat and let jars sit in the water for 5 minutes before removing. This prevents thermal shock and reduces siphoning (butter being sucked out under the lid). Use your jar lifter to carefully transfer jars to your towel-lined counter, setting them upright with space between them. Don't tilt jars or disturb them during this critical cooling period.
Within 12-24 hours, you should hear the distinctive "ping" as each jar seals, the lid center will be depressed and won't flex when pressed. Any unsealed jars should go directly to the refrigerator and be used within 3-4 weeks. Properly sealed jars can be stored in a cool, dark pantry for up to 1 year. After opening, refrigerate and use within 3-4 weeks.
Alternative Storage: Refrigerator and Freezer Methods
Not everyone wants to tackle water bath canning, and that's perfectly okay, cherry butter stores beautifully without it. For refrigerator storage, simply ladle your finished, hot cherry butter into clean jars (they don't need to be sterilized for this method), let them cool to room temperature with lids resting on top, then seal and refrigerate. This butter will keep for 3-4 weeks in the refrigerator.
Freezer storage extends shelf life to about 6 months while bypassing canning entirely. Use freezer-safe mason jars (the straight-sided ones without shoulders) or freezer containers, leaving 1/2 inch of headspace to allow for expansion. Let the butter cool completely before freezing to prevent cracking. Label with the date and contents, frozen cherry butter can look similar to other fruit butters once frozen solid. Thaw overnight in the refrigerator before using.
The advantage of refrigerator and freezer storage is that you can reduce sugar more significantly without safety concerns, since you're not relying on sugar's preservative properties for shelf stability. I often make a reduced-sugar batch specifically for refrigerator use, cutting the sugar by up to half. The flavor is brighter, more intensely cherry, though the texture may be slightly less thick.
Creative Ways to Use Cherry Butter
Cherry butter's versatility extends far beyond morning toast, though I'll never tire of that simple pleasure, thick cherry butter melting into hot, buttered toast, preferably from bread I baked myself. But once you have jars of this preserve, experiment beyond breakfast. Swirl it into plain Greek yogurt for a quick parfait, or fold it into overnight oats before refrigerating. I've spread it between pancakes to create a stacked breakfast cake, and drizzled it over waffles in place of syrup.
In baking, cherry butter acts as both filling and flavor enhancer. Use it as the center of thumbprint cookies, the concentrated flavor holds up to baking heat without becoming overly liquid. Spread it between cake layers, particularly with chocolate or vanilla cake, where its tartness cuts through sweetness beautifully. I've substituted cherry butter for some of the oil in muffin recipes, adding moisture and subtle cherry flavor throughout. It makes an excellent filling for hand pies, Danish pastries, or even as a surprise center in chocolate truffles.
Savory applications surprise people, but they're where cherry butter truly shows its sophistication. Use it as a glaze for roasted pork tenderloin or pork chops during the last few minutes of cooking, the sugars caramelize beautifully while the fruit complements the meat's richness. I've stirred cherry butter into pan sauces for duck breast, where its tartness balances the fatty meat perfectly. On cheese boards, cherry butter bridges the gap between sweet and savory, pairing exceptionally well with aged cheddar, blue cheese, or creamy brie. Spread a thin layer on crostini topped with goat cheese and a grind of black pepper for an elegant appetizer.
Dessert applications are limited only by imagination. Swirl cherry butter into vanilla ice cream during the last minutes of churning for homemade cherry butter ice cream. Spoon it over pound cake or angel food cake. Use it as a filling for crepes. I've even stirred it into cream cheese frosting for a subtle fruit flavor that doesn't overwhelm. During the holidays, small jars with handwritten labels and fabric toppers become my go-to hostess gifts, more personal than wine, more memorable than store-bought chocolates.

Storage, Shelf Life, and Safety Tips
Properly canned cherry butter, processed in a water bath canner with sealed lids, remains shelf-stable for up to 12 months when stored in a cool, dark location. The pantry, a basement shelf, or even a kitchen cupboard away from the stove works well. Avoid temperature extremes, don't store canned goods in unheated garages where winter temperatures drop below freezing, or in hot attics where summer temperatures soar. Temperature fluctuations can compromise seals and quality.
Before storing canned jars, remove the metal bands. This might seem counterintuitive, but bands can rust onto jars during storage, making them difficult to open. More importantly, if a seal fails during storage, you'll notice immediately when you pick up the jar without a band, the lid will pop off. Label each jar with contents and date using a permanent marker on the lid or a sticker on the jar. Even if you think you'll remember, you won't after six months and multiple canning sessions.
Refrigerated cherry butter lasts 3-4 weeks once opened, or about the same timeframe if you made it specifically for refrigerator storage without canning. Keep it tightly sealed and always use a clean spoon when scooping, introducing bread crumbs or other contaminants can promote mold growth. Frozen cherry butter maintains quality for about 6 months, though it's technically safe indefinitely. The texture might become slightly grainy after very long freezer storage, but a quick stir usually resolves this.
Food safety for home canning isn't optional, it's essential. Always follow tested recipes from reliable sources like the National Center for Home Food Preservation, Ball Canning, or university extension offices. Never alter the ratio of fruit to acid (lemon juice), as this affects pH and safety. You can adjust sugar, spices, and cooking time, but the fundamental proportions ensuring safe acidity must remain constant. When in doubt, refrigerate or freeze rather than can.
Watch for signs of spoilage before consuming any home-canned goods. Obvious red flags include bulging lids, leaking jars, or lids that aren't properly sealed (the center should be depressed and shouldn't flex when pressed). When opening, listen for the "whoosh" of the vacuum seal breaking. If there's no sound, don't eat the contents. Inspect for mold, off-colors, or strange odors. If anything seems questionable, throw it out. The food isn't worth the risk, and you can always make more cherry butter.
Troubleshooting Common Cherry Butter Problems
Butter won't thicken: This is the most common frustration, but it's easily fixable. First, ensure you're cooking at the right temperature, medium-low heat encourages evaporation without scorching. If you're in a hurry and using high heat, the bottom will burn before enough moisture evaporates. Second, be patient. Cherry butter can take 1-2 hours to reach proper thickness, depending on variables like your pot's surface area and your cherries' water content. If you've been cooking for over 2 hours and it's still thin, increase heat slightly to encourage faster evaporation, but stir constantly to prevent burning. In the worst case, you can add a tablespoon or two of cornstarch mixed with water, though purists frown upon this shortcut.
Too sweet or not sweet enough: This is why I always recommend adding less sugar initially, then tasting and adjusting. If your finished cherry butter is too sweet, there's unfortunately no perfect fix for canned batches, the sugar is integrated throughout. For refrigerator or freezer storage, you can stir in a bit more lemon juice to add brightness that balances sweetness, though this changes the flavor profile. If it's not sweet enough, simply stir in more sugar while the butter is still hot. It will dissolve easily and incorporate throughout.
Burnt bottom: Once cherry butter scorches, there's no salvaging that batch, the burnt flavor permeates everything. Prevention is key: use a heavy-bottomed pot that distributes heat evenly, cook at medium-low heat rather than high, and stir frequently (especially toward the end when the mixture is thick). If you catch it just as it's starting to stick, immediately transfer the butter to a clean pot, leaving behind any stuck portions. The slight scorched flavor might be detectable, but it won't be overwhelming. Some canners swear by using a heat diffuser under their pot to prevent hot spots.
Jars didn't seal: First, don't panic, unsealed jars aren't wasted. Transfer them immediately to the refrigerator and use within 3-4 weeks. To prevent seal failures, ensure you're wiping jar rims perfectly clean before applying lids, leaving proper headspace (1/4 inch for cherry butter), and processing for the full recommended time with jars covered by 1-2 inches of water. If multiple jars from one batch fail to seal, the problem might be old lids (always use new ones), overtightened bands (they should be fingertip-tight only), or insufficient processing time. You can reprocess unsealed jars within 24 hours using new lids and the full processing time.
Discoloration issues: Cherry butter naturally darkens during the long cooking process, this is normal and even desirable, as it indicates proper caramelization and concentration. However, if your butter turns brownish rather than deep red, your cherries might have been overripe or you cooked at too high heat. Some cherry varieties naturally produce darker butter. After canning, if butter darkens further at the top of the jar during storage, this usually indicates oxidation from too much headspace. It's safe to eat but might have less vibrant flavor. Storing jars away from light helps preserve color.
Frequently Asked Questions About Cherry Butter
Q: What's the difference between cherry butter and cherry jam?
Cherry butter and cherry jam differ fundamentally in texture, preparation method, and concentration. Cherry jam contains recognizable fruit pieces suspended in a gelled mixture, achieved by cooking cherries with sugar and pectin for a relatively short time. The fruit maintains some structural integrity, and you can often see individual cherry pieces. Cherry butter, by contrast, is completely smooth and spreadable, made by pureeing cooked cherries and then reducing the mixture through long, slow cooking until it reaches a thick, butter-like consistency. No pectin is required because the extended cooking naturally concentrates the fruit sugars and reduces water content. The flavor of cherry butter is more intense and concentrated than jam, imagine eating the essence of many cherries rather than preserved whole fruit. While jam is primarily a breakfast condiment, cherry butter's smooth texture and concentrated flavor make it versatile for both sweet and savory applications.
Q: Do I need pectin to make cherry butter?
No, cherry butter requires no pectin whatsoever. Unlike jam or jelly, which rely on pectin to create their gel-like consistency, fruit butters thicken through reduction alone. The long, slow cooking process evaporates water content while concentrating natural fruit sugars and pectin already present in the cherries. As moisture evaporates, the mixture naturally thickens into a spreadable consistency. This is actually one of the beautiful aspects of making fruit butter, it's more forgiving and less technical than jam-making. You don't need to worry about pectin measurements, precise temperatures, or whether your fruit has sufficient natural pectin. You simply cook until the desired consistency is reached, testing with the spoon method or plate test. The patience required for the long cooking time is the only challenge, not any technical complexity with thickening agents.
Q: Can I make cherry butter without a food mill or blender?
While a blender or immersion blender makes achieving perfectly smooth cherry butter much easier, you can work around it if necessary. The simplest alternative is thorough mashing with a potato masher after the initial cooking phase when cherries are soft. This won't create the same silky-smooth texture, but it will break down most fruit pieces. For a smoother result, press the mashed cherries through a fine-mesh strainer using the back of a spoon, labor-intensive but effective. A food mill is actually ideal for cherry butter if you have one, as it simultaneously purees and strains, removing any remaining skins or hard bits. Some traditional cooks prefer slightly rustic cherry butter with a bit of texture rather than perfectly smooth, so don't feel the texture must be absolutely uniform. That said, if you make fruit butters or soups regularly, an immersion blender is an invaluable $30 investment that will change your kitchen life.
Q: How long does homemade cherry butter last?
Storage method determines shelf life dramatically. Properly water bath canned cherry butter with sealed lids remains shelf-stable in a cool, dark pantry for 12 months. Once you open a canned jar, transfer it to the refrigerator and use within 3-4 weeks. If you made cherry butter specifically for refrigerator storage without canning, it will last 3-4 weeks from the time you made it. Frozen cherry butter maintains best quality for about 6 months, though it remains safe indefinitely, the texture might become slightly grainy after extended freezer time, but flavor remains good. Always trust your senses: if opened cherry butter shows any mold, off-odors, or unusual appearance, discard it regardless of the date. Properly stored canned cherry butter often maintains quality beyond the 12-month guideline, but quality gradually declines after a year. I try to use all canned goods within their first year and start each new season with empty shelves, ready for fresh preserves.
Q: Can I reduce the sugar in cherry butter recipes?
Sugar reduction in cherry butter depends on your intended storage method. For shelf-stable water bath canning, I recommend staying close to the recipe's suggested sugar amount, typically 2-3 cups of sugar for 5 pounds of cherries. While sugar primarily adds sweetness, it also acts as a preservative and affects texture. Significantly reducing sugar in canned goods can compromise safety and shelf life. However, for refrigerator or freezer storage, you have much more flexibility since you're not relying on sugar's preservative properties. You can reduce sugar by up to half for butter you'll refrigerate and use within a month. The result will be brighter, more tart, with a slightly thinner consistency. Some people prefer this less-sweet version, especially for savory applications. You can also substitute part of the white sugar with honey or maple syrup, though this will change the flavor profile. Artificial sweeteners don't work well in fruit butter, they don't provide the same body, and many break down during the long cooking process, leaving an unpleasant aftertaste.
Q: What's the best way to pit cherries quickly?
The fastest method uses a handheld cherry pitter, available at any kitchen store for under $15. These simple tools let you pit a cherry in one press, position the cherry in the holder, press down, and the pit pops out while the fruit stays mostly intact. For large batches, consider splurging on a multi-cherry pitter that holds several cherries at once, though these are pricier and only worth it if you pit cherries regularly. Without specialized tools, a chopstick or drinking straw works surprisingly well: push it through the cherry from the stem end, forcing the pit out the bottom. This method is slower and messier but requires no special equipment. A paper clip bent into a hook can also work. Some people cook cherries with pits in, then puree and press through a food mill to strain out pits afterward, this method works but wastes some fruit flesh that stays attached to pits. Whatever method you choose, work over a large bowl to catch juice, wear an apron or old clothes you don't mind staining, and accept that your hands will be red for a day. It's part of the ritual.
Q: Can I use a slow cooker to make cherry butter?
Absolutely, and many people prefer this hands-off method. Cook your pitted cherries with a splash of water in a slow cooker on low for 6-8 hours or high for 3-4 hours until completely soft. Puree with an immersion blender directly in the slow cooker (or transfer to a blender), then add sugar and lemon juice. Continue cooking uncovered on low for another 3-4 hours, stirring every 30-60 minutes, until the butter reaches desired thickness. The slow cooker method reduces hands-on stirring time and virtually eliminates scorching risk. The downside is much longer total time, plan for an all-day or overnight process. Some cooks do the initial cooking in a slow cooker, then transfer to a wide pot on the stove for the final reduction phase, which is faster due to the greater surface area for evaporation. I've done this when I need my stove for other cooking but still want cherry butter finished in a reasonable timeframe. The slow cooker method is particularly appealing for beginners nervous about scorching their first batch.
Q: Why is my cherry butter too runny?
Runny cherry butter usually means insufficient cooking time. Remember, the mixture should reduce by nearly half through evaporation, this takes time, typically 1-2 hours after pureeing. If you're measuring by volume, you should have roughly half as much finished butter as you had initial puree. Use the spoon test: drag a wooden spoon through the butter in your pot. If the path stays clear for a few seconds before the butter flows back together, it's done. The plate test also works: place a spoonful on a chilled plate and let it cool for a minute. It should be thick enough to mound slightly and not run when you tilt the plate. Keep in mind that cherry butter thickens considerably as it cools, what seems slightly loose in the hot pot will firm up in the jar. If your butter is already canned and you discover it's too thin, you can open the jars, return the butter to a pot, and cook it down further, then reprocess with new lids. For uncanned butter, simply return it to the pot and continue cooking. There's no such thing as overcooked cherry butter until it actually scorches, so when in doubt, cook longer.
Conlusion
And there you have it, you've successfully created a batch of perfectly smooth, flavorful Cherry Butter. This recipe proves that you don't need complicated pectin or hours of stressful cooking to achieve a truly magnificent fruit preserve. By employing a slow and patient reduction method, you have perfectly concentrated the sweet, tangy depth of fresh cherries, resulting in a buttery-smooth spread ideal for slathering on toast, muffins, or even pairing with cheese and charcuterie. Better yet, the easy canning method you learned ensures you can lock in this taste of summer for months to come. Don't hesitate to experiment with different spices next time, perhaps a hint of vanilla or a touch of almond extract. Share your homemade Cherry Butter with family and friends, and enjoy the satisfaction of knowing you've crafted something truly delicious, wholesome, and made with love. Happy preserving!
READ MORE:


