
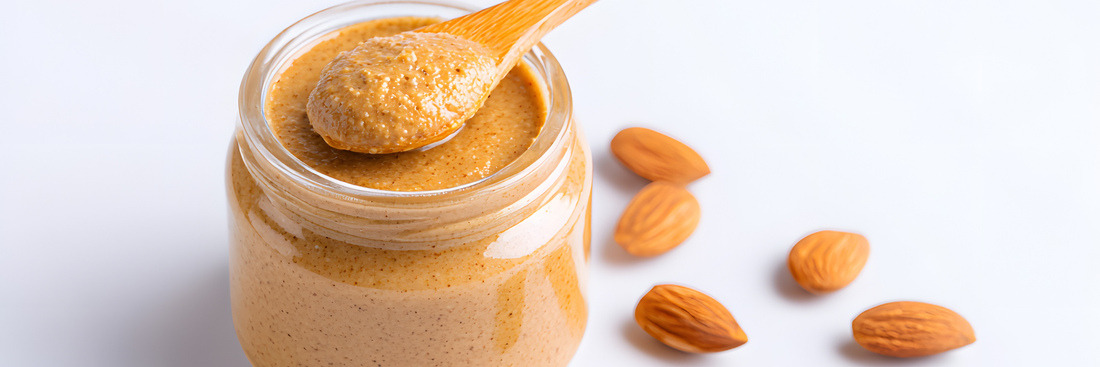
The secret to the creamiest, most flavorful nut butter you've ever tasted isn't hiding in an expensive specialty store, it's waiting in your kitchen pantry. Almond cashew butter represents the perfect marriage of nutrition and indulgence, combining almonds' robust, slightly sweet flavor with cashews' rich, buttery texture. If you've been intimidated by the idea of making nut butter from scratch, prepare to be pleasantly surprised by just how straightforward the process really is. Unlike complicated recipes that require specialty ingredients or advanced culinary skills, homemade almond cashew butter needs only nuts and a powerful blender or food processor. Within minutes, you'll watch whole nuts transform into a silky-smooth spread that rivals anything you'd find on store shelves. This guide covers everything from selecting the perfect nuts to achieving your ideal consistency, along with storage tips that'll keep your creation fresh for weeks. Ready to revolutionize your breakfast routine and snack game forever?
What Is Almond Cashew Butter? (Understanding This Hybrid Nut Butter)
The Best of Both Nuts Combined
Almond cashew butter is exactly what it sounds like, a delicious blend of almonds and cashews processed together into a smooth, spreadable consistency. Unlike single-nut butters that showcase one particular flavor profile, this hybrid spread captures the best characteristics of both nuts. Almonds contribute a slightly sweet, robust nuttiness along with impressive nutritional benefits, while cashews add an incredibly creamy, buttery texture that makes the final product silky-smooth and almost luxurious. The result is a nut butter that's more approachable than pure almond butter (which some find slightly bitter) and more complex than cashew butter alone (which can be one-dimensional). When you blend these two nuts together, they create a naturally balanced spread that doesn't need added oils to achieve that perfect creamy consistency, the cashews provide natural creaminess while the almonds add depth and character.
The beauty of almond cashew butter lies in its versatility and customizability. You can adjust the ratio of almonds to cashews based on your personal preference, creating a spread that's uniquely yours. Some people prefer a 50/50 blend for perfect balance, while others lean toward more almonds for a pronounced nutty flavor or more cashews for extra creaminess. This flexibility means you're not locked into one specific taste profile, you can experiment until you discover your perfect combination. The nuts complement each other beautifully, with almonds providing structure and cashews delivering smoothness, making this hybrid butter easier to spread than pure almond butter while offering more nutritional diversity than cashew butter alone.
Almond Cashew Butter vs. Other Nut Butters
When compared to pure almond butter, the almond cashew blend offers a milder, more balanced flavor that appeals to a wider audience. Pure almond butter can sometimes have a slightly bitter undertone, especially when made from almonds with skins, and its texture tends to be grainier and more prone to dryness. Adding cashews to the mix softens these characteristics significantly, creating a spread that's naturally sweeter and smoother without any additional ingredients. The cashews also help the butter reach that coveted creamy consistency faster during the blending process, which means less processing time and less stress on your food processor. This makes almond cashew butter an excellent choice for anyone who loves the nutritional benefits of almonds but prefers a gentler, more versatile taste.
Compared to pure cashew butter, the almond cashew blend provides additional nutritional complexity and a more interesting flavor profile. While cashew butter is wonderfully creamy and naturally sweet, it can lack the depth and character that almonds bring to the table. Almonds are particularly rich in vitamin E, magnesium, and fiber, nutrients that complement the copper, phosphorus, and manganese found abundantly in cashews. By combining these nuts, you're creating a more nutritionally complete spread that delivers a broader spectrum of vitamins, minerals, and beneficial compounds. The flavor becomes more sophisticated too, with the almonds adding a pleasant nuttiness that prevents the butter from being one-note.
When stacked up against peanut butter, the most popular nut butter in North America, almond cashew butter offers several distinct advantages. It has a more refined, less assertive flavor that works beautifully in both sweet and savory applications. Peanut butter has a very recognizable taste that can sometimes overwhelm other ingredients, while almond cashew butter plays well with others, enhancing dishes without dominating them. From a nutritional standpoint, almond cashew butter typically contains more heart-healthy monounsaturated fats and fewer inflammatory compounds than peanut butter. It's also a fantastic alternative for anyone dealing with peanut sensitivities or following specific dietary protocols that exclude legumes, since true nuts like almonds and cashews are often better tolerated than peanuts, which are technically legumes.

Health Benefits of Almond Cashew Butter (Why Your Body Will Love It)
Nutritional Profile Breakdown
Almond cashew butter is a nutritional powerhouse that delivers an impressive array of vitamins, minerals, and beneficial compounds in every spoonful. A typical two-tablespoon serving contains approximately 180-200 calories, with around 7-8 grams of protein, making it an excellent choice for satisfying hunger and supporting muscle maintenance. The protein in nut butters is considered high-quality, containing all nine essential amino acids your body needs but cannot produce on its own. This makes almond cashew butter particularly valuable for vegetarians and vegans looking to increase their protein intake from plant-based sources. The protein content also helps stabilize blood sugar levels when paired with carbohydrates, preventing the energy crashes that can follow eating refined carbs alone.
The fat content in almond cashew butter, approximately 15-17 grams per serving is predominantly made up of heart-healthy unsaturated fats. These include both monounsaturated fats, which help reduce bad cholesterol levels, and polyunsaturated fats, including small amounts of omega-3 fatty acids that support brain health and reduce inflammation. Unlike the saturated fats found in butter or coconut oil, the fats in almond cashew butter have been associated with improved cardiovascular health when consumed as part of a balanced diet. These healthy fats also enhance the absorption of fat-soluble vitamins like A, D, E, and K, making your entire meal more nutritionally effective.
From a micronutrient perspective, almond cashew butter is particularly rich in vitamin E, a powerful antioxidant that protects cells from oxidative damage and supports immune function. A single serving can provide up to 50% of your daily vitamin E needs. The butter is also an excellent source of magnesium, which plays crucial roles in over 300 enzymatic reactions in the body, including energy production, protein synthesis, and blood pressure regulation. Additionally, you'll find significant amounts of copper, which supports iron absorption and red blood cell formation; manganese, which aids in bone formation and wound healing; and phosphorus, which is essential for strong bones and teeth. The fiber content, typically 2-3 grams per serving, supports digestive health and contributes to feelings of fullness.
Top Health Benefits
The cardiovascular benefits of almond cashew butter are particularly noteworthy. Regular consumption of nuts and nut butters has been consistently linked to reduced risk of heart disease in numerous studies. The monounsaturated and polyunsaturated fats help lower LDL (bad) cholesterol while maintaining or even raising HDL (good) cholesterol, creating a more favorable lipid profile. The magnesium content supports healthy blood pressure by helping blood vessels relax, while the potassium helps counterbalance sodium's effects on blood pressure. The antioxidants, including vitamin E and various phytonutrients, help prevent the oxidation of cholesterol, a key step in the development of arterial plaque. Together, these compounds create a heart-protective effect that makes almond cashew butter a smart addition to a cardiovascular-friendly diet.
For energy and sustained vitality throughout the day, almond cashew butter is hard to beat. The combination of protein, healthy fats, and complex carbohydrates provides steady, long-lasting energy without the spikes and crashes associated with simple sugars. The B vitamins present in the butter, particularly B2 (riboflavin) and B3 (niacin), play essential roles in converting food into usable energy at the cellular level. The iron content supports oxygen transport throughout the body, preventing the fatigue that comes with iron deficiency. Many people find that eating almond cashew butter as part of breakfast or a mid-afternoon snack helps them maintain focus and energy without relying on caffeine or sugar-laden snacks.
When it comes to weight management, almond cashew butter can be a valuable ally despite its calorie density. The protein and fiber content work together to promote satiety, helping you feel full and satisfied for longer periods. This can naturally reduce overall calorie intake by preventing between-meal snacking and reducing portion sizes at subsequent meals. Research has shown that people who regularly consume nuts and nut butters tend to have lower body weights and smaller waist circumferences than those who don't, despite the high calorie content. The key is mindful consumption, enjoying nut butter as part of balanced meals rather than eating it straight from the jar with a spoon, though we've all been tempted.
The impact on blood sugar regulation makes almond cashew butter particularly valuable for people with diabetes or prediabetes, as well as anyone looking to maintain stable energy levels. The low glycemic index means it won't cause rapid spikes in blood glucose, and the protein and fat content actually slow down the absorption of carbohydrates eaten alongside it. This makes it an excellent addition to higher-glycemic foods like fruit or whole grain bread, moderating their impact on blood sugar. The magnesium content also plays a direct role in insulin sensitivity, helping cells respond more effectively to insulin signals and use glucose more efficiently.
For bone health, almond cashew butter provides several important minerals. The calcium content, while not as high as dairy products, still contributes to bone density, especially when combined with the magnesium and phosphorus that work synergistically to build and maintain strong bones. The copper in the butter is essential for the enzymes that help create collagen and elastin, the connective tissues that provide bones with flexibility and strength. Vitamin K, present in moderate amounts, directs calcium to bones rather than allowing it to deposit in arteries, making it crucial for both skeletal and cardiovascular health.
Brain function and cognitive health receive support from several components of almond cashew butter. The vitamin E acts as a powerful antioxidant that protects brain cells from oxidative stress, which is linked to age-related cognitive decline. The healthy fats, particularly the small amounts of omega-3 fatty acids, are crucial components of brain cell membranes and support the signaling processes between neurons. The magnesium helps regulate neurotransmitters that send messages throughout the brain and nervous system, while the B vitamins support myelin formation, the protective sheath around nerve fibers that enables fast, efficient communication. Some research suggests that regular nut consumption is associated with better memory and reduced risk of neurodegenerative diseases.
Dietary Considerations
Almond cashew butter fits beautifully into numerous dietary frameworks, making it an inclusive choice for many eating styles. For vegans and vegetarians, it provides valuable protein, healthy fats, and minerals that might otherwise come from animal products. The protein content, while not complete on its own, combines well with grains and legumes to create a complete amino acid profile throughout the day. The iron, zinc, and calcium contribute to meeting the increased needs of plant-based eaters who must source these nutrients from non-animal sources.
Those following a paleo diet will appreciate that almond cashew butter consists entirely of whole food ingredients, just nuts, and perhaps a pinch of salt. Since both almonds and cashews (technically a seed, but generally accepted in paleo circles) are considered paleo-friendly, this butter fits well within the framework. It provides satisfying fats and protein that align with the paleo emphasis on nutrient-dense, minimally processed foods. The natural sweetness means no need for added sugars or honey, keeping it compliant with stricter interpretations of the diet.
For those on a ketogenic diet, almond cashew butter can work in moderation, though portion control becomes important. While nuts are keto-friendly, cashews are slightly higher in carbohydrates than almonds, so the blend contains more carbs than pure almond or macadamia nut butter. A two-tablespoon serving typically contains 6-8 grams of net carbs, which needs to be factored into daily carb limits. However, the high fat and moderate protein content make it a satisfying choice that can help meet keto macronutrient ratios when consumed mindfully.
The naturally gluten-free nature of almond cashew butter makes it safe for people with celiac disease or gluten sensitivity, provided it's made without any additives or produced in facilities that don't process wheat products. Always check labels on store-bought versions, but homemade versions are inherently gluten-free. This makes it an excellent alternative to wheat-based spreads and a safe option for gluten-free baking projects.
Regarding allergens, while almond cashew butter is free from the most common allergen, peanuts, it does contain tree nuts, which are also among the eight major food allergens. People with tree nut allergies must avoid this product entirely. Interestingly, some individuals with peanut allergies can tolerate tree nuts, making almond cashew butter a valuable alternative, but this should always be determined under medical supervision. For those serving guests or family members, always disclose that a dish contains nut butter to prevent potentially serious allergic reactions.

How to Make Almond Cashew Butter (Step-by-Step Recipe)
Ingredients You'll Need
The beauty of homemade almond cashew butter lies in its simplicity, you truly only need two primary ingredients to create something magical. For a standard batch that yields approximately 1.5 cups of nut butter, you'll need:
Main Ingredients:
- 1.5 cups raw or roasted almonds (about 8 ounces)
- 1.5 cups raw or roasted cashews (about 8 ounces)
This 50/50 ratio creates a perfectly balanced butter, but feel free to adjust based on your preferences. Some people prefer a 60/40 ratio favoring almonds for more robust flavor, while others go 40/60 toward cashews for extra creaminess.
Optional Add-Ins (add these after the nuts have fully transformed into butter):
- 1/4 to 1/2 teaspoon fine sea salt (enhances the natural nutty flavor)
- 1-2 tablespoons neutral oil like avocado or grapeseed (only if you want extra-drippy consistency)
- 1-2 tablespoons honey or maple syrup (for a sweeter version)
- 1 teaspoon vanilla extract (adds warmth and depth)
- 1 tablespoon cocoa powder (for chocolate version)
- 1/2 teaspoon cinnamon (for a warming spice note)
Ingredient Quality Tips:
The quality of your nuts directly impacts the final product, so choose wisely. Look for nuts that smell fresh and nutty, not rancid or stale. Rancid nuts will have an unpleasant, bitter smell and will ruin your batch. If buying in bulk from bins, give them a sniff test first. For the best price-to-quality ratio, check warehouse stores like Costco or online retailers like Nuts.com or Amazon. Buying in larger quantities and storing excess nuts in the freezer maintains freshness while saving money.
When it comes to raw versus roasted nuts, roasted will give you a deeper, more developed flavor with pleasant toasted notes, while raw nuts create a milder, more neutral-tasting butter. Roasted nuts also tend to release their oils slightly faster during processing. If you're buying pre-roasted nuts, make sure they're dry-roasted without added oils, as oil-roasted nuts can make your butter too greasy. For almonds, both blanched (skins removed) and skin-on work well, blanched will give you a smoother, lighter-colored butter, while skin-on provides more fiber and nutrients but a slightly grainier texture and darker color.
Equipment Required
The most critical piece of equipment is a powerful food processor or high-speed blender. Not all food processors are created equal for this task, you need one with a strong motor (at least 600 watts) that can run continuously for 10-15 minutes without overheating. A standard-sized food processor with an 11-14 cup capacity works perfectly for a double batch. Smaller mini processors often lack the power and capacity needed, though they can work for tiny batches if you're patient.
Food Processor Recommendations:
Cuisinart Custom 14-Cup is a popular mid-range option that handles nut butter like a champ. The Breville Sous Chef is a premium choice with exceptional power and large capacity. For budget-friendly options, the KitchenAid 9-Cup or Hamilton Beach 10-Cup can work, though they may require more frequent breaks to prevent overheating. The key feature to look for is a powerful motor and an S-shaped blade, this design is most effective at pulling nuts down into the blade's path.
High-Powered Blender Alternative:
If you prefer using a blender, you'll need a high-powered model like a Vitamix, Blendtec, or Ninja Professional. Regular countertop blenders typically don't have enough power and will struggle with the thick, dry nut mixture. High-powered blenders can actually create smoother nut butter than food processors because of their superior blending power, but they require more frequent stopping to push ingredients down with the tamper tool. The narrower container means less surface area for the nuts to spread out, which can be both an advantage (more concentrated blending action) and a challenge (more careful monitoring needed).
Additional Helpful Tools:
A flexible silicone spatula is essential for scraping down the sides of your food processor bowl, you'll be doing this frequently throughout the process. A kitchen towel helps steady the processor if it starts walking across the counter during heavy processing. An instant-read thermometer isn't necessary but can be helpful if you're roasting nuts yourself and want to ensure you don't over-roast them. Finally, clean glass jars with tight-fitting lids are needed for storage, mason jars work perfectly and look beautiful on the counter or in the fridge.
The Complete Recipe Process
Step 1: Roasting the Nuts (Optional but Recommended)
If you're starting with raw nuts, roasting them first significantly enhances the flavor of your final butter. Preheat your oven to 350°F (175°C) and spread your almonds and cashews in a single layer on a large rimmed baking sheet. You can roast them together since they have similar roasting times. Place the pan in the preheated oven and set a timer for 8 minutes. After 8 minutes, give the nuts a stir and check their color and aroma. They should smell fragrant and nutty, with a light golden color starting to develop. Continue roasting, checking every 2-3 minutes, until they're lightly golden and aromatic, typically 10-12 minutes total. Watch carefully during the final minutes, as nuts can go from perfectly roasted to burnt very quickly. Cashews tend to brown slightly faster than almonds, so keep a close eye on them.
The roasting process does more than just add flavor, it also dries out some of the natural moisture in the nuts, which actually helps them break down into butter more efficiently. The heat causes the nuts' natural oils to move closer to the surface, making them more readily accessible during the grinding process. If you notice any nuts that seem darker than others, remove them before processing, as burnt nuts will impart a bitter flavor to the entire batch. Some people prefer a deeper roast for more intense, almost caramelized flavor, while others like a lighter roast that lets the nuts' natural sweetness shine through. Experiment to find your preference.
Step 2: Cooling the Nuts
This step is crucial and often overlooked by eager first-timers. After removing your nuts from the oven, spread them out on the baking sheet and let them cool for at least 10-15 minutes before adding them to your food processor. Processing hot nuts can cause several problems: the heat can damage your food processor's plastic bowl or gasket, the nuts will release oils too quickly and create an overly greasy butter, and the heat can actually make the processing take longer. Room temperature nuts blend more predictably and create better texture. If you're in a hurry, you can spread the nuts on a cool baking sheet to speed up the cooling process, but don't skip this step entirely. Use this cooling time to prepare your storage jars and gather your optional add-ins.
Step 3: Initial Blending Phase
Once your nuts are cooled (or if you're starting with pre-roasted nuts at room temperature), add all 3 cups of nuts to your food processor. Secure the lid firmly, this is important because the processor will be working hard and you don't want the lid to pop off. Start processing on high speed, and prepare for what might seem like nothing is happening. For the first 1-2 minutes, the nuts will simply chop into smaller and smaller pieces, resembling a coarse meal or flour. You'll hear the motor working hard, and the mixture will look dry and powdery. This is completely normal and expected. Resist the urge to add oil or liquid at this stage, the nuts need time to release their natural oils, and adding oil too early will interfere with that process.
During this phase, the sound of your food processor will be quite loud and aggressive, almost grinding. The nut pieces will fly around the bowl, and it might look chaotic. Some pieces will even climb up the sides of the bowl. All of this is normal. Keep the processor running continuously rather than pulsing, steady, consistent processing is what breaks down the cell walls and releases the oils. Your food processor may start to feel warm, which is fine as long as it's not overheating. Most modern food processors have thermal protection that will shut them off if they get too hot, but if your motor seems to be struggling excessively, you can give it a brief rest.
Step 4: Scraping and Patience
After about 2 minutes, stop the processor and scrape down the sides and bottom of the bowl with your spatula. You'll notice that much of the mixture has climbed up the sides, and there might be some larger chunks hiding at the bottom. Scraping ensures everything gets evenly processed. This is also a good time to check that your lid is still secure. Restart the processor and let it run for another 2-3 minutes. During this phase, you'll start to see the mixture clumping together and taking on a slightly wetter appearance as the oils begin to release. The consistency will start to resemble wet sand or cookie dough at this point.
Continue this pattern of processing for 2-3 minutes, then stopping to scrape down, then processing again. You'll typically need to do this scraping process 4-6 times total throughout the butter-making journey. Each time you scrape and restart, you'll notice the mixture becoming progressively wetter, shinier, and more cohesive. Around the 6-8 minute mark, something magical happens, the mixture transitions from a thick, chunky paste into something that actually looks like butter. It will suddenly become much more fluid, starting to swirl around the food processor bowl in ribbons rather than chunks.
Step 5: Achieving Desired Consistency
Once you've reached the butter stage, the texture will continue to improve with additional processing. For a basic spreadable consistency, process for a total of 10-12 minutes. The butter should be smooth and creamy, though it may still have a slight grainy texture if you look closely. This is perfectly fine and is actually preferred by many people who enjoy a bit of texture. For an ultra-smooth, almost liquid consistency that drips off a spoon, continue processing for another 2-4 minutes, bringing the total time to 14-16 minutes. The extended processing generates more heat through friction, which further liquefies the natural oils and creates that premium, store-bought smoothness.
The consistency will change as the butter cools, it will be quite fluid and pourable when you first finish making it, then will thicken substantially as it cools to room temperature, and thicken even more when refrigerated. Keep this in mind when deciding how long to process. If you want a very thick, almost stiff butter for frosting or filling applications, process just until smooth (10-12 minutes). If you want something easily spreadable straight from the fridge, process longer for a looser consistency. Remember that cashew-forward blends will naturally be creamier and more fluid, while almond-forward blends will be slightly thicker and more textured.
Step 6: Adding Flavor Enhancers
Once your nut butter has reached your desired base consistency, it's time to add any optional ingredients. This is where you can get creative and customize your butter to match your preferences. If adding salt, start with 1/4 teaspoon and taste before adding more, you can always add more salt, but you can't take it out. For sweetened versions, add honey or maple syrup gradually, tasting as you go. Remember that sweetness can mask some of the natural nutty flavor, so use restraint unless you're specifically making a dessert-style butter.
For chocolate almond cashew butter, add 1-2 tablespoons of unsweetened cocoa powder along with a tablespoon of maple syrup or honey to balance the bitterness of the cocoa. For vanilla cinnamon butter, add 1 teaspoon of pure vanilla extract and 1/2 teaspoon of cinnamon, this creates a flavor profile reminiscent of snickerdoodle cookies and is absolutely delicious on apple slices or in oatmeal. For a more sophisticated flavor, try adding a pinch of sea salt and a tiny pinch of cardamom for an exotic, aromatic quality.
If your nut butter seems too thick even after extended processing, you can add 1-2 tablespoons of neutral-flavored oil to loosen it up. Good options include avocado oil, grapeseed oil, or light olive oil. Add the oil with the processor running, drizzling it in slowly to allow it to incorporate evenly. Stop processing as soon as the desired consistency is reached, over-processing after adding oil can make the butter too loose.
Step 7: Final Blending
After adding your chosen flavorings or adjustments, pulse the processor a few times to incorporate everything evenly, then run it for a final 30-60 seconds to ensure complete integration. Taste the butter at this point, this is your last chance to make adjustments before jarring. The flavor should be rich, nutty, and balanced. If it tastes flat, add a pinch more salt. If it's too savory, a small drizzle of maple syrup or honey can round it out. If you detect any bitterness, it might be from over-roasted nuts or almonds with skins, a touch of sweetness can help mask this.
The final consistency should be smooth enough to spread but substantial enough to hold its shape. When you lift the spatula out of the butter, it should fall off in thick ribbons, not pour off like a liquid (unless that's what you're going for). The color will range from light tan to deeper brown depending on your almond-to-cashew ratio and whether you used roasted nuts. The aroma should be rich, toasty, and inviting, if you can resist eating it straight from the processor bowl, you're stronger than most of us.
Step 8: Storage
Transfer your freshly made almond cashew butter to clean, dry glass jars while it's still warm and fluid, this makes it much easier to pour and scrape into jars. Leave about half an inch of headspace at the top of each jar. If you're planning to refrigerate it (recommended for maximum freshness), wait until it cools completely before putting the lids on and refrigerating. Trapping heat in a sealed jar can create condensation, which can introduce moisture and potentially encourage mold growth. Once cooled, seal the jars tightly and label them with the date you made them.

Customizing Your Almond Cashew Butter (Recipe Variations)
Adjusting the Almond-to-Cashew Ratio
The standard 50/50 split creates a beautifully balanced butter, but part of the joy of making your own is experimenting with different ratios to discover your personal perfect blend. Each adjustment shifts the flavor profile, texture, and even the nutritional makeup of your final product. A 60% almond, 40% cashew ratio (approximately 1.75 cups almonds to 1.25 cups cashews) creates a more pronounced almond flavor with slightly more texture and bite. This version has a bit more protein and vitamin E from the extra almonds, and the flavor is more assertive, making it ideal for those who love a stronger nutty taste. It pairs especially well with dark chocolate or in savory applications like Thai-inspired peanut sauce alternatives.
Moving in the other direction, a 40% almond, 60% cashew ratio (approximately 1.25 cups almonds to 1.75 cups cashews) produces an exceptionally creamy, mild butter that children and picky eaters often prefer. The increased cashew content makes the butter noticeably smoother and richer, almost like a dessert spread. This version has a subtly sweet flavor that works beautifully in baking applications, smoothies, or anywhere you want nut butter that won't overpower other ingredients. It's also the best choice if you're using the butter in Asian-inspired dishes where you want creaminess without strong competing flavors.
For the most economical option, a 70% almond, 30% cashew ratio (approximately 2 cups almonds to 1 cup cashews) stretches more expensive cashews while still benefiting from their creamy properties. Since cashews typically cost more per pound than almonds, this ratio reduces your per-batch cost while maintaining a lovely smooth consistency. You'll get more almond-forward flavor, but the cashews provide just enough creaminess to prevent the graininess that pure almond butter sometimes has. This is a practical choice for regular nut butter consumers who go through jars quickly.
On the opposite end, a 30% almond, 70% cashew ratio (approximately 1 cup almonds to 2 cups cashews) creates an ultra-luxurious, almost decadent butter with extraordinary smoothness. While this version is more expensive, the texture rivals any premium nut butter you'd find in specialty stores. The almonds provide just enough character to prevent the butter from being bland, while the cashews create a silky, almost fondant-like consistency. This ratio is perfect for special occasions, gifting, or using in desserts where texture is paramount.
Flavor Variations to Try
Honey Cinnamon Almond Cashew Butter combines 2 tablespoons of raw honey with 1 teaspoon of ground cinnamon and a pinch of nutmeg for a warming, comfort-food version that tastes like autumn in a jar. The honey's floral sweetness complements the nuts' natural richness, while the cinnamon adds warmth without being spicy. This variation is spectacular on warm toast, stirred into oatmeal, or used as a dip for apple slices. For a more intense cinnamon flavor, you can add up to 1.5 teaspoons, and for extra depth, a tiny pinch of ground ginger works beautifully.
Chocolate Almond Cashew Butter transforms your basic recipe into something that tastes like a healthy Nutella alternative. Add 2-3 tablespoons of unsweetened cocoa powder (Dutch-process creates a more mellow flavor while natural cocoa powder is more intense), 2 tablespoons of maple syrup or honey, and a tiny pinch of sea salt to enhance the chocolate flavor. For an even more indulgent version, add 1/2 teaspoon of vanilla extract and a handful of mini dark chocolate chips stirred in at the very end. This version is addictive on everything from strawberries to graham crackers to eaten straight from the jar with a spoon.
Vanilla Maple Almond Cashew Butter offers sophisticated sweetness without chocolate. Combine 2 tablespoons of pure maple syrup with 1 teaspoon of pure vanilla extract and a pinch of fine sea salt. The vanilla and maple create a flavor profile reminiscent of butter pecan ice cream, especially if you roast your nuts until they're deeply golden. This variation is outstanding in smoothies, on pancakes, or swirled into yogurt. For an extra layer of flavor, you can add a quarter teaspoon of maple extract along with the vanilla for an even more pronounced maple taste.
Sea Salt Caramel Style Almond Cashew Butter satisfies those sweet-and-salty cravings. To your basic recipe, add 2 tablespoons of maple syrup, 1/2 teaspoon of flaky sea salt (like Maldon), and 1/2 teaspoon of vanilla extract. If you want to take it even further, you can make a quick date caramel by blending 4-5 pitted Medjool dates with 2 tablespoons of hot water until smooth, then mixing this into your nut butter. The result tastes remarkably like salted caramel but is made entirely from whole food ingredients.
Spiced Chai Almond Cashew Butter brings warming spices typically found in chai tea lattes. Add 1/2 teaspoon ground cinnamon, 1/4 teaspoon ground ginger, 1/8 teaspoon ground cardamom, a tiny pinch of ground cloves, and a tiny pinch of black pepper. Add 1-2 tablespoons of honey or maple syrup to balance the spices. This exotic variation is perfect for anyone who loves the cozy flavors of chai and works beautifully spread on naan bread, stirred into coffee or tea, or used in Indian-inspired desserts.
Espresso Almond Cashew Butter appeals to coffee lovers and provides a subtle caffeine boost. Add 1-2 tablespoons of finely ground espresso powder or very finely ground coffee beans to your finished nut butter along with 1 tablespoon of maple syrup and a pinch of sea salt. The coffee flavor pairs exceptionally well with the nuts, creating a mocha-like experience. This variation is fantastic for morning smoothies, spread on toast before a workout, or mixed into overnight oats for a caffeinated breakfast.
Texture Modifications
For extra creamy texture that's almost pourable, process your nut butter for a full 15-18 minutes, allowing the friction and heat to fully liquefy all the natural oils. You can also tip the ratio toward more cashews (60-70%) since they naturally create a smoother consistency. Adding 1-2 tablespoons of neutral oil while processing will also increase creaminess. This style is perfect for using in smoothies, drizzling over desserts, or creating sauces and dressings.
For chunky style with pieces of nuts throughout, process your base batch until completely smooth, then add 1/2 cup of roughly chopped roasted almonds and cashews (in your preferred ratio) and pulse just 3-4 times to incorporate without fully breaking them down. The contrast between the smooth butter and crunchy nut pieces provides textural interest and makes each bite more exciting. This style is excellent on toast, in sandwiches, or anywhere you want that satisfying crunch.
For ultra-smooth texture that rivals commercial nut butters, use blanched almonds (skins removed), process for the full extended time, and strain the finished butter through a fine-mesh sieve to remove any remaining tiny particles. This creates an exceptionally refined texture that's perfect for using in frostings, fillings, or anywhere appearance matters. While this method is more labor-intensive and you'll lose a small amount of product, the result is noticeably silkier.
For drizzle-able consistency that's perfect for topping oatmeal, yogurt bowls, or desserts, make your base recipe and then thin it with 2-4 tablespoons of melted coconut oil, avocado oil, or even a neutral nut oil. Add the oil gradually while the food processor runs, stopping when you reach your desired consistency. This version stays more fluid even when refrigerated, making it convenient for drizzling applications. Store this version in a squeeze bottle for easy dispensing.
Storing Almond Cashew Butter (Keeping It Fresh)
Best Storage Practices
Proper storage is essential for maintaining the quality, flavor, and safety of your homemade almond cashew butter. Unlike commercial nut butters that contain preservatives and stabilizers, your homemade version is entirely natural and therefore more susceptible to spoilage if not stored correctly. The good news is that with proper care, homemade nut butter can stay fresh for weeks or even months. The first rule of storage is choosing the right container. Glass jars with tight-fitting, airtight lids are your best option, mason jars, old jam jars that have been thoroughly cleaned, or purpose-bought glass storage containers all work beautifully. Glass doesn't absorb odors or flavors, doesn't react with the natural oils in the butter, and allows you to see the product clearly so you can monitor its condition.
Make sure your jars are completely clean and dry before filling them. Any moisture or food residue can introduce bacteria or mold spores that will compromise your butter's shelf life. If reusing jars, run them through the dishwasher or wash them thoroughly in hot, soapy water, then dry them completely before use. Fill jars to within half an inch of the rim, leaving a small amount of headspace. This space allows for slight expansion and makes it easier to stir the butter if oil separation occurs. Always use a clean, dry spoon when scooping out butter, introducing moisture or food particles from a used spoon is one of the main ways people inadvertently contaminate their nut butter.
The debate between refrigerator and pantry storage depends on several factors. Refrigeration is the safest choice and will maximize shelf life, keeping your butter fresh for 3-4 months or even longer. The cool temperature slows oxidation of the natural oils and inhibits any potential microbial growth. The downside is that cold butter becomes quite thick and firm, making it difficult to spread directly from the fridge. Many people keep a small jar on the counter for everyday use and store the rest in the refrigerator, refilling the counter jar as needed. If you choose pantry storage, select a cool, dark location away from the stove or any heat sources. Pantry-stored butter should be consumed within 2-3 weeks, and you must be vigilant about monitoring for any signs of spoilage.
Oil separation is a natural phenomenon with nut butters and nothing to worry about. Because homemade versions don't contain emulsifiers or stabilizers, the natural oils will slowly rise to the top of the jar, especially if stored in a warm environment or made with a higher oil content. When you open your jar and see a layer of oil on top, simply stir it back into the butter using a clean knife or spoon. Some people find it helpful to store jars upside down periodically to redistribute the oils naturally. If you find oil separation annoying, you can reduce it by processing your butter for less time (creating a thicker consistency), storing in the refrigerator where cooler temperatures keep oils more solid, or adding a tablespoon of coconut oil which solidifies when cool and helps bind everything together.
Shelf Life and Food Safety
Understanding the shelf life of your homemade almond cashew butter helps you make it in appropriate quantities and consume it while it's at peak quality. In the refrigerator, properly stored nut butter typically remains fresh for 3-4 months, though many people report their butter staying good for up to 6 months. The high fat content and low moisture content create an environment that's not particularly hospitable to bacterial growth, which is why nut butters are relatively shelf-stable. The main concern is rancidity, the oxidation of fats that creates off flavors and unpleasant odors. Refrigeration dramatically slows this oxidation process.
At room temperature in a cool pantry, homemade nut butter maintains optimal quality for about 2-3 weeks. In warmer climates or during summer months, this window shrinks to 1-2 weeks. The warmer the storage environment, the faster oils oxidize and the greater the risk of spoilage. If your kitchen regularly exceeds 75°F, refrigeration becomes much more important. Pay attention to the smell and taste of your butter, fresh nut butter should smell pleasant, nutty, and rich. If it starts to smell paint-like, chemical, or "off" in any way, it's beginning to go rancid and should be discarded.
Visual signs of spoilage include mold growth (which can appear as fuzzy spots of various colors), darkening of the butter beyond its original color, or any unusual discoloration. If you see any mold, do not simply scrape it off and eat the rest, mold can send invisible filaments throughout the product, so the entire jar should be discarded. An unusual or unpleasant smell is another red flag, as is any change in taste toward bitterness or sourness. Trust your senses, if something seems off about your nut butter, it's better to err on the side of caution and make a fresh batch.
Freezing is an excellent option for long-term storage and barely affects the quality of almond cashew butter. To freeze, portion the butter into ice cube trays or small jars, filling them about three-quarters full to allow for slight expansion. Once frozen solid, you can pop the cubes out and transfer them to a freezer bag for more efficient storage. Frozen nut butter maintains excellent quality for 6-8 months or even longer. Thaw frozen butter in the refrigerator overnight or at room temperature for a few hours. After thawing, give it a good stir to recombine any separated oils, and it will be just as delicious as the day you made it. This approach is perfect if you like to batch-make nut butter or if you've made a large quantity and worry about consuming it quickly enough.
For portion control and meal prep purposes, consider freezing tablespoon-sized portions that you can grab individually for smoothies or recipes. Simply line a baking sheet with parchment paper, drop tablespoon-sized dollops of nut butter on it, freeze until solid, then transfer to a freezer bag. These portions thaw quickly at room temperature or can be added directly to blended recipes. This method prevents you from being tempted to overeat nut butter straight from the jar and makes it easy to track your intake.
Creative Ways to Use Almond Cashew Butter (Beyond Toast)
Breakfast Ideas
Starting your morning with almond cashew butter sets you up for sustained energy and satisfaction throughout the day. In smoothies, it adds rich creaminess, protein, and healthy fats that make your drink more filling and blood-sugar balancing. Try blending 2 tablespoons of almond cashew butter with a frozen banana, 1 cup of milk (dairy or non-dairy), a handful of spinach, and a dash of cinnamon for a breakfast smoothie that tastes like dessert but fuels you like a power meal. The nut butter emulsifies the smoothie and creates a luxuriously thick texture while adding approximately 7-8 grams of protein. For a chocolate version, add a tablespoon of cocoa powder and a couple of pitted dates.
Oatmeal becomes exponentially more delicious with a generous swirl of almond cashew butter melted into the hot cereal. As you stir it in, it creates beautiful ribbons throughout the oats and adds richness that makes each bite satisfying. Top with sliced banana, a sprinkle of cinnamon, and a drizzle of maple syrup for a breakfast that tastes indulgent but is packed with whole grains, protein, and healthy fats. For overnight oats, mix the nut butter directly into the oat mixture before refrigerating, it will distribute throughout as it sits, creating consistent flavor in every spoonful.
Pancakes and waffles reach new heights when you spread almond cashew butter between layers or use it as a topping instead of (or in addition to) syrup. The warmth of the pancakes slightly melts the butter, making it easy to spread and creating a satisfying contrast between hot pancakes and cool, creamy butter. You can also mix a couple of tablespoons into your pancake batter for extra protein and a subtle nutty flavor throughout. Top with fresh berries and a dusting of powdered sugar for a restaurant-worthy breakfast at home.
Yogurt parfaits benefit from the addition of nut butter both in terms of taste and nutrition. Swirl a tablespoon or two into Greek yogurt along with honey and top with granola and fresh fruit. The combination of protein from the yogurt and nut butter keeps you full for hours, while the healthy fats help you absorb the fat-soluble vitamins in the fruit. For a quick breakfast that you can take on the go, layer yogurt, nut butter, and granola in a jar the night before and grab it from the fridge in the morning.
Snacks and Appetizers
The classic combination of apple slices and nut butter remains popular for good reason, the sweet-tart crispness of apples pairs perfectly with rich, creamy nut butter. For an elevated version, core an apple and slice it into rounds, creating rings that are perfect for spreading or dipping. Choose crisp varieties like Honeycrisp, Fuji, or Granny Smith that can stand up to the butter's richness. If making this for kids, a squeeze of lemon juice over the apple slices prevents browning. For adults, a sprinkle of cinnamon, chopped nuts, or even a few chocolate chips on top makes this simple snack feel special.
Celery boats stuffed with almond cashew butter provide a satisfying crunch with creamy contrast, plus they're virtually zero-prep. For a complete snack, add a sprinkle of raisins on top (the classic "ants on a log") or substitute dried cranberries, chocolate chips, or even a drizzle of honey. This snack offers the perfect combination of hydrating vegetables, healthy fats, and a touch of sweetness. It's also remarkably filling despite being relatively low in calories, making it perfect for afternoon snack attacks or as a pre-dinner option that won't spoil your appetite.
Energy balls are perhaps the most popular way to use nut butter in snack form. Mix 1 cup of almond cashew butter with 1.5 cups of old-fashioned oats, 1/2 cup of honey or maple syrup, 1/2 cup of mini chocolate chips or dried fruit, and a pinch of salt. Roll the mixture into tablespoon-sized balls and refrigerate until firm. These no-bake treats store in the fridge for up to two weeks and provide quick, portable energy before workouts, as afternoon pick-me-ups, or even as healthier dessert options. You can customize them endlessly, add chia seeds, hemp hearts, shredded coconut, vanilla extract, or cocoa powder to create your signature version.
Stuffed dates transform this simple dried fruit into an elegant appetizer or dessert. Choose large, soft Medjool dates and slice them lengthwise to remove the pit, creating a pocket. Fill each date with about a teaspoon of almond cashew butter and press the date closed around it. For extra indulgence, dip the stuffed dates halfway in melted dark chocolate and sprinkle with flaky sea salt. These sweet, rich, satisfying bites are perfect for entertaining, make beautiful gifts, and provide a healthier alternative to traditional candies and confections.
Rice cakes or crackers topped with nut butter create the perfect base for endless variations. Spread almond cashew butter on a rice cake or whole grain cracker, then top with sliced banana and a drizzle of honey for a sweet option, or go savory with cucumber ribbons, everything bagel seasoning, and a squeeze of lemon. The crunch of the rice cake or cracker contrasts beautifully with the creamy butter, and the whole snack comes together in under a minute.
Cooking and Baking Applications
Almond cashew butter makes an excellent base for salad dressings that are both creamy and nutritious. Whisk together 3 tablespoons of nut butter, 2 tablespoons of rice vinegar, 1 tablespoon of soy sauce or tamari, 1 tablespoon of maple syrup, 1 teaspoon of sesame oil, and water as needed to reach your desired consistency. This Asian-inspired dressing is fantastic on cabbage slaw, mixed green salads, or grain bowls. The nut butter emulsifies the dressing naturally, eliminating the need for added oils or thickeners. You can also make a simple honey mustard version by mixing equal parts nut butter, Dijon mustard, honey, and lemon juice.
As a sauce thickener and flavor enhancer, almond cashew butter works beautifully in both Asian and fusion cuisines. Add a few tablespoons to Thai curries for extra richness and body, stir it into sauces for pad Thai or stir-fries, or use it as the base for satay sauce. The mild flavor won't overpower other ingredients the way peanut butter sometimes can, and it creates luxurious texture that coats noodles or vegetables beautifully. For a quick weeknight dinner sauce, mix nut butter with coconut milk, curry paste, lime juice, and a touch of brown sugar for an easy Thai-inspired sauce that transforms simple chicken or tofu into something restaurant-worthy.
In baking applications, almond cashew butter can replace some or all of the butter or oil in recipes, adding moisture, binding properties, and rich flavor. It works especially well in cookies, brownies, and blondies where the nutty flavor complements chocolate or brown sugar. For a simple substitution, replace half the butter in your favorite cookie recipe with an equal amount of nut butter, the cookies will be chewier and more tender with a subtle nutty undertone. You can also use it as a complete butter replacement in vegan baking, though you may need to adjust liquid amounts since nut butter is more moisture-dense than solid fats.
Savory marinades benefit from the addition of almond cashew butter, which helps the marinade cling to proteins while adding flavor and richness. For chicken, tofu, or tempeh, blend nut butter with garlic, ginger, soy sauce, lime juice, and a touch of sriracha for a marinade that caramelizes beautifully when grilled or roasted. The natural oils and proteins in the nut butter help keep meat moist during cooking while creating an appealing golden-brown crust. This technique is particularly effective with chicken thighs, pork tenderloin, or firm tofu that can stand up to assertive flavors.
Dessert Creations
Nice cream, the popular vegan ice cream alternative made from frozen bananas, reaches new levels of deliciousness with the addition of almond cashew butter. Blend 3-4 frozen bananas (peeled and sliced before freezing) with 2-3 tablespoons of nut butter until smooth and creamy, scraping down the sides as needed. The result is a soft-serve consistency that tastes like banana-nut ice cream but is made entirely from fruit and nuts. Eat it immediately for soft-serve texture, or refreeze for a scoopable consistency. Add cocoa powder for chocolate banana, a pinch of cinnamon for chai-spiced banana, or swirl in some raspberry puree for a fruit-and-nut combination.
Chocolate truffles made with nut butter are rich, decadent, and surprisingly easy. Mix 1 cup of almond cashew butter with 1/2 cup of maple syrup and 1/2 cup of cocoa powder until well combined. Refrigerate the mixture until firm enough to roll, then shape into balls and roll in cocoa powder, shredded coconut, or crushed nuts. These truffles have the rich, fudgy texture of traditional truffles but are made entirely from whole food ingredients. They store in the fridge for up to two weeks and make elegant gifts or impressive party desserts.
For no-bake pie crusts, combine 1.5 cups of crushed graham crackers or cookies with 1/2 cup of melted almond cashew butter and 2-3 tablespoons of maple syrup or honey. Press the mixture firmly into a pie pan and refrigerate until set. This creates a sturdy, flavorful crust that holds together beautifully and doesn't require baking. The nut butter acts as both a binder and flavor enhancer, creating a crust that's more nutritious and interesting than traditional butter-based versions. This crust works perfectly for no-bake cheesecakes, chocolate pudding pies, or fruit tarts.
Frosting alternatives made with almond cashew butter offer a healthier take on traditional buttercream while still delivering sweetness and spreadable texture. Beat together 1 cup of nut butter, 1/2 cup of softened coconut oil, 1/2 cup of maple syrup, 1 teaspoon of vanilla extract, and a pinch of salt until light and fluffy. This creates a frosting-like spread that's perfect for topping cupcakes, spreading between cake layers, or using as a dip for fruit. For chocolate frosting, add 1/4 cup of cocoa powder. While this won't hold up to piping intricate designs, it's perfect for rustic-style cakes and delivers impressive flavor without refined sugar or dairy.
Nut butter cups rival any commercial candy but with better ingredients. Line a mini muffin tin with paper liners. Melt 1 cup of dark chocolate and spoon a small amount into the bottom of each liner, spreading it up the sides slightly. Freeze for 10 minutes until set. Add a small spoonful of almond cashew butter to each cup (you can mix it with a bit of powdered sugar and salt if you want it sweeter and more reminiscent of commercial peanut butter cups). Top with more melted chocolate to seal, and freeze until firm. These homemade treats let you control the quality of chocolate and nut butter while creating something that tastes incredibly indulgent.

Cost Comparison: Homemade vs. Store-Bought
Breaking Down the Numbers
Understanding the real cost savings of making your own almond cashew butter can be eye-opening and provides strong motivation to start DIY-ing this pantry staple. Let's break down the math with real-world pricing. A typical bag of raw almonds from a warehouse store or bulk retailer costs approximately $8-10 per pound, while raw cashews run slightly higher at $9-12 per pound. For our standard recipe using 1.5 cups of each nut (approximately 8 ounces or half a pound each), your total nut cost is roughly $4-5 for almonds and $4.50-6 for cashews, bringing your total ingredient cost to about $8.50-11 for a batch that yields approximately 1.5 cups (about 12 ounces) of finished nut butter.
In comparison, commercial almond cashew butter or mixed nut butters at health food stores typically cost $12-18 for a 12-ounce jar, with premium brands sometimes reaching $20 or more. Even standard almond butter alone often costs $10-15 per jar. This means your homemade version costs roughly 30-50% less than store-bought equivalents, and that's before considering the quality advantage. Your homemade butter is fresher, contains no additives or preservatives, and can be customized to your exact preferences, benefits you simply cannot put a price on.
The savings become even more significant if you buy nuts in larger quantities. Warehouse stores like Costco often sell 3-pound bags of almonds for $18-20 and 2.5-pound bags of cashews for $20-24, bringing the per-pound cost down considerably. If you purchase nuts on sale, stock up and store them in the freezer (where they'll stay fresh for 6-12 months), or buy from online bulk retailers, your per-batch cost can drop to $6-8. At this price point, you're spending roughly one-third to one-half what you'd pay for commercial nut butter, and making multiple batches becomes incredibly economical.
Let's consider a typical family that goes through one jar of nut butter per week, a realistic amount for a household with children or active adults who use nut butter regularly. Buying store-bought butter at $15 per jar means spending $60 per month or $720 per year on this single item. Making your own at an average cost of $9 per batch drops this to $36 per month or $432 annually, a savings of $288 per year. That's significant money that could go toward other healthy foods, kitchen equipment that enables more homemade items, or simply back into your household budget.
Value Beyond Price
While the monetary savings are compelling, the non-financial benefits of homemade almond cashew butter deserve equal consideration. Ingredient control stands as perhaps the most significant advantage. When you make your own butter, you know exactly what's in it, just nuts and whatever you choose to add. Commercial nut butters, even those marketed as "natural," often contain added oils (typically palm oil or other vegetable oils), added sugars, salt, and stabilizers like mono and diglycerides. Some brands add so much sugar that what should be a healthy spread becomes more like candy. Making your own means zero additives, preservatives, or mystery ingredients, just pure, wholesome food that nourishes your body.
Freshness represents another major advantage that's hard to overstate. Commercial nut butter can sit in warehouses and on store shelves for months before you purchase it, and the nuts used to make it might have been processed months before that. Your homemade version is as fresh as possible, you control when the nuts are roasted and processed, and you consume it within weeks of making it. Fresh nut butter simply tastes better, with brighter, more pronounced nutty flavor and more aromatic qualities. The oils haven't had time to oxidize, which means better flavor and better nutrition, since oxidized fats lose some of their beneficial properties.
The customization value cannot be purchased at any price. Store-bought nut butter comes in whatever flavor and consistency the manufacturer decided to create. Your homemade version can be adjusted endlessly to match your exact preferences and needs. Want it sweeter? Add honey. Prefer it more savory? Extra salt. Need it thinner for drizzling? Add oil. Making it for a child who prefers mild flavors? Use more cashews. Creating a batch for sophisticated adult palates? Go almond-forward and add interesting spices. This level of personalization means you'll actually use and enjoy every bit of what you make, eliminating waste and ensuring satisfaction.
Finally, there's the satisfaction factor, the genuine pleasure and sense of accomplishment that comes from making something yourself. In our modern world where almost everything is pre-made and purchased, creating food from scratch connects us to a more fundamental way of living. There's something deeply satisfying about watching whole nuts transform into creamy butter through nothing but time and mechanical action. Many people report that foods they make themselves taste better simply because they invested effort and attention in creating them. This psychological benefit, while intangible, contributes to overall wellbeing and encourages further kitchen experimentation and skill-building.

Frequently Asked Questions About Almond Cashew Butter
Q: Do I need to roast the nuts first?
Roasting is optional but highly recommended for several reasons. Roasted nuts produce nut butter with deeper, more complex flavor characterized by pleasant toasted notes and enhanced natural sweetness. The roasting process also draws moisture out of the nuts, which actually helps them break down into butter more efficiently and quickly. Raw nuts can certainly be used and will create a milder, more neutral-tasting butter with a lighter color, which some people prefer. The choice ultimately comes down to personal taste preference and how you plan to use the butter. For baking and cooking applications where you want subtle flavor, raw nuts work beautifully. For spreading and eating straight, most people find roasted nut butter more satisfying and delicious.
Q: What's the best ratio of almonds to cashews?
The classic 50/50 ratio (equal parts almonds and cashews) creates a beautifully balanced butter that showcases both nuts equally and appeals to the widest range of palates. However, the "best" ratio is entirely personal. If you prefer more pronounced nutty flavor and slightly more texture, go with 60% almonds and 40% cashews. If you want exceptional creaminess and milder taste, flip it to 40% almonds and 60% cashews. Some people even go more extreme in either direction, 70% of one nut and 30% of the other. The beauty of homemade nut butter is that you can experiment with different ratios until you discover your perfect blend. Make small batches with varying ratios and keep notes on which you prefer for different uses.
Q: Can I make almond cashew butter without a food processor?
A high-powered blender like a Vitamix or Blendtec can absolutely work and will actually create smoother butter than most food processors because of the superior blending power. The challenge with blenders is that they have narrower containers, which means you need to stop more frequently to scrape down the sides and push ingredients toward the blades. The tamper tool that comes with high-powered blenders is essential for this task. Regular countertop blenders typically don't have motors powerful enough to handle the thick, dry nut mixture and will likely overheat or burn out if you attempt it. If you don't have a food processor or high-powered blender, you might consider purchasing a food processor specifically for nut butter making, it's one of the best kitchen investments you can make and opens up a world of homemade spreads, dips, and sauces beyond just nut butter.
Q: Why is my nut butter separating?
Oil separation is completely natural and normal in homemade nut butter since it contains no emulsifiers or stabilizers to keep oils suspended in the mixture. Commercial nut butters often add palm oil or other stabilizers specifically to prevent this separation. When you see oil pooling on top of your butter, simply stir it back in with a clean knife or spoon, it takes just a few seconds and re-incorporates easily. To minimize separation, store your butter in the refrigerator where cooler temperatures keep oils more solid and less likely to separate. You can also process your butter for slightly less time, creating a thicker consistency where oils are less mobile. Some people store their jars upside down and right them periodically, which naturally redistributes oils. Ultimately, oil separation is a sign that your nut butter is pure and natural, not a problem to be concerned about.
Q: How do I make it creamier?
The key to ultra-creamy nut butter is patience and processing time. Continue blending for a full 14-18 minutes to achieve maximum smoothness, the extended processing generates heat through friction, which fully liquefies the natural oils and breaks down any remaining particles. Using a higher ratio of cashews to almonds (60% cashews, 40% almonds or even 70/30) will also significantly increase creaminess since cashews are naturally softer and contain more oil than almonds. Starting with roasted nuts rather than raw helps because roasting dries out moisture and makes oils more readily available. If your butter is at the texture you want but still not quite smooth enough, you can add 1-2 tablespoons of neutral oil like avocado or light olive oil while processing. Finally, using blanched almonds (skins removed) instead of skin-on almonds eliminates the slightly grainy texture that skins can create, resulting in noticeably smoother butter.
Q: Is almond cashew butter healthier than peanut butter?
Both almond cashew butter and peanut butter offer nutritional benefits, but they have different profiles that might make one better suited to your specific needs. Almond cashew butter typically contains more monounsaturated fats (the heart-healthy fats also found in olive oil), more vitamin E, more magnesium, and more calcium than peanut butter. It's also lower in inflammatory omega-6 fatty acids. Peanut butter, on the other hand, contains more protein per serving and is generally less expensive. From an allergen perspective, tree nuts (almonds and cashews) and peanuts (which are legumes) are different allergens, some people allergic to one can tolerate the other, though this should always be determined under medical supervision. For anyone following a paleo diet, almond cashew butter fits while peanut butter doesn't. Neither is universally "healthier", both can be part of a balanced diet. The best choice depends on your personal health goals, dietary restrictions, budget, and taste preferences.
Q: Can I add oil to make it smoother?
Yes, adding oil is perfectly acceptable if you want to adjust the consistency of your butter. Wait until your nuts have fully transformed into butter before adding oil, adding it too early interferes with the natural oil release process. Once your butter has reached butter stage, drizzle in 1-2 tablespoons of neutral-tasting oil (avocado oil, grapeseed oil, or light olive oil work well) while the food processor runs. Add gradually and stop as soon as you reach your desired consistency, as it's easy to add too much and make the butter too thin. The added oil will make your butter more fluid and easier to stir or spread, but it will also slightly dilute the concentrated nutty flavor and reduce the nutritional density per tablespoon. Most people find that proper processing technique eliminates the need for added oil, but it's a useful option if you prefer very drippy nut butter or if your food processor isn't quite powerful enough to fully break down the nuts.
Q: Does homemade nut butter need to be refrigerated?
Refrigeration is recommended but not absolutely required for short-term storage. In the refrigerator, your almond cashew butter will stay fresh for 3-4 months, with the cool temperature slowing oil oxidation and preventing any microbial growth. The downside is that cold butter becomes quite thick and difficult to spread straight from the fridge. If you prefer to store at room temperature, keep the butter in a cool, dark location away from heat sources and consume it within 2-3 weeks. In warm climates or during summer, room temperature storage time shrinks to about one week. A practical compromise is keeping a small jar on the counter for immediate use while storing the bulk of your batch in the refrigerator, refilling the counter jar weekly. Always use clean, dry utensils when scooping butter to prevent introducing contaminants. If you notice any off smells, unusual tastes, or visible mold, discard the butter immediately, when in doubt, throw it out.
Q: How long does it take to make?
The entire process from start to finish takes approximately 30-40 minutes, though your active hands-on time is only about 15-20 minutes. If roasting nuts from raw, plan for 10-12 minutes roasting time plus 10-15 minutes cooling time before you can begin processing. The actual blending and processing takes 10-15 minutes depending on your equipment and desired consistency. You'll spend a few minutes throughout this process stopping to scrape down the bowl, this is normal and necessary. Once you become familiar with the process, you can multitask during the cooling and processing phases, preparing breakfast, cleaning up, or doing other kitchen tasks while occasionally checking on and scraping your nut butter. While the total clock time might seem long, the actual effort required is minimal, making this an easy project even for busy schedules.
Q: Can I use raw nuts instead of roasted?
Absolutely, raw nuts work perfectly well and will create a milder, more neutral-tasting butter with a lighter, more golden color. Some people actually prefer raw nut butter because it allows the pure, natural flavor of the nuts to shine through without any roasted notes. Raw nut butter is also preferred by some raw food enthusiasts who follow diets that avoid heated ingredients. The processing time might be slightly longer with raw nuts since they tend to be a bit harder and contain more moisture that must be worked through before the oils release fully. The nutritional profile is essentially the same whether using raw or roasted nuts, any differences are minimal. The choice really comes down to flavor preference. Try making one batch with roasted nuts and one with raw, then decide which you prefer for different applications. You might find that you like roasted for spreading and snacking, while raw works better for smoothies or baking.
Q: Why won't my nut butter get smooth?
If you've been processing for 10+ minutes and your mixture is still grainy or chunky rather than smooth and creamy, several factors might be at play. First, check your equipment, if your food processor has a motor under 600 watts, it may simply not be powerful enough to fully break down the nuts. Try processing in smaller batches to reduce the load on the motor. Second, make sure you're processing continuously rather than pulsing, steady, consistent blending is what generates the friction and heat needed to release oils. Third, ensure your nuts are at room temperature, not cold, cold nuts take longer to break down. Fourth, be patient and keep processing, the transformation from chunky paste to smooth butter often happens suddenly after what seems like nothing is happening. Scrape down the bowl thoroughly every 2-3 minutes to ensure all nuts are making contact with the blade. If you've tried all this and still can't achieve smoothness, you can add 1-2 tablespoons of neutral oil to help things along, though this should be a last resort. Some graininess is normal, especially with skin-on almonds, and many people actually prefer a bit of texture in their nut butter.
Troubleshooting Common Issues
My Nut Butter Won't Get Creamy
This is the most common frustration for first-time nut butter makers, and it's almost always a matter of patience rather than a fundamental problem with your technique or ingredients. The transformation from chopped nuts to creamy butter doesn't happen on a linear timeline, instead, the mixture seems to stay stubbornly chunky and dry for many minutes, then suddenly shifts into butter almost all at once. This transition typically happens around the 8-10 minute mark, so if you're only 5-6 minutes in, keep going. The nuts need time for friction and heat to break down cell walls and fully release the natural oils. Stopping too early leaves you with nut meal rather than nut butter.
If you've been processing for 12-15 minutes and still haven't achieved butter, check that you're not stopping and starting constantly continuous processing is essential. Each time you stop the machine, the mixture cools down slightly, prolonging the process. Make sure you're scraping down thoroughly every 2-3 minutes, as nuts stuck to the sides never make contact with the blade. Consider your nut choice, cashews break down into butter much more quickly than almonds, so a mixture heavy in almonds will take longer. The power of your food processor matters significantly, a weak motor simply can't generate enough force and friction.
One trick that sometimes helps is adding a tiny pinch (literally just a few grains) of coarse salt to the mixture early in the process. The salt crystals create slight abrasion that can help break down nut particles. You can also try processing in a slightly warmer room, cold environments make oils less fluid and slow the butter-making process. If you've tried everything and your butter is usable but not as smooth as you'd like, embrace the texture, many people prefer slightly chunky, rustic-style nut butter over completely smooth commercial-style butter.
Oil Separation Problems
While oil separation is normal and not a problem per se, excessive separation that leaves a substantial layer of oil floating on top can be annoying. This happens because natural nut butter contains no emulsifiers or stabilizers, components that keep oil suspended in the mixture. Several factors can increase oil separation: very extended processing times that liquify oils completely, warm storage temperatures that keep oils fluid, and high-oil nuts like cashews. To minimize separation, process your butter for slightly less time, stopping when it's smooth but still relatively thick. This thicker consistency means oils are less mobile and less likely to separate dramatically.
Storage temperature makes a huge difference, refrigerated butter separates much less than room-temperature butter because cold temperatures keep oils partially solidified. If you prefer room-temperature storage, consider adding one tablespoon of coconut oil to your nut butter after processing. Coconut oil solidifies at room temperature and helps bind everything together, reducing separation. Storing jars upside down periodically naturally redistributes oils, every few days, flip your jar, and oils that migrated to the top will work their way back down. Using jars with wider openings rather than narrow necks makes stirring separated butter much easier when it does occur.
Remember that separated oil doesn't mean your butter has gone bad, it's simply a natural occurrence. Just stir it back in with a clean knife before each use. Some people actually appreciate oil separation because they can pour off a small amount of oil for other uses (it's great for cooking or adding to smoothies), creating a thicker, more spreadable butter underneath. If oil separation really bothers you, stick with refrigerator storage and slightly thicker processing, these two strategies together minimize the issue significantly.
Too Thick or Too Thin
Achieving your ideal consistency is partly a matter of trial and error as you learn how your specific equipment and preferred nut ratio behave. If your butter turns out thicker than desired, there are several easy fixes. The simplest is adding 1-2 tablespoons of neutral oil (avocado, grapeseed, or light olive oil) and processing again until smooth. Add gradually, you can always add more but can't take it out. Alternatively, add a tablespoon of coconut oil, which will create a butter that's fluid when warm but firms up when chilled. You could also adjust your nut ratio in future batches, using more cashews (naturally creamier) and fewer almonds (naturally thicker).
If your butter is too thin and almost pourable, you have fewer options to thicken it since you can't remove oil that's already been released. The butter will thicken substantially as it cools, so wait until it reaches room temperature before judging the final consistency, butter straight from the food processor is always much thinner than it will be once cooled. Refrigeration thickens it even more. In future batches, process for less time, stopping when the butter is smooth but hasn't yet reached that ultra-fluid stage. Using more almonds relative to cashews will also create naturally thicker butter. If you have thin butter that you'd like to thicken now, you can stir in a small amount of finely ground nut meal or flour (made by grinding a few tablespoons of nuts very finely), which will absorb some oil and add body.
The consistency of your nut butter will also vary based on ambient temperature, butter that seems perfect in winter might seem too thin in summer. Store in the refrigerator during warm months and bring to room temperature before using if you want easily spreadable butter. You can also keep two different consistencies on hand: a thinner, more fluid butter for drizzling over oatmeal or blending into smoothies, and a thicker butter for spreading on toast or using in recipes.
Shopping Guide: Choosing the Right Nuts
Almond Selection Tips
When shopping for almonds, you'll encounter several choices that impact your final nut butter's flavor, texture, and appearance. Raw versus roasted is the first decision. Raw almonds are beige to light brown, have a mild, slightly sweet flavor, and contain all their natural nutrients without any heat-induced changes. They're ideal if you plan to roast them yourself or prefer a milder-tasting butter. Pre-roasted almonds save time and effort, offering deeper, more developed flavor with pleasant toasted notes. If buying roasted, ensure they're dry-roasted without added oils, oil-roasted almonds will make your butter greasy. Check the ingredient list: it should only say "roasted almonds" or "almonds, salt," nothing else.
Blanched versus skin-on almonds is another consideration. Blanched almonds have had their brown skins removed through a quick blanching process, leaving smooth, pale nuts that create lighter-colored, slightly sweeter butter with smoother texture. The skins contain tannins that can add slight bitterness and create a grainier texture with brown flecks throughout the butter. Skin-on almonds are more nutritious since the skins contain fiber, antioxidants, and additional vitamins, and many people prefer the more rustic appearance and slight textural interest they provide. Neither is objectively better, the choice depends on your priorities. For the smoothest possible butter, choose blanched; for maximum nutrition and authentic almond flavor, choose skin-on.
Quality indicators help you select the best almonds. Good almonds should smell fresh and nutty, never musty, sour, or chemically. If buying from bulk bins, smell before purchasing, rancid nuts smell unpleasant and will ruin your batch. Look for almonds that are uniform in size and color, free from cracks, holes, or dark spots that might indicate insect damage or age. The nuts should feel heavy for their size and not rattle inside the shells (if buying in-shell). Most nut butter recipes use shelled almonds, which are more convenient and economical since you're not paying for shell weight.
Where to buy for best value: Warehouse stores like Costco and Sam's Club typically offer the best prices on large quantities of almonds, often $6-8 per pound compared to $10-12 at regular grocery stores. Online retailers like Nuts.com, Amazon, and Thrive Market offer competitive pricing, especially when buying 3-5 pound quantities. Buying in bulk dramatically reduces cost, and almonds store beautifully in the freezer for 6-12 months, so don't hesitate to stock up during sales. Place almonds in freezer-safe bags or containers, press out excess air, and freeze, they'll maintain quality and can be used directly from frozen or thawed to room temperature.
Cashew Buying Guide
Cashews are generally more expensive than almonds, so strategic shopping makes a bigger difference in your final cost. Raw versus roasted considerations are similar to almonds, with raw offering mild, naturally sweet flavor and roasted providing deeper, more complex taste. An important note: all commercially available cashews have been heat-treated to some degree because truly raw cashews contain urushiol (the same compound found in poison ivy) in their shells and must be processed to remove this toxic substance. What's sold as "raw" cashews has been minimally processed, while roasted cashews have been roasted additionally for flavor development.
Quality grades exist for cashews, though you may not always see them labeled in retail settings. Whole cashews command the highest prices, while pieces and broken cashews cost significantly less. For nut butter, pieces work perfectly well since you're grinding everything anyway, save money by buying cashew pieces rather than expensive whole nuts. The only consideration is ensuring the pieces aren't tiny fragments, which might have lost some freshness due to greater surface area exposure. Medium to large pieces are ideal for nut butter making.
Color and freshness indicators: High-quality cashews should be creamy white to pale ivory in color. Yellowing or darkening indicates age and possible rancidity. The nuts should have a sweet, almost buttery aroma, any sour, musty, or paint-like smells mean they're past their prime. Cashews are softer than almonds and can show damage more readily, so inspect for dark spots, mold, or shriveling. Because of their high oil content, cashews go rancid faster than almonds, making freshness especially important.
Sourcing recommendations: Cashews often come from Vietnam, India, or Africa, the origin doesn't significantly impact quality, though some people have country preferences. More important is the retailer's turnover, buy from stores or online sources that move products quickly to ensure freshness. Warehouse stores typically offer good prices on 2-3 pound bags. Trader Joe's often has competitively priced whole cashews and cashew pieces. Online retailers frequently run sales on bulk cashews. As with almonds, buying in larger quantities and freezing what you won't use immediately provides best value while maintaining quality.
Consider buying a mix of whole cashews for snacking and cashew pieces specifically for nut butter, this strategy gives you
beautiful whole nuts for other uses while saving money on butter-making supplies. Store cashews in airtight containers in the refrigerator (up to 6 months) or freezer (up to 1 year) to prevent rancidity. Because of their high oil content and soft texture, cashews are particularly susceptible to absorbing odors, so store them away from strong-smelling foods.
Conclusion
Making your own almond cashew butter at home is one of those simple kitchen projects that delivers outsized rewards. You'll save money compared to buying premium store-bought versions while creating something fresher, more delicious, and perfectly tailored to your taste preferences. The process itself is remarkably straightforward, just nuts, a food processor, and a bit of patience as the magic happens. Whether you're motivated by health considerations, budget consciousness, or simply the satisfaction of creating something yourself, homemade almond cashew butter checks all the boxes. The versatility of this creamy, nutritious spread means you'll use it constantly, from breakfast smoothies to afternoon snacks to creative dinner sauces. Once you experience the superior flavor and texture of fresh, homemade nut butter, the store-bought versions will seem flat and uninspiring by comparison. Start with the basic recipe, then experiment with different ratios and flavor variations until you discover your signature blend. Your morning toast will never be the same.
READ MORE:


