
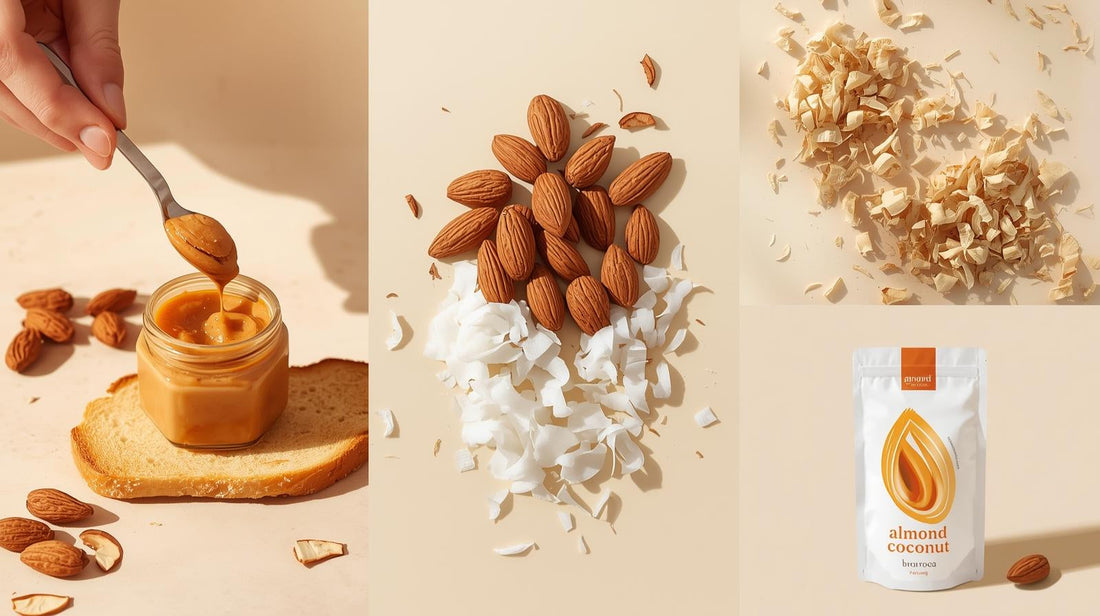
Making homemade almond coconut butter combines creamy texture, natural sweetness, and tropical flavor into one versatile spread. This nutrient-dense butter offers healthy fats from almonds, medium-chain triglycerides from coconut, and complete control over ingredients. Whether you're spreading it on toast, blending it into smoothies, or eating it straight from the jar, this easy almond coconut butter recipe delivers restaurant-quality results at a fraction of the cost. Studies show that homemade nut butters retain more nutrients than commercial varieties due to minimal processing and no added preservatives. Learning how to make almond coconut butter empowers you to avoid unnecessary sugars, oils, and additives while customizing flavors to your preference. This comprehensive guide walks you through ingredient selection, equipment choices, step-by-step instructions, texture adjustments, and troubleshooting tips to create the perfect batch every time. You'll discover why roasting almonds matters, when to add coconut oil, and how to achieve your ideal consistency—whether silky smooth or satisfyingly crunchy.
Almond Coconut Butter Ingredients
Creating exceptional almond coconut butter starts with understanding each ingredient's role in flavor, texture, and nutrition. The foundation requires just almonds and coconut, but strategic additions transform a basic spread into something extraordinary. Quality ingredients directly impact the final product—fresh almonds produce smoother butter, while aged nuts can taste bitter. Similarly, unsweetened coconut provides natural sweetness without overwhelming the almonds' nutty character. Each component serves a specific purpose: almonds contribute protein and healthy fats, coconut adds tropical notes and creaminess, oils adjust consistency, sweeteners balance flavors, and salt enhances overall taste. Optional add-ins like vanilla or cinnamon introduce complexity without artificial flavoring. Research indicates that nut butters made from fresh, high-quality ingredients contain higher levels of vitamin E and antioxidants compared to mass-produced alternatives. Understanding these ingredients allows you to customize your recipe while maintaining optimal nutrition and flavor. The beauty of homemade almond coconut butter lies in its simplicity—you control exactly what goes into your jar, eliminating concerns about palm oil, added sugars, or preservatives commonly found in store-bought versions.
Raw or Roasted Almonds — Best Almonds for Almond Coconut Butter
The choice between raw and roasted almonds significantly impacts your butter's flavor profile and processing time. Raw almonds offer a milder, slightly sweet taste with delicate nutty undertones, making them ideal for those who prefer subtle flavors or plan to add strong seasonings like chocolate or cinnamon. They also retain maximum nutrients since they haven't been exposed to heat beyond pasteurization. However, raw almonds require longer blending times and may produce a less creamy texture initially. Roasted almonds, whether store-bought or home-roasted, deliver deeper, toasted flavors with caramelized notes that complement coconut beautifully. The roasting process releases natural oils more readily, resulting in faster processing and smoother consistency. Culinary experts note that roasting almonds at 350°F for 10-12 minutes enhances their natural oils and makes them easier to blend into butter. For optimal results, choose raw, unsalted almonds and roast them yourself to control the degree of toasting. Look for plump, uniform almonds without discoloration or rancid odors. Blanched almonds (skins removed) create lighter-colored butter with milder flavor, while unblanched almonds add rustic color and slightly more fiber. Most recipes benefit from roasted almonds due to superior flavor development and easier processing.

Unsweetened Shredded Coconut — Choosing the Right Coconut for Almond Butter
Selecting the right coconut product determines whether your almond coconut butter achieves balanced flavor or becomes overly sweet. Unsweetened shredded coconut provides natural tropical sweetness without added sugars, maintaining the spread's nutritional integrity while contributing healthy medium-chain fatty acids. The shredded form blends more efficiently than large flakes, releasing oils faster for smoother integration with ground almonds. Avoid sweetened coconut varieties, as they contain substantial added sugar that overwhelms the almonds' delicate flavor and may cause the butter to seize or become grainy during processing. Dried shredded coconut offers concentrated flavor and extended shelf life, while fresh coconut meat requires freezing for optimal blending and spoils quickly. Nutrition studies demonstrate that unsweetened coconut retains beneficial lauric acid and fiber without the blood sugar spikes associated with sweetened versions. For best results, choose fine or medium shred rather than coarse flakes—smaller pieces incorporate more evenly and release oils efficiently. Organic unsweetened coconut ensures no sulfites or preservatives interfere with flavor. The typical ratio combines 2 cups almonds with ½ to 1 cup shredded coconut, though you can adjust based on desired coconut intensity. Store unused coconut in airtight containers to prevent rancidity, as coconut's high fat content makes it susceptible to oxidation.
Coconut Oil — How It Affects Texture and Flavor
Coconut oil serves as a texture modifier rather than a required ingredient, offering control over your butter's spreadability and consistency. Adding 1-2 tablespoons of melted coconut oil creates a silkier, more pourable butter that spreads easily even when refrigerated, while omitting it produces thicker, denser butter that's better for scooping or using in baking. Refined coconut oil contributes smoothness without adding coconut flavor, making it ideal when you want almonds and shredded coconut to dominate. Unrefined (virgin) coconut oil intensifies tropical notes and adds subtle sweetness, perfect for coconut lovers seeking maximum flavor. The oil also prevents separation and extends shelf life by emulsifying the mixture. Food scientists explain that coconut oil remains solid at temperatures below 76°F, which can make nut butters firmer when stored in cool environments. Add coconut oil gradually after the almonds and coconut have formed a paste—this prevents the mixture from becoming overly greasy or separating during storage. Start with one tablespoon, blend thoroughly, then assess consistency before adding more. For oil-free versions, simply blend longer to release the nuts' natural oils, though the final product will be denser and may require stirring before use. Consider your storage method when deciding on oil quantity: room-temperature storage benefits from less oil, while refrigerated butter needs more for spreadability.
Natural Sweeteners — Maple Syrup, Honey, or Monk Fruit
Natural sweeteners balance the almonds' slight bitterness and complement coconut's inherent sweetness without creating candy-like results. Maple syrup offers complex flavor with caramel undertones and mineral content including manganese and zinc, requiring 1-2 tablespoons for subtle sweetness. Its liquid consistency integrates smoothly into the butter without affecting texture significantly. Raw honey provides floral notes and trace enzymes, though it crystallizes when cold and may make refrigerated butter grainy. Use honey sparingly—its intense sweetness means less goes further. Nutritionists recommend natural sweeteners over refined sugars for nut butters because they provide additional nutrients and have lower glycemic impacts. Monk fruit sweetener works excellently for sugar-free versions, offering zero-calorie sweetness without aftertaste when used in powdered form; start with ½ teaspoon and adjust to taste. Dates provide whole-food sweetness plus fiber, though they require thorough blending and add brown color. Coconut sugar mirrors maple syrup's caramel notes while reinforcing coconut flavor. Add sweeteners after the butter reaches smooth consistency to accurately gauge sweetness level—blending can intensify or mellow flavors. Remember that shredded coconut contributes natural sugars, so taste before sweetening. For completely unsweetened versions, the coconut provides sufficient sweetness for many palates, especially when using roasted almonds with developed flavors.
Sea Salt — Balancing Sweet and Savory
Sea salt elevates almond coconut butter from pleasant to exceptional by enhancing both sweet and nutty flavors while balancing the coconut's richness. Just ¼ to ½ teaspoon of fine sea salt brightens the overall taste profile, preventing the butter from tasting flat or one-dimensional. Salt activates taste receptors that make other flavors more pronounced, allowing you to taste the almonds' nuttiness and coconut's tropical character more distinctly. Fine sea salt dissolves completely into the butter, distributing evenly without creating salty pockets or gritty texture. Culinary research shows that salt in appropriate quantities enhances perceived sweetness in desserts and spreads, allowing for reduced sugar content while maintaining satisfying flavor. Avoid using too much salt initially—you can always add more, but removing excess salt is impossible. Start with ¼ teaspoon, blend thoroughly, taste, then add more if needed. Different salt varieties offer subtle variations: pink Himalayan salt adds trace minerals and slight color, flaky sea salt provides texture if stirred in at the end, and kosher salt works well but requires slightly more due to larger crystals. For savory applications, increase salt to ½ teaspoon or more. Those following low-sodium diets can reduce or eliminate salt, though the butter may taste slightly bland. The salt also acts as a natural preservative, extending shelf life by inhibiting bacterial growth, making it particularly valuable for room-temperature storage.
Optional Flavor Add-Ins — Vanilla, Cinnamon, Cocoa Powder, or Dark Chocolate
Optional flavor additions transform basic almond coconut butter into specialized spreads for different applications and preferences. Vanilla extract (½-1 teaspoon) adds warmth and rounds out flavors, making the butter taste more dessert-like without additional sweetness—use pure vanilla extract rather than imitation for authentic flavor without chemical aftertaste. Cinnamon (½-1 teaspoon) introduces warming spice that pairs beautifully with both almonds and coconut, evoking snickerdoodle cookies or chai tea; Ceylon cinnamon offers delicate sweetness while cassia cinnamon provides bold spice. Unsweetened cocoa powder (2-3 tablespoons) creates chocolate almond coconut butter reminiscent of candy bars but with superior nutrition—use Dutch-process cocoa for mellow chocolate flavor or natural cocoa for pronounced chocolate intensity. Food pairing studies indicate that chocolate, vanilla, and cinnamon complement both almonds and coconut due to shared flavor compounds that create harmonious taste experiences. Finely chopped dark chocolate (¼ cup) stirred in at the end adds texture and intense chocolate bursts. Other excellent add-ins include cardamom for exotic flavor, espresso powder for mocha versions, or orange zest for bright citrus notes. Add dry ingredients like cocoa or cinnamon after the butter becomes smooth to ensure even distribution. Liquid extracts should be added last to prevent seizing. Start conservatively with add-ins—you can always make another batch with more, but overpowering the almonds and coconut defeats the purpose of this unique butter.
Equipment Needed for Almond Coconut Butter Recipe
Success in making almond coconut butter depends heavily on having appropriate equipment that can handle prolonged processing of hard nuts. The right tools make the difference between smooth, creamy butter and a frustrating experience with burnt motors or grainy results. While you don't need specialized nut butter machines, certain appliances significantly outperform others. A powerful food processor or high-speed blender forms the foundation, providing the sustained power and blade speed necessary to break down almonds' cellular structure and release natural oils. Kitchen equipment experts note that underpowered appliances struggle with nut butter production, often overheating or failing to achieve smooth consistency. Beyond the primary appliance, supporting tools like baking sheets, spatulas, and storage containers ensure efficient workflow and proper preservation. Investing in quality equipment pays dividends through consistent results, reduced processing time, and extended appliance lifespan. This section explores each tool's role, comparing options to help you choose wisely based on your kitchen setup and budget. Understanding equipment capabilities also helps troubleshoot issues—knowing whether texture problems stem from technique or tool limitations guides appropriate solutions. Proper equipment makes homemade almond coconut butter accessible even for beginners.
Food Processor vs High-Speed Blender — Which Works Best
The food processor versus blender debate for nut butter production has a clear winner: food processors excel for this specific task due to their design and blade configuration. Food processors feature wide, shallow bowls with powerful motors designed for thick mixtures, while their S-shaped blades create horizontal motion that pushes ingredients toward the blades repeatedly. This design prevents nuts from flying up the sides and ensures consistent contact with blades for even grinding. A full-size processor with at least 11-cup capacity and 600+ watts handles 2 cups of almonds comfortably, though smaller 7-cup processors work for half batches. Kitchen appliance testing shows that food processors process nut butters 30-40% faster than standard blenders due to superior blade-to-ingredient contact. High-speed blenders like Vitamix or Blendtec can make nut butter but require frequent tamping to push ingredients toward the blades, and their tall, narrow containers make this awkward. The upside is that high-speed blenders achieve silkier texture when they do work, particularly for small batches. Use the blender's tamper constantly and scrape sides frequently. Regular countertop blenders lack sufficient power and will overheat or burn out—don't attempt nut butter in standard blenders. For best results, choose a food processor as your primary tool, reserving high-speed blenders as an alternative only if you already own one. The processor's convenience and efficiency make the process enjoyable rather than tedious.
Baking Sheet for Roasting Almonds
A quality baking sheet ensures even roasting of almonds, which directly impacts flavor development and processing ease. Heavy-duty rimmed baking sheets (also called sheet pans) distribute heat uniformly and prevent almonds from rolling off during handling. The 18" x 13" half-sheet size accommodates 2-3 cups of almonds in a single layer—crucial for even roasting since crowded nuts roast unevenly, with some burning while others remain pale. Choose aluminum or aluminized steel sheets for optimal heat conduction, avoiding dark nonstick pans that can cause over-browning before interiors properly roast. Professional bakers prefer light-colored aluminum baking sheets for nuts and cookies because they reflect heat evenly and prevent burning. Rimmed edges contain nuts even when shaking the pan for even roasting every 3-4 minutes. While parchment paper or silicone mats prevent sticking and ease cleanup, neither is essential for nuts—just shake the pan periodically to prevent sticking. A cooling rack allows air circulation under the sheet after roasting, cooling almonds faster and preventing continued cooking from residual heat. Some cooks roast directly on the rack for maximum airflow, though small almonds may fall through. Having two baking sheets allows you to roast larger batches or prep ingredients simultaneously. The investment in a good baking sheet pays off through years of reliable service for this and countless other recipes.
Spatula and Airtight Jar for Storage
Specialized tools for scraping and storing your almond coconut butter seem minor but prove essential for maximizing yield and maintaining freshness. A flexible silicone spatula with squared edges efficiently scrapes every bit of butter from the food processor bowl's sides and bottom, recovering tablespoons that would otherwise be wasted—significant when you've invested time and money in quality ingredients. Kitchen efficiency studies show that proper scraping tools can recover up to 15% more product from mixing bowls compared to regular spoons or rigid spatulas. Choose heat-resistant silicone that withstands warmth from freshly blended butter without melting or absorbing oils. The spatula also helps during processing by pushing ingredients down the bowl's sides between blending cycles, speeding progress toward smooth consistency. For storage, select glass jars with airtight seals rather than plastic containers—glass doesn't absorb oils or odors, maintains flavor integrity, and allows you to see when supplies run low. Mason jars work excellently and come in various sizes: 8-ounce jars for single servings or gifts, 16-ounce pint jars for weekly supplies, or 32-ounce quart jars for bulk batches. Wide-mouth jars simplify scooping thick butter, while narrow mouths better protect contents from oxidation. Ensure lids seal properly—oxygen exposure causes rancidity. Label jars with preparation dates to track freshness. Dark-colored glass offers protection from light-induced oxidation, though storing any jar in a cupboard or refrigerator provides adequate darkness.
How to Make Almond Coconut Butter Step by Step
Creating perfect almond coconut butter follows a straightforward seven-step process that transforms simple ingredients into luxurious spread. Understanding each step's purpose and timing ensures consistent success regardless of equipment or variations. The process begins with optional but highly recommended almond roasting, continues through strategic blending stages, and concludes with proper storage techniques. Patience proves crucial—rushing leads to grainy texture or overheated motors, while methodical progression produces restaurant-quality results. Professional chefs emphasize that nut butter making requires patience as natural oils gradually release during extended processing. Most batches require 15-25 minutes of total processing time, though this varies based on equipment power and desired consistency. Plan to monitor the process actively rather than walking away, as ingredients transition through distinct stages: coarse meal, clumpy ball, thick paste, and finally smooth butter. Recognizing these stages helps you know when to add supplementary ingredients for optimal integration. This detailed walkthrough covers timing, visual cues, and techniques that ensure your first batch succeeds and subsequent batches improve. Follow these steps precisely for initial attempts, then adapt based on personal preferences and equipment quirks you discover through experience.
Step 1 — Roast the Almonds for Enhanced Flavor
Roasting almonds represents the most impactful step for flavor development, transforming bland nuts into aromatic ingredients with pronounced nuttiness. Preheat your oven to 350°F (175°C) while spreading 2 cups of raw almonds in a single layer on a large baking sheet—overlapping nuts roast unevenly, creating some that burn while others remain underdone. Place the sheet in the middle oven rack where heat circulates most evenly. Set a timer for 5 minutes, then shake the pan vigorously to redistribute nuts for even browning. Roasting almonds activates enzymes and reduces moisture content, intensifying flavor compounds and making oils more accessible during processing. Continue roasting, shaking every 3-4 minutes, until almonds turn golden brown and release a toasted aroma—typically 10-14 minutes total depending on your oven and almond size. Watch carefully during the final minutes as almonds transition rapidly from perfectly roasted to burnt. Visual cues include darkening color and visible surface oils. The aroma should smell sweet and toasty, not acrid or burnt. If you detect burning smell, remove immediately. Remember that almonds continue cooking briefly after removal due to residual heat, so pull them slightly before your target doneness. Roasting also reduces moisture that could make butter grainy or cause spoilage. For raw almond butter, skip this step entirely, though expect longer processing times and milder flavor.
Step 2 — Cool the Almonds Before Processing
Cooling roasted almonds completely before processing prevents several issues that compromise texture and equipment safety. Hot or warm almonds release moisture as steam during blending, which can make butter grainy or seize into clumps rather than flowing smoothly. The moisture also promotes separation, causing oil to pool separately from solids during storage. Transfer roasted almonds from the baking sheet to a cooling rack or spread them on your counter, allowing air circulation around them. Food science research indicates that processing hot nuts can create steam that interferes with oil emulsification and leads to grainy texture in nut butters. Leave almonds undisturbed for 15-20 minutes until they reach room temperature—test by touching one; it should feel barely warm or completely cool. This waiting period seems tedious but prevents frustration later. While almonds cool, prepare other ingredients, clean equipment, and ready your storage jar. The cooling time also allows you to evaluate roasting success—properly roasted almonds should have uniform color without dark spots and should crunch rather than bend when broken. If some appear under-roasted, return them to the oven for 2-3 additional minutes. Completely cooled almonds also protect your food processor or blender from thermal stress, as processing hot ingredients can warp plastic components or loosen blade assemblies. Use this time productively rather than rushing into blending with warm nuts.
Step 3 — Combine Almonds and Shredded Coconut in the Processor
Once almonds reach room temperature, begin the transformation into butter by combining dry ingredients in your food processor bowl. Add all 2 cups of cooled almonds first, followed by ½ to 1 cup unsweetened shredded coconut depending on desired coconut intensity—start with ½ cup for almond-forward butter or 1 cup for prominent coconut flavor. Secure the processor lid firmly, ensuring it locks properly to prevent accidents during high-speed operation. Culinary experts recommend adding all dry ingredients together initially to create uniform grinding and consistent texture throughout the mixture. Pulse the processor 10-15 times (1-2 second bursts) to break almonds into small pieces and incorporate coconut evenly. Pulsing prevents immediate overheating and allows you to monitor progress, whereas continuous running can seize the motor with whole nuts. After pulsing, the mixture should resemble coarse meal with almond pieces ranging from sand-grain to small pebble size. Scrape down the bowl sides with your spatula, pushing ingredients toward the center and blade—this ensures nothing escapes processing by riding up the walls. At this stage, the mixture appears dry and powdery with no sign of butter forming—this is normal and expected. Avoid adding oils or liquids yet, as the almonds and coconut must first break down completely to release their natural oils. The combination of almonds and coconut creates better texture than either alone, as coconut's softer consistency helps break down harder almonds.
Step 4 — Blend Until Smooth and Creamy
The blending stage requires patience and persistence as your mixture transforms through several distinct phases before becoming smooth butter. After pulsing into coarse meal, begin continuous processing at high speed, stopping every 30-45 seconds to scrape down the bowl sides and break up clumps. Initially, the powder will transform into a ball that rolls around the processor bowl—this stage lasts 2-4 minutes depending on processor power. Don't worry; the ball stage is normal and necessary as oils begin releasing. The nut butter creation process involves cell wall breakdown that gradually releases oils stored within the nuts, requiring sustained mechanical force and friction heat. Continue processing as the ball eventually breaks down into thick, paste-like consistency, then gradually becomes wetter and flows more easily. This transformation takes 8-15 minutes total for most processors, though high-powered models work faster. Watch for visual cues: the mixture should become glossy as oils release, flow away from the processor walls, and eventually swirl smoothly around the bowl. The texture will remain slightly gritty at this point unless you process for 20+ minutes—natural almond butter has subtle texture. If your processor overheats (indicated by hot motor housing or burning smell), stop immediately and let it cool for 10 minutes before continuing. Most processors can run continuously for 1-2 minutes safely, so adopt a pattern of processing 60 seconds, scraping, then processing again. The result should be spreadable, glossy butter that holds soft peaks when lifted with a spatula.
Step 5 — Add Coconut Oil, Sweetener, and Salt
Once your almond-coconut mixture reaches smooth, flowing consistency, enhance it with supporting ingredients that adjust texture, flavor, and preservation. With the processor running, drizzle in 1-2 tablespoons of melted coconut oil through the feed tube—the oil incorporates instantly, creating silkier texture and looser consistency. Add oil gradually, as too much creates separated, greasy butter. Food scientists explain that adding oils at the end of nut butter processing ensures proper emulsification with the already-released natural oils. Next, add your chosen sweetener: 1-2 tablespoons maple syrup or honey, or ½-1 teaspoon monk fruit sweetener. Pour liquid sweeteners through the feed tube while processing, or stop the processor to add powdered sweeteners, then resume processing. Finally, sprinkle in ¼ teaspoon fine sea salt initially. Process these additions for 30-60 seconds until completely incorporated—you should see the butter become more fluid and glossy. This stage also allows you to add any optional flavors like vanilla extract, cinnamon, or cocoa powder. Add dry spices before liquids for better distribution. The processor's friction generates slight warmth that helps ingredients meld together, creating unified flavor rather than distinct separate tastes. If making unsweetened butter, simply add salt and oil, skipping sweeteners entirely. The coconut oil will solidify when refrigerated, making butter firmer, so adjust quantity based on storage plans. Room-temperature storage needs less oil, while refrigerated butter benefits from the full 2 tablespoons for spreadability.
Step 6 — Adjust Texture and Taste
After adding all ingredients, conduct a thorough taste and texture assessment to perfect your almond coconut butter before transferring it to storage. Stop the processor, remove the lid, and scrape the sides to collect a small sample on your spatula or a spoon. Taste critically, evaluating sweetness, saltiness, coconut intensity, and overall flavor balance. Professional food tasting protocols emphasize evaluating multiple sensory aspects including texture, aroma, and flavor progression from initial taste to finish. The butter should taste balanced with no single element overwhelming others—if too bland, add more salt (⅛ teaspoon at a time); if not sweet enough, add more sweetener (½ tablespoon liquid or ¼ teaspoon powder); if coconut flavor is weak, add 2-3 tablespoons more shredded coconut. Process for 20-30 seconds after each adjustment, then taste again. For texture assessment, spread some butter on your finger—it should feel smooth with minimal grittiness and flow easily at room temperature. If too thick, add more coconut oil (½ tablespoon at a time) or process longer to release more natural oils. If too thin, resist adding thickeners; instead, refrigeration will firm it up. Remember that butter thickens as it cools, so room-temperature testing shows how it will be for immediate use while cold testing reveals refrigerated consistency. Once satisfied, run the processor for a final 30 seconds to ensure complete incorporation of any additions, then proceed to storage.
Step 7 — Store Almond Coconut Butter Properly
Proper storage determines whether your almond coconut butter stays fresh for weeks or spoils within days. Immediately transfer finished butter to a clean, dry, airtight glass jar using your silicone spatula to scrape every bit from the processor bowl. Press the butter down firmly as you fill the jar, eliminating air pockets that promote oxidation and rancidity. Leave about ½ inch of headspace at the top to allow for expansion if refrigerating. Food preservation experts state that homemade nut butters contain no preservatives and rely on proper storage to prevent rancidity from oil oxidation. Wipe the jar rim clean with a paper towel before sealing—oil residue prevents tight seals. For room-temperature storage, keep the jar in a cool, dark cupboard away from heat sources, where it will remain fresh for 2-3 weeks. Refrigeration extends shelf life to 4-6 weeks while maintaining optimal flavor, though the butter will firm up significantly—remove it 10-15 minutes before use to allow softening, or microwave briefly (10-15 seconds) for immediate spreadability. Freezing preserves almond coconut butter for up to 3 months in freezer-safe containers; thaw overnight in the refrigerator before use. Always use clean utensils when scooping butter to prevent contamination. Natural separation (oil pooling on top) occurs normally during storage—simply stir before use to reincorporate. Check periodically for signs of spoilage: off odors, bitter taste, or mold growth, though proper storage prevents these issues.
Texture and Consistency Tips for Almond Coconut Butter
Achieving your ideal almond coconut butter texture requires understanding the variables that influence consistency and how to manipulate them effectively. Texture ranges from pourable and silky to thick and scoopable, with crunchy variations adding textural interest. The final consistency depends on processing time, oil content (both natural and added), storage temperature, and ingredient ratios. Food texture research shows that consumer preferences for nut butter consistency vary widely, making customization important for satisfaction. Natural nut butters contain no stabilizers, so they behave differently than commercial products—separation is normal, and consistency changes with temperature. Understanding these principles empowers you to troubleshoot texture issues and intentionally create specific consistencies for different applications. Smooth, fluid butter works beautifully for drizzling or blending into smoothies, while thicker butter suits spreading on toast or using in baking. This section provides specific techniques for adjusting texture when it doesn't meet expectations and for intentionally creating variations. Most texture problems stem from insufficient processing, improper oil amounts, or inadequate cooling before storage. Mastering these aspects transforms texture from a frustration into a controllable variable you manipulate confidently.
When and How to Add Coconut Oil
Strategic coconut oil addition significantly impacts texture without overwhelming flavor, but timing and quantity matter tremendously. Add coconut oil only after the almonds and coconut have completely broken down into flowing butter—adding it earlier prevents proper grinding as the oil lubricates nuts, causing them to slide rather than break down. Food science principles indicate that oils should be added to nut butters after sufficient processing has released natural oils to ensure proper emulsification. Start with 1 tablespoon of melted (liquid) coconut oil while the processor runs, drizzling through the feed tube for immediate incorporation. Process for 30 seconds, then assess consistency—the butter should become visibly more fluid and glossy. If still thick, add another tablespoon, process again, and re-evaluate. Avoid exceeding 2-3 tablespoons total, as excessive oil creates greasy, separated butter that's unpleasant and pools during storage. The type of coconut oil affects results: refined oil adds smoothness without flavor, while virgin coconut oil intensifies tropical taste. For completely oil-free butter, simply process longer (potentially 20-30 minutes) to extract maximum natural oils, accepting that the result will be thicker and may separate during storage. Temperature matters when adding oil—room-temperature or slightly warm oil incorporates better than cold, solidified oil. If you accidentally add too much oil, mix in 2-3 tablespoons additional roasted almonds to absorb excess, then process until smooth again. Remember that refrigeration solidifies coconut oil, firming the butter considerably.
Fixing Thick or Grainy Almond Coconut Butter
Thick or grainy almond coconut butter stems from insufficient processing, inadequate oil release, or improper technique, but all these issues have solutions. If your butter is too thick but otherwise smooth, the simplest fix involves adding more coconut oil—add ½ tablespoon at a time while processing, testing consistency after each addition until you reach desired thickness. Alternatively, process longer to release more natural oils, checking every 2-3 minutes since over-processing generates excessive heat. Texture troubleshooting in nut butter production typically involves either extended processing time or controlled addition of oils to achieve desired consistency. For grainy texture despite adequate processing time, several culprits may be responsible: warm nuts (moisture creates graininess), insufficient power (weak processor can't break down cell walls), or old, stale nuts (rancid oils don't flow properly). To fix existing grainy butter, try processing in a high-speed blender if available, as superior blade speed creates smoother texture. Alternatively, warm the butter gently by placing the jar in warm water for 5-10 minutes, then re-process—warmth liquefies oils for easier blending. Adding 1-2 teaspoons of neutral oil like almond or avocado oil can help, though this changes the flavor profile slightly. Prevent graininess by ensuring completely cooled almonds before processing, using fresh nuts within their shelf life, and processing continuously until smooth rather than stopping prematurely. Some food processors simply lack power for ultra-smooth butter—if graininess persists despite all efforts, accept subtle texture or invest in more powerful equipment.
Creating Crunchy Almond Coconut Butter
Crunchy almond coconut butter offers satisfying texture contrast and additional nutty flavor through intentionally preserved almond pieces. Create it by processing butter normally until completely smooth, then stirring in ¼ to ½ cup roughly chopped almonds by hand at the very end—don't process these additional nuts, as you want distinct chunks rather than integrated pieces. Chop almonds coarsely into pieces ranging from small pebble to half-almond size for noticeable crunch without being overwhelming. Consumer preference studies show that crunchy nut butter appeals to those seeking more complex texture experiences and stronger nut flavor. Toast these additional almonds separately before chopping for enhanced flavor, or leave them raw for softer crunch and milder taste. Use a knife for irregular pieces that provide varied texture, or pulse briefly in the food processor (separately from the butter batch) for more uniform chunks. Stir the chunks thoroughly but gently into the finished smooth butter using a spatula, distributing them evenly without breaking them down. The key distinction between crunchy and smooth versions lies in controlled addition rather than simply under-processing the entire batch—under-processing creates grainy butter with tiny, hard particles, while proper crunchy butter has smooth base with distinct, satisfying chunks. For maximum crunch longevity, store crunchy versions at room temperature, as refrigeration can soften the added pieces. You can also create "super crunchy" versions by adding ¾ to 1 cup chopped almonds, though this creates a thicker spread that's harder to stir. Some people add toasted coconut flakes along with almond chunks for double texture contrast. Adjust the ratio of smooth butter to crunchy pieces based on personal preference—start conservative and add more chunks in future batches if desired.
Almond Coconut Butter Recipe Variations
The basic almond coconut butter recipe serves as a versatile foundation for countless creative variations that suit different dietary needs, flavor preferences, and culinary applications. Customizing your butter allows you to create specialized versions for specific uses: dessert-like spreads for toast, protein-rich additions for smoothies, or sugar-free options for keto diets. Recipe variation creativity enables home cooks to develop signature flavors that commercial products cannot replicate, using fresh ingredients and personal preferences. Each variation maintains the nutritious base of almonds and coconut while introducing new flavor dimensions through strategic ingredient additions or technique modifications. These adaptations also help prevent flavor fatigue—rotating through different versions keeps your homemade butter exciting rather than monotonous. Understanding variation principles empowers you to experiment confidently beyond these specific recipes, combining elements that appeal to your taste. Consider dietary restrictions when varying recipes: vegan versions avoid honey, keto versions minimize sweeteners, and paleo versions ensure all ingredients meet protocol requirements. This section presents six popular variations that address common preferences, but view them as starting points for your own creativity. Most variations require only minor adjustments to the base recipe, making experimentation low-risk and rewarding.
Toasted Coconut Almond Butter
Toasted coconut almond butter intensifies the tropical coconut flavor through additional roasting that creates caramelized, nutty notes alongside the almonds' richness. Create this variation by toasting your unsweetened shredded coconut separately before making butter. Spread ½ to 1 cup shredded coconut on a baking sheet and toast at 325°F for 5-8 minutes, stirring every 2 minutes, until golden brown and fragrant—watch carefully as coconut browns rapidly and burns easily. Toasting coconut activates Maillard reactions that create hundreds of new flavor compounds, adding complexity and depth to the final product. The toasted coconut develops deeper sweetness and nutty character that complements roasted almonds beautifully, creating a more cohesive flavor profile where both components share similar toasted notes. Cool the toasted coconut completely before combining with your cooled roasted almonds in the food processor, then follow the standard recipe. The result tastes remarkably like dessert—some describe it as "macaroon butter" due to its sweet, toasted coconut intensity. This variation pairs exceptionally well with chocolate, making it perfect for spreading on brownies or mixing into chocolate smoothies. Consider reducing added sweeteners since toasted coconut provides enhanced natural sweetness. Store toasted coconut almond butter the same as basic versions, though the additional roasting may slightly reduce shelf life—consume within 3-4 weeks for peak flavor. This variation appeals particularly to coconut lovers who want maximum tropical flavor.
Sweetened Coconut Almond Butter
Sweetened coconut almond butter transforms the spread into a dessert-worthy treat while maintaining nutritional benefits from nuts and healthy fats. This variation uses increased sweetener quantities—2-4 tablespoons maple syrup or honey instead of the standard 1-2 tablespoons—creating noticeably sweet butter that satisfies dessert cravings without refined sugar. Nutritionists note that even sweetened homemade nut butters contain significantly less sugar than commercial chocolate hazelnut spreads while providing superior protein and healthy fats. For enhanced sweetness complexity, combine sweeteners: use 2 tablespoons maple syrup plus 1 tablespoon honey for layered flavor, or add 1 tablespoon coconut sugar for molasses-like depth. The additional sweetness pairs beautifully with vanilla extract (1 teaspoon) and a pinch of cinnamon, creating flavors reminiscent of cookies or pastries. Process sweeteners thoroughly to ensure complete incorporation and taste multiple times during adjustment—sweetness intensifies slightly as butter sits. This version excels as a fruit dip, toast topping, or oatmeal stirrer, and children especially enjoy the dessert-like flavor. Balance the sweetness with ½ teaspoon sea salt rather than ¼ teaspoon to prevent cloying taste. Remember that coconut and almonds already contribute natural sugars, so even 3-4 tablespoons added sweetener creates moderately sweet butter rather than candy-like results. For those transitioning from commercial sweetened spreads to homemade versions, this variation provides familiar sweetness while eliminating hydrogenated oils and excessive sugar found in store-bought products. Refrigerate sweetened versions to maintain freshness, as higher sugar content can promote faster spoilage at room temperature.
Sugar-Free Coconut Almond Butter
Sugar-free coconut almond butter serves keto, diabetic, and low-carb dieters while maintaining delicious flavor through strategic ingredient selection and technique. Omit all traditional sweeteners completely, relying instead on the natural sweetness of coconut and roasted almonds' caramelized notes. The key to successful sugar-free butter lies in thorough almond roasting—extend roasting time by 1-2 minutes beyond standard to develop maximum caramelization and sweetness from the Maillard reaction, watching carefully to avoid burning. Low-carb and ketogenic diet followers report that well-made sugar-free nut butters satisfy sweet cravings when prepared with properly roasted nuts and complementary spices. For subtle sweetness without sugar, add ½ to 1 teaspoon monk fruit sweetener or 2-3 drops liquid stevia—these zero-calorie, low-glycemic options don't spike blood sugar but provide perceived sweetness. Alternatively, embrace the naturally savory-sweet profile by adding ½ teaspoon vanilla extract and ¼ teaspoon cinnamon, which create the illusion of sweetness through aroma compounds even without actual sugar. Increase salt slightly to ⅓ teaspoon, as salt enhances perceived sweetness through taste receptor interactions. This version typically contains 2-3g net carbs per 2-tablespoon serving, making it suitable for strict keto diets. The flavor profile is more sophisticated and adult-oriented than sweetened versions, with prominent nuttiness and subtle tropical notes. Sugar-free butter pairs excellently with celery sticks, low-carb crackers, or as a fat bomb base mixed with cocoa powder and coconut oil, then frozen.
Chocolate Coconut Almond Butter
Chocolate coconut almond butter recreates the beloved flavor combination of popular candy bars while delivering superior nutrition through whole food ingredients. Create this indulgent variation by adding 3-4 tablespoons unsweetened cocoa powder to your finished smooth butter, then processing for 1-2 minutes until the cocoa fully incorporates and the butter turns rich brown. High-quality cocoa powder contains flavonoids and antioxidants that provide health benefits beyond just flavor, making chocolate nut butters surprisingly nutritious. Use Dutch-process cocoa for mellow, smooth chocolate flavor without bitterness, or natural cocoa powder for intense, slightly acidic chocolate taste. Since cocoa adds dryness and absorbs oils, compensate by increasing coconut oil to 2-3 tablespoons for maintained creaminess. Enhance chocolate flavor with 1 teaspoon vanilla extract and increase sweetener to 2-3 tablespoons since cocoa's natural bitterness requires balancing. For ultimate chocolate intensity, stir in ¼ cup finely chopped dark chocolate (70% cacao or higher) after processing, creating pockets of intense chocolate throughout. This variation tastes remarkably like the filling of chocolate coconut candy bars but with wholesome ingredients: heart-healthy almonds, beneficial fats from coconut, and antioxidant-rich chocolate. Kids love this version spread on banana slices or graham crackers, while adults appreciate it swirled into coffee or dolloped on ice cream. The chocolate flavor deepens after 24 hours as the cocoa fully hydrates, so make it a day ahead when possible. Store chocolate coconut almond butter in the refrigerator to prevent cocoa butter separation.
Almond Joy Coconut Butter
Almond Joy coconut butter faithfully recreates the iconic candy bar's flavor profile while using wholesome, nutrient-dense ingredients instead of processed sugars and artificial flavors. This variation combines chocolate coconut almond butter base with whole almond pieces for authentic texture mimicry. Begin with the chocolate coconut almond butter recipe (previous variation), then stir in ⅓ cup roughly chopped roasted almonds for the characteristic almond chunks found in Almond Joy bars. Candy bar flavor recreation through homemade nut butters allows people to enjoy nostalgic tastes while consuming significantly more nutrients and avoiding unwanted additives. Add an extra tablespoon of sweetener beyond the chocolate version—3 tablespoons total maple syrup or honey—to match the candy's sweetness level. Include 1 teaspoon vanilla extract and ¼ teaspoon almond extract for enhanced almond flavor that makes the candy bar connection unmistakable. Some versions incorporate mini dark chocolate chips (2-3 tablespoons) stirred in at the end for extra chocolate intensity. The result tastes remarkably similar to the famous candy while providing protein, fiber, healthy fats, and minerals. This indulgent spread works beautifully as a dessert, satisfying sweet cravings with nutritional benefits. Serve it in small portions—1-2 tablespoons provides intense flavor and satisfaction. Children transitioning from candy to healthier options often embrace this variation enthusiastically. For special occasions, spread it between graham crackers or use it as a dip for pretzels. The combination of chocolate, coconut, and almond creates what food scientists call "flavor synergy"—the components taste better together than separately, explaining the candy bar's enduring popularity and this variation's appeal.
Smooth vs Crunchy Almond Coconut Butter
The smooth versus crunchy debate represents personal preference rather than superior technique, with each style offering distinct advantages for different applications and taste preferences. Smooth almond coconut butter provides luxurious, velvety texture that spreads effortlessly, blends seamlessly into smoothies and baked goods, and offers consistent flavor in every bite. Its uniform consistency makes portion control easier and creates elegant presentation when drizzled or swirled. Texture preference research in food psychology shows that smooth versus chunky preferences often correlate with personality traits and eating styles, though both groups appreciate quality ingredients. Create perfectly smooth butter by processing for 15-20 minutes total, scraping frequently, until the mixture becomes completely fluid with no detectable grittiness. Adding 2 tablespoons coconut oil enhances smoothness further. Crunchy almond coconut butter delivers satisfying textural contrast, stronger almond flavor from the added pieces, and more interesting eating experience through varied mouthfeel. The chunks provide distinct almond bursts that complement the creamy base, making each spoonful slightly different. Some people find crunchy versions more satisfying and filling due to the additional chewing required. Create crunchy butter by processing the base completely smooth, then stirring in ½ to ¾ cup chopped roasted almonds by hand—never by processing them in, which creates grainy texture rather than distinct chunks. You can also create "medium crunch" with ¼ cup additions for subtle texture or "extra crunchy" with 1 cup for prominent chunks. Consider application when choosing: smooth for baking and smoothies, crunchy for toast and apples, either for eating by the spoonful.
Why Make Almond Coconut Butter? (Benefits of Homemade Almond Coconut Butter)
Making almond coconut butter at home offers compelling advantages over purchasing commercial varieties, spanning health benefits, cost savings, and creative control. While store-bought options provide convenience, homemade versions deliver superior nutrition, cleaner ingredients, and customizable flavors impossible to find on supermarket shelves. The growing maker movement in food emphasizes understanding and controlling what goes into your body, with homemade nut butters representing an accessible entry point. Economic analysis shows that making nut butters at home can save 40-60% compared to premium commercial brands while using higher-quality ingredients. Beyond financial considerations, the satisfaction of creating luxurious spreads from simple ingredients provides psychological benefits and skill development. Many people report that making their own nut butters increases mindfulness about food choices and inspires broader cooking adventures. This section explores three primary motivation categories: health and nutrition, flavor customization, and economic efficiency. Understanding these benefits helps justify the time investment and equipment requirements. Even if you occasionally buy commercial nut butter for convenience, having homemade versions as your primary option improves overall diet quality and saves money annually. The skills learned through nut butter making also transfer to other DIY food projects like nut milks, energy balls, and granola.
Health Benefits of Almond Coconut Butter
Almond coconut butter delivers impressive nutritional benefits through its combination of almonds' protein and minerals with coconut's medium-chain triglycerides and antioxidants. A 2-tablespoon serving typically provides 6-8 grams of protein, 4-5 grams of fiber, significant vitamin E (antioxidant), magnesium (muscle and nerve function), and healthy monounsaturated fats that support heart health. Research published in the Journal of the American College of Nutrition indicates that regular almond consumption correlates with reduced cardiovascular disease risk and improved cholesterol profiles. The coconut component contributes medium-chain fatty acids (MCTs) that the body metabolizes differently than long-chain fats—MCTs convert quickly to energy rather than storing as body fat, making them popular among athletes and ketogenic dieters. Homemade versions maximize these benefits by eliminating the hydrogenated oils, excess sugars, and preservatives found in commercial products. Store-bought nut butters often contain palm oil (environmental concerns and potential health issues), added sugars (inflammation and blood sugar spikes), and artificial flavors or stabilizers. By controlling ingredients, you avoid these additives while ensuring freshness—commercial nut butters may sit on shelves for months, degrading nutritional quality through oxidation. The combination of almonds and coconut creates complementary amino acid profiles, making the butter a more complete protein source than either ingredient alone. Additionally, the healthy fats enhance absorption of fat-soluble vitamins from other foods eaten with the butter, making it particularly valuable when spread on fruits or whole grain toast.
Flavor Control — Customize Your Almond Coconut Butter Recipe
Complete flavor control represents one of homemade almond coconut butter's greatest advantages, allowing you to create signature varieties perfectly suited to your taste preferences and dietary requirements. Commercial nut butters offer limited flavor options—typically plain or chocolate—with fixed sweetness levels and ingredient ratios that may not align with your preferences. Making your own means you decide whether to emphasize coconut or almonds, how sweet or salty to make it, and which additional flavors to incorporate. Food customization empowerment improves dietary adherence and satisfaction, as people consistently choose foods that match their individual preferences when given control. Want minimal coconut with strong almond focus? Use just ½ cup coconut. Prefer tropical paradise flavor? Increase coconut to 1½ cups and use virgin coconut oil. Hate overly sweet spreads? Skip sweeteners entirely or use just a touch. This customization extends to texture—you control smoothness levels and can create your perfect consistency. Dietary restrictions become non-issues: vegans use maple syrup instead of honey, sugar-free eaters use monk fruit or stevia, and people avoiding certain nuts can experiment with cashew-coconut or other combinations. Seasonal variations keep things interesting: add pumpkin spice in fall, peppermint extract during holidays, or lemon zest in summer. Children can help create custom flavors, increasing their enthusiasm for healthy eating. The ability to adjust salt levels benefits those on sodium-restricted diets, while adding extra protein powder creates athletic recovery fuel. This level of personalization simply doesn't exist in commercial products, where one-size-fits-all formulations dominate.
Cost Savings and Ingredient Quality
Making almond coconut butter at home generates significant cost savings while simultaneously improving ingredient quality—a rare win-win situation in food economics. Premium commercial almond coconut butter typically costs $12-18 per 16-ounce jar, while making the equivalent amount at home costs approximately $5-7, representing 40-60% savings. Even comparing to conventional grocery store nut butters, homemade versions cost 20-30% less while using organic or higher-quality ingredients. Economic analysis of home food production consistently shows that nut butters, broths, and seasonings offer the highest return on time investment. Buying almonds and coconut in bulk from warehouse stores or online suppliers further reduces costs—a 3-pound bag of almonds from Costco costs roughly what 12 ounces of almond butter costs in the same store. The savings compound over time for regular nut butter consumers: families using 2-3 jars monthly save $150-250 annually by making their own. Beyond monetary savings, homemade versions allow you to choose superior ingredients: organic almonds without chemical residues, sustainably sourced coconut supporting fair trade practices, and high-quality coconut oil with beneficial properties. You can also ensure freshness—almonds and coconut you buy have been roasted or dried recently, whereas commercial nut butters may contain nuts processed months earlier. The transparency of knowing exactly what's in your food provides peace of mind worth considering alongside financial benefits. Many people find that making nut butter becomes an enjoyable ritual rather than a chore, adding value beyond pure economics through skill development and creative satisfaction.
Troubleshooting Almond Coconut Butter
Even experienced cooks encounter occasional issues when making almond coconut butter, as the process involves variables like equipment power, ingredient freshness, and environmental factors. Understanding common problems and their solutions prevents frustration and wasted ingredients, transforming potential failures into learning opportunities. Most issues fall into four categories: texture problems (too thick or separated), flavor issues (bitter or burnt taste), processing difficulties (overheating equipment), and storage concerns (rapid spoilage). Food production troubleshooting requires systematic evaluation of ingredients, technique, and equipment to identify root causes rather than just addressing symptoms. This section provides specific diagnostic questions and solutions for each common problem. The key to effective troubleshooting involves changing one variable at a time—if you simultaneously modify multiple factors, you won't know which change solved the problem. Many issues stem from rushing the process or skipping steps like proper cooling or adequate scraping. Others relate to equipment limitations or ingredient quality. By methodically working through these solutions, you'll develop intuition for the process and recognize potential problems before they occur. Keep notes on what works with your specific equipment and ingredients, as slight variations in food processor power or almond variety can require technique adjustments. Most problems have simple fixes that yield successful butter once you understand the underlying cause.
Why Is My Almond Coconut Butter Too Thick?
Excessively thick almond coconut butter stems from insufficient natural oil release, inadequate added oil, or premature processing termination. If your butter won't flow and maintains stiff, paste-like consistency even at room temperature, first try processing longer—continue blending in 2-minute intervals with scraping between, as some batches require 20-25 minutes to release adequate oils. Food processor capacity affects processing time, with smaller machines requiring longer periods to achieve the same consistency as larger processors. If extended processing doesn't help, your almonds may be low in oil content due to age or variety—some almond cultivars naturally contain less oil. The solution involves adding coconut oil: start with 1 tablespoon, process for 30 seconds, assess consistency, then add another tablespoon if needed. Avoid exceeding 3 tablespoons total unless you prefer very fluid butter. Another potential cause is incorrect almond-to-coconut ratio—too much coconut (over 1½ cups per 2 cups almonds) can absorb oils and create thickness. Reduce coconut in your next batch if this seems likely. Environmental factors also play a role: cold kitchens cause oils to solidify, making butter appear thicker than it truly is. Try warming the butter gently by placing the processor bowl in warm water for 5 minutes, then processing again. If thick butter resulted from adding too little coconut oil initially, you can always blend in more oil later—place the butter back in the processor, add oil, and blend until incorporated. For future batches, ensure you're using fresh almonds stored properly (airtight containers in cool locations), as stale nuts don't release oils efficiently.
What to Do If It's Oily or Separated
Oily or separated almond coconut butter occurs when oils fail to emulsify properly with the ground solids, creating two distinct layers with liquid oil pooling on top. This natural phenomenon happens because homemade nut butters lack the emulsifiers and stabilizers found in commercial products, making separation normal to some degree. However, excessive separation indicates problems with technique or storage. Oil separation research in food science shows that particle size consistency and proper emulsification during processing minimize separation in natural nut butters. If separation occurs during initial processing, the issue likely involves adding coconut oil too early—oil added before nuts fully break down can't incorporate properly. The solution: drain off excess oil, then continue processing the remaining paste until smooth before gradually re-adding the drained oil. If butter separates during storage, simply stir thoroughly with a knife or spoon before each use to reincorporate the oils—this takes 30-60 seconds and restores creamy consistency. To minimize storage separation, store butter at room temperature rather than refrigerating (cold temperatures encourage separation), keep it in smaller jars that you'll finish quickly, and reduce added coconut oil in future batches. Processing longer—until the butter reaches very smooth, flowing consistency—also helps, as finer particle size maintains better emulsion. Some separation is inevitable and harmless; if a thin oil layer appears after a week, that's normal. If half the jar is liquid oil, you've added too much oil or under-processed the nuts. You can fix over-oiled butter by mixing in 2-3 tablespoons additional ground almonds or almond meal to absorb excess, then processing until smooth. Store jars upside-down to redistribute oils throughout the butter between uses.
How to Fix a Bitter or Burnt Taste
Bitter or burnt-tasting almond coconut butter results from over-roasted nuts, rancid ingredients, or equipment overheating during processing. Identifying the specific cause helps prevent the problem in future batches, though unfortunately, pronounced bitterness is difficult to fix in finished butter. If almonds were roasted too long or at too high temperature, they develop acrid, burnt flavors that permeate the entire batch. Bitter taste compounds from Maillard reaction byproducts and carbonized sugars become distributed throughout the butter during processing. The Maillard reaction produces desirable flavors at moderate temperatures but creates bitter compounds when excessive heat causes burning. Prevention is key: watch almonds carefully during roasting, remove them when golden brown (before dark brown), and ensure even roasting by shaking the pan frequently. If you suspect burnt nuts caused bitterness, there's no complete fix, but you can mask it somewhat by adding 2-3 tablespoons sweetener (maple syrup or honey), 1 teaspoon vanilla extract, and ¼ teaspoon cinnamon—these strong flavors help cover bitterness. Another common cause is rancid nuts or coconut. Almonds and coconut contain high fat levels that oxidize over time, developing bitter, unpleasant flavors. Always smell ingredients before using—rancid nuts smell like old crayons or paint, not fresh and sweet. Discard questionable ingredients rather than trying to salvage them. Equipment overheating during processing can also create bitterness as friction heat exceeds safe temperatures, causing surface burning on the processor bowl or blades. If you smell burning during processing or notice smoke, stop immediately, let everything cool for 15 minutes, then continue with shorter processing intervals. For mildly bitter butter, try mixing it into smoothies or baked goods where other strong flavors balance the bitterness, rather than eating it plain.
Preventing Overheating During Blending
Equipment overheating during blending ranks among the most common almond coconut butter challenges, potentially damaging your food processor while creating burnt-tasting butter. Most home food processors aren't designed for continuous 15-20 minute operation, making heat management essential for success. Motor overheating occurs when electrical resistance generates excess heat that the motor housing can't dissipate fast enough, potentially warping plastic components or burning out the motor entirely. Professional food processing equipment includes active cooling systems, but home models rely on passive heat dissipation. Prevent overheating through strategic processing intervals: blend for 60-90 seconds, stop, scrape down the bowl, let the motor rest for 30-60 seconds, then repeat. This pattern allows heat dissipation while maintaining progress toward smooth butter. Watch for warning signs: unusually hot motor housing, burning smell, or the processor shutting off automatically (thermal protection). If any occur, immediately stop and let the equipment cool completely—15-20 minutes minimum—before resuming. Some processors handle continuous operation better than others; learn your equipment's limits through experience. High-powered processors (800+ watts) generally tolerate longer run times than smaller models. Room temperature affects overheating risk—processing on hot summer days increases likelihood of problems compared to cool winter kitchens. If your processor consistently overheats, consider making smaller batches (1 cup almonds instead of 2), which process faster with less motor strain. Alternatively, invest in a more powerful food processor or high-speed blender designed for tough tasks. Never force equipment beyond its capabilities, as repairs or replacements cost far more than the savings from homemade butter.
Almond Coconut Butter Recipe Card
Quick Recipe Overview (Prep Time, Ingredients, Steps)
Homemade Almond Coconut Butter Yield: 1½ cups (approximately 24 servings) Prep Time: 10 minutes Roasting Time: 12 minutes Processing Time: 15-20 minutes Total Time: 40 minutes
Ingredients:
- 2 cups raw almonds
- ½ to 1 cup unsweetened shredded coconut
- 1-2 tablespoons coconut oil (melted)
- 1-2 tablespoons maple syrup or honey (optional)
- ¼ teaspoon fine sea salt
- ½ teaspoon vanilla extract (optional)
Quick Steps:
- Roast almonds at 350°F for 10-12 minutes until golden
- Cool completely (15 minutes)
- Process almonds and coconut for 12-18 minutes until smooth
- Add coconut oil, sweetener, and salt
- Adjust texture and taste
- Store in airtight jar for 2-3 weeks (room temp) or 4-6 weeks (refrigerated)
Nutrition (per 2-tablespoon serving): Calories: 180 | Protein: 6g | Fat: 16g | Carbs: 7g | Fiber: 4g | Sugar: 2g
Detailed Instructions and Notes
Detailed Method:
Step 1: Roast Almonds Preheat oven to 350°F (175°C). Spread almonds in a single layer on a rimmed baking sheet. Roast for 10-14 minutes, shaking the pan every 3-4 minutes for even browning. Almonds are ready when golden brown and fragrant. Remove immediately and cool completely before processing—this takes 15-20 minutes. Warm almonds create grainy butter.
Step 2: Process Nuts and Coconut Add cooled almonds and shredded coconut to a food processor. Pulse 10-15 times to break into coarse pieces. Then process continuously, stopping every 45-60 seconds to scrape down the sides. The mixture will progress through stages: powder → clumpy ball → thick paste → flowing butter. This typically takes 12-18 minutes depending on processor power. Be patient—the transformation happens gradually.
Step 3: Add Remaining Ingredients Once butter is smooth and flowing, add melted coconut oil, sweetener of choice, salt, and any optional flavorings. Process for 30-60 seconds until fully incorporated. Taste and adjust: add more sweetener, salt, or oil as needed, processing briefly after each addition.
Step 4: Storage Transfer to an airtight glass jar using a spatula to scrape out every bit. Press down to eliminate air pockets. Store at room temperature for 2-3 weeks or refrigerate for 4-6 weeks. If refrigerated, let sit at room temperature 10 minutes before using, or microwave briefly for easier spreading.
Important Notes:
- Equipment: Requires a food processor with at least 7-cup capacity and 600+ watts. High-speed blenders work but require frequent tamping.
- Processing Time: Varies significantly based on equipment power. Don't rush—proper processing ensures smooth texture.
- Oil Separation: Natural and harmless. Simply stir before using.
- Customization: Adjust coconut amount (½-1½ cups) based on desired coconut flavor intensity.
- Make It Crunchy: Stir in ½ cup chopped roasted almonds after processing for crunchy version.
Troubleshooting:
- Too thick: Add more coconut oil (½ tablespoon at a time) or process longer
- Too thin: Process was likely sufficient; butter firms when cooled
- Grainy: Process longer or add 1 teaspoon oil and blend until smooth
- Separated: Stir thoroughly before use
Printable Almond Coconut Butter Recipe Card
🥥 ALMOND COCONUT BUTTER 🥥
INGREDIENTS: □ 2 cups raw almonds □ ½-1 cup unsweetened shredded coconut □ 1-2 tbsp coconut oil, melted □ 1-2 tbsp maple syrup/honey (optional) □ ¼ tsp fine sea salt □ ½ tsp vanilla extract (optional)
INSTRUCTIONS:
ROAST: 350°F for 10-12 minutes, stir frequently ↓ COOL: 15-20 minutes (completely cool) ↓ PROCESS: 12-18 minutes until smooth, scraping frequently ↓ ADD: Oil, sweetener, salt—blend 30-60 seconds ↓ ADJUST: Taste and modify as desired ↓ STORE: Airtight jar, 2-3 weeks room temp or 4-6 weeks refrigerated
VARIATIONS: 🍫 Chocolate: Add 3-4 tbsp cocoa powder 🔥 Toasted: Toast coconut before processing 🌶️ Crunchy: Stir in ½ cup chopped almonds 🚫 Sugar-Free: Omit sweetener, use monk fruit
TIME: 40 minutes total | YIELD: 1½ cups | NUTRITION (2 tbsp): 180 cal, 6g protein, 16g fat
Frequently Asked Questions About Almond Coconut Butter Recipe
How Do You Make Almond Coconut Butter?
Making almond coconut butter involves roasting almonds until golden (10-12 minutes at 350°F), cooling them completely, then processing with unsweetened shredded coconut in a food processor for 12-18 minutes until smooth and creamy. The process transforms whole nuts through distinct stages—from coarse meal to clumpy ball to thick paste, finally becoming flowing butter as natural oils release. After achieving smooth consistency, add coconut oil for desired texture, sweetener for taste balance, and sea salt for flavor enhancement, processing briefly to incorporate. The key to success lies in patience during processing, allowing sufficient time for nuts to break down completely and release their oils naturally. Stop every 45-60 seconds to scrape down the processor bowl sides, ensuring all ingredients get processed evenly rather than riding up the walls. Most batches require 15-20 minutes of total processing time, though powerful processors work faster. Store finished butter in airtight glass jars at room temperature for 2-3 weeks or refrigerate for 4-6 weeks. The beauty of homemade almond coconut butter is complete control over ingredients and customization—adjust sweetness, coconut intensity, and texture to match your exact preferences.
Should You Roast Almonds Before Making Almond Coconut Butter?
Roasting almonds before making almond coconut butter is highly recommended but not absolutely required, with roasted almonds producing superior flavor and easier processing compared to raw almonds. Roasting develops complex, toasted flavors through Maillard reactions and caramelization that complement coconut's sweetness beautifully, while also releasing natural oils more readily for faster processing and smoother texture. Studies on nut processing show that roasting reduces moisture content and alters cell structure, making oils more accessible during grinding. Raw almonds create milder, subtler butter with delicate flavor that some people prefer, particularly when adding strong flavors like chocolate or cinnamon that might clash with roasted notes. However, raw almonds require significantly longer processing time—potentially 25-30 minutes compared to 12-18 minutes for roasted—and may never achieve quite as smooth a consistency. The extended processing time also increases equipment overheating risk. For optimal results, roast almonds yourself at 350°F for 10-12 minutes rather than buying pre-roasted almonds, as this ensures freshness and allows you to control roasting level. Watch carefully and remove almonds when golden brown and fragrant, before they darken to deep brown or burn. Cool completely before processing—this crucial step prevents grainy texture and ensures smooth butter. If you prefer raw almonds for nutritional reasons or taste preference, simply accept longer processing times and potentially thicker final texture, perhaps adding slightly more coconut oil to compensate.
Do You Need to Add Oil to Almond Coconut Butter?
Adding oil to almond coconut butter is optional rather than essential, serving primarily as a texture modifier that creates smoother, more fluid consistency while extending shelf life. Almonds and coconut both contain substantial natural oils that release during processing, providing sufficient fat content for the mixture to become butter-like without additional oil. However, adding 1-2 tablespoons of coconut oil produces silkier, more spreadable butter that flows easily even when refrigerated, while also helping prevent separation during storage. Food science principles indicate that added oils act as emulsifiers in nut butters, helping maintain homogeneous texture by preventing solid and liquid components from separating. The decision whether to add oil depends on personal preference and intended use. For dipping or drizzling applications, added oil creates ideal flowing consistency. For spreading on toast or using in baking, thicker, oil-free butter works excellently. Consider storage method when deciding: room-temperature storage requires less oil, while refrigerated butter benefits from additional oil to maintain spreadability since cold temperatures firm the butter considerably. If making oil-free butter, simply process longer—potentially 20-30 minutes—to extract maximum natural oils from the almonds and coconut, accepting that the final product will be denser and may separate during storage. Start without added oil, assess the consistency after thorough processing, then add coconut oil gradually (½ tablespoon at a time) only if needed. This approach prevents over-oiling while ensuring you achieve your desired texture. Remember that coconut oil solidifies below 76°F, so butter with added coconut oil will firm up in cool environments, while oil-free versions maintain more consistent texture across temperature ranges.
How Long Does Homemade Almond Coconut Butter Last?
Homemade almond coconut butter lasts 2-3 weeks when stored at room temperature in an airtight container or 4-6 weeks when refrigerated, with proper storage techniques significantly impacting shelf life and quality. The actual duration depends on several factors: ingredient freshness, storage conditions, contamination prevention, and whether you added salt (which acts as a natural preservative). Research on nut butter shelf stability shows that homemade versions spoil faster than commercial products due to lack of preservatives and potential exposure to contaminants during home preparation. For room-temperature storage, keep the jar in a cool, dark cupboard away from heat sources like stoves or sunny windows—temperatures above 75°F accelerate oil rancidity. Always use clean, dry utensils when scooping butter to prevent introducing moisture or bacteria that promote spoilage. Refrigeration extends shelf life by slowing oxidation and microbial growth, though it firms the butter considerably; simply remove the jar 10-15 minutes before use or microwave briefly for easier spreading. Some people successfully freeze almond coconut butter for up to 3 months in freezer-safe containers, thawing overnight in the refrigerator before use—freezing halts oxidation and rancidity completely. Monitor for signs of spoilage: off odors (sour, musty, or paint-like), bitter or rancid taste, mold growth (fuzzy spots, usually white or green), or dramatic color changes. If any occur, discard the butter immediately. Natural oil separation is normal and doesn't indicate spoilage—simply stir before using. Using fresh, high-quality ingredients and adding ¼-½ teaspoon salt maximizes shelf life while maintaining optimal flavor throughout the storage period.
Can You Make Almond Coconut Butter in a Blender?
Making almond coconut butter in a blender is possible but significantly more challenging than using a food processor, with success depending heavily on blender type and power level. High-speed blenders like Vitamix, Blendtec, or Ninja Professional (1000+ watts) can successfully make nut butter, though they require constant attention and use of the tamper tool to push ingredients toward the blades. The tall, narrow design of blender containers causes nuts to fly up the sides and avoid blade contact, necessitating frequent tamping and scraping. Kitchen equipment comparisons consistently rank food processors as superior for nut butter production due to their wide, shallow bowl design that promotes better ingredient-to-blade contact. When using a high-speed blender, start with the pulse function to break almonds into smaller pieces, then blend on low speed while using the tamper to continuously push ingredients down. Gradually increase speed as the mixture becomes paste-like, but never step away—the butter requires constant intervention. Make smaller batches in blenders (1-1½ cups almonds maximum) compared to food processor batches, as overfilling makes tamping impossible. The advantage of high-speed blenders is their superior power, which can create silkier texture than most home food processors once you overcome the design challenges. Standard countertop blenders (under 700 watts) cannot make nut butter and will overheat or burn out if you attempt it—the motor simply lacks sufficient power to handle dense nut mixtures. Personal-size blenders like NutriBullet or Magic Bullet also lack the capacity and power for nut butter. If a food processor is unavailable and you own a high-speed blender, attempt almond coconut butter but expect a workout from constant tamping and longer processing time—potentially 20-25 minutes total.
How Do You Make Crunchy Almond Coconut Butter?
Making crunchy almond coconut butter requires a two-step approach: creating smooth butter as the base, then intentionally adding coarsely chopped almonds for textural contrast and enhanced almond flavor. First, prepare smooth almond coconut butter following the standard recipe—process 2 cups roasted almonds with ½-1 cup shredded coconut for 12-18 minutes until completely smooth and flowing. Once the base achieves perfect consistency and you've added oil, sweetener, and salt, remove the butter from the food processor and transfer it to a mixing bowl. Consumer research on nut butter preferences indicates that crunchy versions appeal to those seeking more complex texture experiences and don't simply reflect under-processed butter. Separately chop ¼ to ¾ cup additional roasted almonds using a knife or by pulsing briefly in the food processor (cleaned after making smooth butter)—aim for irregular pieces ranging from small pebble size to half-almond chunks. Avoid uniform pieces, as varied sizes create more interesting texture. Stir the chopped almonds into the smooth butter by hand using a spatula, distributing them evenly without breaking them down. The amount of added chunks determines crunch level: ¼ cup creates subtle texture, ½ cup provides moderate crunch, and ¾ cup makes intensely crunchy butter. For maximum flavor, toast these additional almonds separately at 350°F for 8-10 minutes before chopping—this creates distinct toasted almond bursts throughout the creamy base. Some variations include adding toasted coconut flakes along with almond chunks for double texture contrast. Never attempt to make crunchy butter by simply under-processing the entire batch, as this creates grainy, unpleasant texture rather than smooth butter with satisfying chunks. Store crunchy almond coconut butter at room temperature when possible, as refrigeration can soften the added pieces and reduce crunch satisfaction. The crunchy pieces may settle toward the bottom during storage, so stir gently before each use to redistribute them throughout the butter.
Can You Make Almond Coconut Butter Without Sugar?
Making almond coconut butter without any added sugar is not only possible but results in a nutritious, naturally sweet spread suitable for low-carb, keto, diabetic, and sugar-conscious diets. Simply omit all sweeteners from the recipe, relying entirely on the natural sugars present in almonds and coconut for subtle sweetness. The key to successful sugar-free almond coconut butter lies in maximizing natural sweetness through technique: roast almonds thoroughly (11-13 minutes at 350°F rather than standard 10-12 minutes) to develop maximum caramelization and Maillard reaction products that create perceived sweetness, and use unsweetened shredded coconut which contributes natural coconut sugars without added sweeteners. Nutritional analysis shows that 2 tablespoons of unsweetened almond coconut butter contains only 2-3 grams of naturally occurring sugars compared to 6-8 grams in sweetened versions. The unsweetened version emphasizes the sophisticated, nutty-coconut flavor profile rather than dessert-like sweetness, appealing to adult palates and those preferring savory-sweet balance. If complete sugar elimination feels too austere, consider zero-calorie, low-glycemic sweeteners like monk fruit (½-1 teaspoon powdered) or liquid stevia (2-3 drops), which provide sweetness perception without sugar or carbohydrates. Enhance natural sweetness through aromatics: add ½ teaspoon vanilla extract and ¼ teaspoon cinnamon, as these create sweet aroma that your brain interprets as sweetness even without actual sugar. Increase salt slightly to ⅓-½ teaspoon, as salt enhances perceived sweetness through taste receptor interactions. Sugar-free almond coconut butter works excellently in savory applications: spread on celery with everything bagel seasoning, mixed into grain bowls with roasted vegetables, or dolloped on curries for richness. The absence of added sugar also means the butter doesn't mask or interfere with other flavors when used in cooking, making it a versatile ingredient for both sweet and savory dishes while keeping total sugar content minimal.


