
How to Make a Cheesecake – A Step-by-Step Guide walks you through the process of baking a classic, creamy cheesecake. It covers the essential ingredients like cream cheese, sugar, eggs, vanilla, and heavy cream, and explains why using room-temperature ingredients and careful mixing are important for a smooth batter. You’ll also learn how to prepare and prebake the crust, bake the filling properly, and cool the cheesecake gradually to prevent cracks and achieve the perfect texture. This guide is ideal for both beginners and experienced bakers looking to create a delicious, crack-free cheesecake every time.
- How to Wrap Cheesecake for the Fridge or Freezer
- How to Store Cheesecake Like a Pro
- How to Travel With Cheesecake Without It Melting or Breaking
How to Make a Cheesecake – A Step-by-Step Guide

Ingredients Checklist: Cream Cheese, Sugar, Eggs, Vanilla, Heavy Cream
Before you begin, make sure you have these essential ingredients on hand for a classic cheesecake:
- Cream cheese: Use full-fat, brick-style cream cheese for the best texture and flavor. Soften it to room temperature for easy mixing.
- Granulated sugar: Sweetens the cheesecake without overpowering its natural tang.
- Eggs: Typically large eggs, added one at a time to build structure and richness.
- Vanilla extract: Adds warmth and depth to the flavor profile.
- Heavy cream (or sour cream): Provides moisture and a silky, creamy texture that balances richness.
Having these ingredients prepared and measured will streamline your baking process and ensure consistent results.
Mixing Tips: Avoid Overbeating, Use Room-Temperature Ingredients
Proper mixing is key to a smooth, creamy cheesecake filling:
- Use room-temperature ingredients: Softened cream cheese and eggs blend more easily, preventing lumps.
- Beat cream cheese first: Whip the cream cheese alone until smooth and creamy before adding sugar.
- Add sugar gradually: Mix until fully incorporated, but avoid overmixing.
- Add eggs one at a time: Incorporate each egg slowly on low speed to prevent curdling and excess air bubbles.
- Gently fold in heavy cream or sour cream: This preserves the batter’s smooth texture.
- Avoid overbeating: Overmixing introduces air, which can cause cracks and a spongy texture in the finished cheesecake.
Scrape down the bowl frequently to ensure even mixing without overworking the batter.
Baking Process: Setting Crust, Baking the Filling, Cooling Techniques
Follow these steps for a perfectly baked cheesecake:
- Prepare and prebake the crust: Press a graham cracker or cookie crumb crust mixed with melted butter firmly into a springform pan. Bake at 350°F (175°C) for 8–10 minutes to set and lightly brown the crust. Let it cool before adding the filling.
- Add the filling and bake: Pour the batter over the cooled crust. Bake at 300–325°F (150–160°C) for 50–70 minutes. For best results, bake the cheesecake in a water bath (bain-marie) to ensure even, gentle heat and prevent cracking.
- Check for doneness: The edges should be set and slightly puffed, while the center remains slightly jiggly but not liquid.
- Cool gradually: Turn off the oven and leave the cheesecake inside with the door slightly ajar for about an hour to cool slowly, reducing the risk of cracks.
- Chill thoroughly: Refrigerate the cheesecake for at least 6 hours or overnight to fully set and develop flavor.
Before serving, run a knife around the edges to loosen the cheesecake and carefully remove the springform ring for clean, beautiful slices.
Classic Cheesecake Recipe – The All-Time Favorite

What Defines a Classic Cheesecake?
A classic cheesecake is distinguished by its creamy, dense texture and a slightly tangy flavor that balances richness with subtle acidity. Unlike lighter or mousse-style cheesecakes, the classic version is baked to perfection, resulting in a smooth, velvety filling that holds its shape yet melts in your mouth. Key characteristics include:
- Creamy and dense consistency: Achieved through the use of full-fat cream cheese and careful mixing.
- Slight tanginess: Often from sour cream or a hint of lemon juice, giving the cheesecake depth and brightness.
- Baked crust and filling: Typically a buttery graham cracker crust provides a crisp base that contrasts beautifully with the rich filling.
- Smooth, crack-free surface: A hallmark of a well-made classic cheesecake, indicating proper baking technique and cooling.
This timeless dessert is celebrated for its elegant simplicity and indulgent flavor, making it a perennial favorite for birthdays, holidays, and special occasions.
How to Make Classic New York-Style Cheesecake
New York-style cheesecake is the quintessential classic cheesecake, renowned for its rich, dense texture and tangy flavor profile. Here’s how to master it:
Key Ingredients
- Brick-style full-fat cream cheese: Using the brick form (not spread) ensures the right texture and richness. It should be softened to room temperature for smooth blending.
- Eggs: Provide structure and richness; adding them one at a time helps maintain a smooth batter.
- Granulated sugar: Sweetens without overpowering the tanginess.
- Sour cream: Adds moisture and a subtle tang, contributing to the creamy texture.
- Vanilla extract and lemon juice: Enhance flavor complexity without making the cheesecake taste overtly lemony.
- Graham cracker crust: Made from crushed graham crackers, melted butter, and sugar, this crust is buttery and crisp, complementing the creamy filling.
Baking with a Water Bath (Bain-Marie)
To achieve the ultra-smooth, crack-free texture that defines a classic New York cheesecake, baking it in a water bath is essential:
- The water bath creates a moist, gentle heat environment that prevents the outer edges from cooking too quickly.
- This method reduces the risk of cracks by maintaining even temperature and humidity around the cheesecake.
- Wrap the springform pan tightly with foil to prevent water from seeping in.
- Place the pan in a larger roasting pan filled with hot water about halfway up the sides of the cheesecake pan before baking.
Cooling and Cracking Prevention Tips
- Avoid overmixing: Especially after adding eggs, to prevent incorporating too much air, which causes cracks and deflation.
- Bake at a moderate temperature: Usually around 300°F (150°C) after an initial higher temperature phase to set the crust.
- Do not overbake: The cheesecake should be slightly jiggly in the center when done; it will firm up as it cools.
- Cool gradually: Turn off the oven and leave the cheesecake inside with the door closed for about an hour to prevent sudden temperature changes.
- Chill thoroughly: Refrigerate for at least 6 hours or overnight to allow flavors to meld and texture to set.
- Use room temperature ingredients: This ensures a smooth batter and even baking.
Cheesecake Simple Recipe – Beginner-Friendly & Time-Saving

4-Ingredient No-Bake Cheesecake
For those new to cheesecake or short on time, a 4-ingredient no-bake cheesecake is the perfect solution. This recipe requires minimal ingredients and no oven baking, making it incredibly easy and quick while still delivering a rich, creamy dessert. The basic ingredients include:
- Cream cheese: The key to that classic cheesecake flavor and smooth texture.
- Sweetened condensed milk: Adds sweetness and creaminess without extra sugar.
- Lemon juice or vanilla extract: Provides a subtle tang or aromatic depth to balance the sweetness.
- Whipped topping (such as whipped cream or a non-dairy alternative): Lightens the filling for a smooth, airy finish.
This simple ingredient list means less prep, less mess, and a delicious cheesecake that anyone can make with confidence.
No Springform Pan Needed
One of the biggest challenges for beginners is often the need for specialized bakeware like a springform pan. Luckily, this no-bake cheesecake recipe doesn’t require one. Instead, you can use:
- A regular round cake pan lined with parchment paper for easy removal.
- Individual serving glasses or jars for convenient, portion-controlled desserts.
- A loaf pan or any shallow dish lined or greased well.
This flexibility makes cheesecake accessible to anyone, regardless of the equipment they have on hand.
30-Minute Prep Time – Perfect for Busy Schedules
With just 30 minutes of active prep time, this cheesecake recipe fits perfectly into busy lifestyles. Key factors that save time include:
- Using softened cream cheese to speed up mixing.
- Utilizing store-bought graham cracker crusts or quickly making your own from crushed cookies and melted butter.
- Whipping the topping while the crust chills.
- Eliminating baking altogether, allowing the cheesecake to set in the refrigerator while you focus on other tasks.
This fast preparation combined with minimal cleanup makes it ideal for last-minute gatherings, weeknight treats, or whenever you want a classic dessert without the hassle.
Why Choose No-Bake Cheesecake?
No-bake cheesecakes offer several advantages:
- Minimal ingredients and equipment make it beginner-friendly.
- Light, creamy texture is refreshing and perfect for warmer weather.
- Easy to customize with fruit toppings, chocolate, or flavor extracts.
- Quick chilling process means you can enjoy dessert sooner.
Tips for a Perfect No-Bake Cheesecake
To ensure the best results:
- Chill the cheesecake for at least 4 hours or overnight for firm texture.
- Use full-fat cream cheese for richness and stability.
- Beat cream cheese until smooth to avoid lumps.
- Gently fold in flavorings to maintain a light texture.
Experiment with different crusts like digestive biscuits or Oreo crumbs for variety.
Best Cheesecake Recipe
What Makes the Best Cheesecake?
The best cheesecake combines a rich, creamy texture with a perfectly balanced flavor. It should be dense yet silky smooth, with just the right amount of sweetness and a subtle tang from the cream cheese. A crack-free surface is a hallmark of expert baking, achieved through careful mixing, gentle baking, and gradual cooling. The crust should be tender and buttery, providing a pleasant contrast to the creamy filling without overpowering it. Ultimately, the best cheesecake melts in your mouth and leaves you wanting more.
Key Ingredients You’ll Need
To achieve that perfect cheesecake, focus on high-quality, full-fat ingredients:
- Cream cheese: Use full-fat, brick-style cream cheese softened to room temperature for a smooth, lump-free batter.
- Sugar: Granulated sugar sweetens the filling without overwhelming the tang.
- Eggs: Large eggs at room temperature help bind the batter and provide richness.
- Sour cream or heavy cream: Adds moisture, creaminess, and a slight tang, contributing to the silky texture.
- Vanilla extract: Enhances the overall flavor with a warm, aromatic note.
- Graham cracker crumbs (or cookie crumbs): For a buttery, crisp crust that complements the filling.
Pro Tips for a Smooth and Crack-Free Cheesecake
- Use room-temperature ingredients: This ensures even mixing and prevents lumps.
- Mix carefully: Beat cream cheese until smooth, then add sugar and other ingredients gradually. Add eggs one at a time on low speed, mixing only until just combined to avoid incorporating excess air.
- Avoid overmixing: Too much air causes cracks and a spongy texture.
- Bake in a water bath: Wrapping the pan in foil and placing it in a water bath provides gentle, moist heat, reducing cracking and dryness.
- Don’t overbake: The cheesecake should be slightly jiggly in the center when done; it will firm up as it cools.
- Cool gradually: Leave the cheesecake in the oven with the door slightly open after baking to prevent sudden temperature changes.
- Chill thoroughly: Refrigerate for at least 6 hours or overnight to set the texture and develop flavors.
Optional Toppings to Elevate Your Cheesecake
Enhance your cheesecake with toppings that add flavor, texture, and visual appeal:
- Fresh berries or berry compote: Adds a bright, tart contrast.
- Chocolate ganache or shavings: For a rich, decadent touch.
- Caramel or fruit sauces: Provide sweetness and moisture.
- Whipped cream: Lightens the richness and adds elegance.
- Toasted nuts: Offer crunch and a nutty aroma.
- Citrus zest or lemon curd: Introduce a refreshing tang.
How to Make Classic New York-Style Cheesecake?

Why New York Cheesecake Is Different
New York-style cheesecake stands out for its rich, dense, and creamy texture, achieved by using full-fat cream cheese and baking the cake low and slow. Unlike lighter or fluffier cheesecakes, it has a luxurious mouthfeel and a subtle tang from sour cream or heavy cream. The signature graham cracker crust adds a buttery, slightly crunchy contrast. This style is known for its smooth, crack-free surface and classic, indulgent flavor.
Ingredients for Authentic NY Cheesecake
- Graham cracker crumbs: About 2 cups, mixed with sugar, cinnamon, and melted butter for the crust.
- Full-fat cream cheese: Typically four 8-ounce blocks, softened to room temperature.
- Granulated sugar: Around 1 1/2 cups, for sweetness.
- Cornstarch: 2–3 tablespoons to help stabilize the filling.
- Eggs: 4 whole eggs plus 1 yolk, room temperature, added one at a time.
- Sour cream or heavy cream: About 1 cup, for moisture and creaminess.
- Vanilla extract: 2 teaspoons for flavor depth.
- Fresh lemon juice: Optional, about 2 teaspoons for a subtle tang.
Step 1 – Making the Crust
Combine graham cracker crumbs with sugar, cinnamon, and melted butter until evenly moistened. Press the mixture firmly into the bottom of a 9-inch springform pan, creating an even layer. Bake the crust at 350°F (175°C) for about 8–10 minutes to set and lightly brown it. Let it cool before adding the filling.
Step 2 – Preparing the Filling
Beat the softened cream cheese alone until smooth and creamy, scraping the bowl to avoid lumps. Gradually add sugar and cornstarch, mixing until fully incorporated. Add eggs one at a time on medium speed, mixing just until combined to avoid over-aeration. Stir in sour cream, vanilla extract, and lemon juice gently until smooth.
Step 3 – Baking with or Without a Water Bath
Pour the filling over the cooled crust. For a crack-free finish, place the springform pan wrapped in foil into a larger roasting pan and add hot water halfway up the sides (water bath). Bake at 325°F (160°C) for about 50–60 minutes, until the edges are set but the center still slightly jiggles. If you don’t use a water bath, bake at a slightly lower temperature and watch closely to avoid overbaking.
Step 4 – Cooling and Chilling the Cheesecake
Turn off the oven and leave the cheesecake inside with the door slightly ajar for about an hour to cool gradually, preventing cracks. Remove from the oven and cool completely at room temperature. Then refrigerate for at least 6 hours or overnight to allow the cheesecake to fully set and develop its flavor.
Pro Tips for That Perfect NY Finish
- Use room-temperature ingredients to ensure a smooth batter.
- Scrape the bowl often during mixing to avoid lumps.
- Avoid overmixing to prevent cracks and a dense texture.
- Wrap the pan tightly with foil to prevent water from seeping in during the water bath.
- Do not open the oven door during baking to maintain stable temperature.
- Use a sharp knife dipped in hot water for clean slices.
- Let the cheesecake sit at room temperature for 15–20 minutes before serving for optimal texture.
Cheesecake with Whipped Cream – Light, Fluffy & Delicious
How to Make Stabilized Whipped Cream for Topping
To achieve a whipped cream topping that stays light, fluffy, and holds its shape longer on your cheesecake, it’s essential to stabilize it. Stabilized whipped cream resists weeping and deflating, ensuring your dessert looks fresh and inviting for hours. Here’s how to make it:
- Chill your tools and ingredients: Keep the mixing bowl and beaters cold to help the cream whip faster and hold its structure.
- Use heavy cream with at least 36% fat: This provides the necessary richness and volume.
- Add a stabilizer: Common options include:
- Gelatin: Dissolve a small amount of unflavored gelatin in warm water, cool slightly, and slowly add to the cream as you whip.
- Cream of tartar: A pinch can help stabilize the cream.
- Powdered sugar: Contains cornstarch, which adds slight thickening.
- Commercial stabilizers: Available in baking supply stores for consistent results.
- Whip to medium-stiff peaks: Avoid overwhipping, which can lead to graininess or butter formation.
- Flavor with vanilla extract or other extracts for added depth.
This method ensures your whipped cream topping is not only delicious but also visually appealing and durable.
Decorating Tips for Professional-Looking Finishes
A beautifully decorated cheesecake elevates the entire dessert experience. To achieve a polished, professional look:
- Use a piping bag with decorative tips: Classic star or round tips create elegant borders or rosettes.
- Apply whipped cream evenly: Start from the edges and work inward for balanced coverage.
- Create texture: Use a spatula or the back of a spoon to make gentle swirls or waves.
- Add height and dimension: Pipe tall rosettes or dollops for a dramatic effect.
- Keep it neat: Chill the cheesecake before decorating to help the cream hold its shape and prevent melting.
- Use edible garnishes: Fresh herbs like mint or edible flowers add sophistication.
These simple techniques make your cheesecake look bakery-quality without requiring advanced skills.
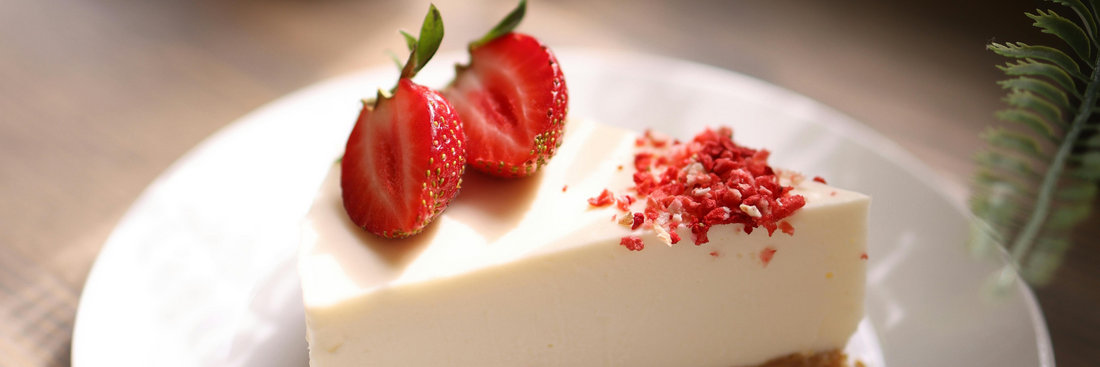
Pairing Toppings: Berries, Chocolate, Nuts
The right toppings complement the creamy richness of cheesecake and add texture, color, and flavor contrast. Popular and delicious options include:
- Fresh berries: Strawberries, blueberries, raspberries, and blackberries provide natural sweetness and a pop of vibrant color.
- Chocolate: Shaved chocolate, curls, or a drizzle of ganache add decadence and richness.
- Nuts: Toasted almonds, pecans, or walnuts contribute crunch and a toasty flavor that balances the smooth filling.
- Additional ideas: Caramel sauce, citrus zest, or a dusting of powdered sugar can also enhance presentation and taste.
Mini Cheesecakes in Muffin Tins or Jars

Benefits: Portion Control, Portable, Great for Parties and Gifts
Mini cheesecakes made in muffin tins or jars offer several distinct advantages that make them increasingly popular:
- Portion control: Individual servings help guests enjoy just the right amount without overindulging, making them ideal for calorie-conscious eaters or those who want to try multiple desserts.
- Portability: Their compact size and sturdy containers make mini cheesecakes easy to transport, perfect for picnics, potlucks, or packed lunches.
- Party-friendly: These bite-sized treats are crowd-pleasers that simplify serving at gatherings, eliminating the need for slicing and reducing mess.
- Gift-ready: Presented in attractive jars or tins, mini cheesecakes become charming, personalized gifts that feel thoughtful and homemade.
This format combines convenience with elegance, making cheesecake more versatile and accessible for a variety of occasions.
Step-by-Step: Muffin Tin Version & Jar Version
Muffin Tin Mini Cheesecakes:
- Prepare the crust: Crush graham crackers or cookies and mix with melted butter. Press the mixture firmly into the bottom of each muffin cup.
- Make the filling: Blend cream cheese, sugar, eggs, and flavorings until smooth.
- Fill the cups: Pour the filling over the crust in each muffin cup, filling about 3/4 full.
- Bake: Place the muffin tin in the oven and bake at a moderate temperature (around 325°F/160°C) for 18–22 minutes until the centers are set but slightly jiggly.
- Cool and chill: Let cool to room temperature, then refrigerate for several hours or overnight.
- Remove and serve: Run a knife around the edges to loosen, then gently remove each mini cheesecake for serving.
Jar Mini Cheesecakes:
- Prepare the crust: Layer crushed cookies or graham crackers mixed with butter at the bottom of each jar, pressing lightly.
- Add the filling: Spoon the cheesecake filling over the crust, leaving space at the top for toppings.
- Chill: Seal the jars and refrigerate for at least 4 hours or overnight to set.
- Decorate and serve: Before serving, add whipped cream, fresh fruit, or other toppings directly in the jar for a beautiful presentation.
Both methods are straightforward and adaptable, allowing for creative variations in crusts, fillings, and toppings.
Eco-Packaging Ideas: Serve or Gift in Sustainable Jars or Kraft Paper Containers
Sustainability is increasingly important when serving or gifting desserts, and mini cheesecakes lend themselves well to eco-friendly packaging options:
- Glass jars: Reusable and recyclable, glass jars are perfect for gifting and can be repurposed by recipients, reducing waste.
- Kraft paper containers: Biodegradable and compostable, these containers add a rustic charm and are ideal for takeaway or gifting.
- Recycled boxes: Provide sturdy protection for transporting multiple mini cheesecakes and can be decorated with natural twine or eco-friendly labels.
- Natural fillers: Use shredded paper or dried flower petals inside packaging to cushion and beautify the presentation without plastic.
The right eco-friendly packaging preserves quality, reduces waste, and supports a more sustainable food system. Whether you’re a small food business or a passionate cake lover, KimEcopak is here to help. Have questions? Reach out and we’ll recommend the best eco-packaging solutions for your cake within 24 hours.
How to Make Crust for Cheesecake
Options: Graham Cracker Crust, Cookie Crust, No-Bake Alternatives
When it comes to cheesecake crusts, there are several popular options to suit different tastes and preparation styles:
- Graham cracker crust: The classic choice, made by combining finely crushed graham crackers with sugar and melted butter. It provides a slightly sweet, buttery, and crisp base that pairs perfectly with creamy cheesecake filling.
- Cookie crust: For a richer or more flavorful crust, crushed cookies such as Oreos, vanilla wafers, or digestive biscuits can be used. These add unique textures and tastes, allowing for creative variations.
- No-bake crusts: Ideal for quick or no-bake cheesecakes, these crusts combine crushed cookies or crackers with melted butter and are pressed firmly into the pan without baking. They set by chilling, offering convenience without sacrificing flavor.
Binding with Butter and Pressing Evenly
Butter plays a crucial role in holding the crust together and giving it structure:
- Melted butter: Mix thoroughly with the crushed crumbs to evenly coat and bind them.
- Press firmly: Use the bottom of a measuring cup or glass to press the mixture evenly and tightly into the pan, ensuring it holds together well during baking and slicing.
- Thickness: Aim for a uniform layer about 1/4 inch thick; pressing too hard can make the crust dense and difficult to cut, while too loose will cause crumbling.
Pre-Baking vs. Chill-Only Crusts
The choice between prebaking and chilling depends on the type of cheesecake and crust:
- Prebaking: Recommended for baked cheesecakes, prebaking the crust at 350°F (175°C) for 8–10 minutes helps set and lightly brown it. This enhances flavor and prevents sogginess from the filling.
- Chill-only crusts: For no-bake cheesecakes, chilling the crust in the refrigerator for at least 30 minutes is sufficient to firm it up. This keeps the crust tender and buttery without baking.
- Partial prebaking: Some crusts, such as those with nuts or coconut, benefit from a short prebake to toast ingredients lightly without fully baking.
Conclusion:
Mastering how to make a cheesecake requires attention to detail from selecting quality ingredients like cream cheese and heavy cream to mixing gently and baking with care. Following this step-by-step guide ensures a smooth, crack-free cheesecake with a tender crust and rich, creamy filling. Whether you choose to bake a classic New York-style cheesecake or a quick no-bake version, these tips will help you create a dessert that’s both visually stunning and irresistibly delicious every time. Enjoy serving your perfect cheesecake with your favorite toppings and share this timeless treat with family and friends.


