
This comprehensive guide is designed for BBQ enthusiasts who want to take their rib-grilling skills to the next level, experienced grill masters who want to hone their techniques, home cooks who aspire to restaurant quality, and environmentally conscious grillers who prefer a sustainable cooking method. Whether you’re using a traditional smoker or adapting the technique to your home grill, the principles remain consistent.
By the end of this guide, you’ll have mastered the art of wrapping ribs in butcher paper, understood the key differences between a smoker and a grill, and know exactly how to choose the best butcher paper for your specific needs. You’ll also understand why this method has become the go-to choice for many competitive BBQ teams and high-end restaurants.
- Link to register to receive Kimecpak's best wholesale Butcher Paper for Ribs price for first time customers
-
Your Complete Guide to Ordering Custom Logo Butcher Paper in Bulk
Types of Butcher Paper for Ribs
Peach (Pink) Butcher Paper
Pink butcher paper, also known as peach paper, is the gold standard for BBQ applications. The natural color of the paper comes from unbleached kraft pulp, and is specially designed to be both heat-resistant and breathable. The paper allows moisture to escape slowly, while maintaining enough moisture around the meat to prevent drying out. This balance is important for creating the perfect crust while still retaining moisture inside.

White Butcher Paper
White butcher paper undergoes a bleaching process for a cleaner appearance. While it performs similarly to pink paper, many barbecue chefs prefer pink paper because it is slightly more breathable and has not been chemically treated. White paper is also suitable for wrapping ribs, but is not the first choice of true BBQ enthusiasts.

Unwaxed vs Waxed Paper
This distinction is important for safety and performance. Unwaxed butcher paper is essential for high-heat cooking applications such as smoking ribs. It can withstand temperatures up to 420°F (220°C) without degrading or releasing harmful chemicals. Waxed paper, on the other hand, will melt under high temperatures and can contaminate your food with paraffin wax.
What is Wax Paper? Is Wax Paper The Same As Parchment Paper?
Choosing food-safe, environmentally friendly food wrapping paper aligns with sustainable cooking methods and ensures you don’t introduce unwanted chemicals into your cooking. The paper is biodegradable and made from renewable resources, making it an environmentally friendly choice for the conscious griller.
The striking pink butcher paper is ideal for ribs due to its unique properties. Paper is naturally breathable, allowing excess moisture to escape while still retaining enough moisture to keep the meat from drying out. It is also smoke-absorbent, meaning the delicate smoky flavor can continue to develop even after wrapping. Most importantly, paper helps promote crust development by preventing evaporation that often occurs with non-breathable wrapping methods.

Why Wrap Ribs in Butcher Paper?
The decision to wrap ribs in butcher paper offers distinct advantages over the unwrapped method and the traditional foil method. Understanding these benefits helps explain why this technique is so popular among both professional and home cooks.
Butcher Paper vs Foil: Which Is Better?
Butcher paper retains moisture better than not wrapping ribs throughout the cooking process. When ribs are left unwrapped for long periods of time, the outer crust can become dry and tough even though the meat inside is perfectly cooked. Butcher paper creates a micro-environment around the ribs, maintaining optimal moisture.
Unlike foil, which creates a completely airtight seal and can lead to evaporation, butcher paper allows moisture to escape in a controlled manner. This means you retain the juiciness of the ribs without losing the crispy crust that is the highlight of the ribs. Foil also allows the smoke to continue to penetrate the meat, which foil cannot do.
Butcher paper is always better than foil. Foil creates a moist environment that makes the crust soggy and tough. Butcher paper preserves the texture of the crust while adding moisture to the meat underneath.

Disadvantages to Consider
Butcher paper will take longer to cook than aluminum foil. The breathable nature of the paper makes it less efficient at transferring heat, so you need to factor in additional cooking time. This can be tricky when you’re working with limited time.
Monitoring the internal temperature is a little trickier with butcher paper. You’ll need to carefully check through the paper, and the extra paper can make it harder to get an accurate temperature reading. Some chefs like to open the paper briefly to check the temperature, then rewrap it.
Comparing Smoke Flavor
Smoky flavor differs significantly between butcher paper and foil. Butcher paper allows smoke to continue to permeate the meat throughout the cooking process, creating a more pronounced smoke flavor. Foil creates a barrier that prevents additional smoke from being absorbed after it has been wrapped.
This difference is especially noticeable with longer cooking times, where the wrapping stage takes up a significant portion of the total cooking time. Ribs cooked in butcher paper retain a more balanced, less overpowering smoke flavor, while ribs wrapped in foil can sometimes taste under-smoked.
These properties make butcher paper particularly valuable for smoking applications where creating smoke flavor is the primary goal. The paper allows you to maintain the smoking process while addressing the challenges of extended cooking times.
When and How to Wrap Ribs in Butcher Paper
When Should You Wrap?
Proper timing is important for optimal results. The most reliable indicator is bark development, not strict adherence to time. After 2-3 hours in the smoker, check to see if the bark is well formed. The surface should be a deep reddish brown and feel firm to the touch. When you pick up the ribs, they should hold their shape without becoming pliable.
Temperature is another reliable indicator of when to wrap meat. When the internal temperature reaches 160-165°F (71-74°C), the meat has typically developed enough bark to wrap. At this point, the collagen begins to break down more rapidly, and wrapping the meat will help speed up the tenderization process.
The popular 3-2-1 method uses wrapping as the second step. This method provides a structured timeline: 3 hours unwrapped to develop the crust, 2 hours wrapped to keep it moist, and 1 hour unwrapped to finish. While this method works well for many types of ribs, it should be adjusted based on your specific ribs and cooking conditions.
How to Wrap Ribs in Butcher Paper (Step-by-Step Guide)

Tools Needed
Prepare your ingredients before you begin the wrapping process. You will need high-quality butcher paper, heat-resistant gloves, and long tongs to handle the hot ribs. Having everything ready will help you avoid fumbling with hot meat and reduce heat loss from the smoker.
Wrapping Procedure
Start by cutting a piece of butcher paper about 45cm (18 inches) long for a full rib. Place the paper on a clean work surface, shiny side up. This will prevent the paper from sticking to the meat.
In most cases, place the ribs meat-side down on the paper. This will protect the rib casing from direct contact with the juices that accumulate. However, some grillers prefer to place the rib casing meat-side up to preserve the rib casing texture - experiment to find your preference.
Before wrapping, consider adding moisture-enhancing ingredients. A light drizzle of honey will add a subtle sweetness and help retain moisture. A pat of butter will add richness, while apple juice or cider vinegar can add a complex flavor. These ingredients are optional but can greatly enhance the finished product.
Start wrapping by folding the paper over the ribs, creating an airtight seal. Start with the long edges, then fold the short edges in. The goal is to create a tight wrap that won’t open during cooking, while still allowing the paper to breathe.
Work quickly but carefully to minimize heat loss. The entire process takes less than two minutes. Practice this technique with cold ribs to build muscle memory before trying it with hot meat.
These wrapping techniques work well with both smoked and oven-roasted ribs. The principles remain the same regardless of your heat source, although oven-roasting may require a slight temperature adjustment.
3-2-1 Method Using Butcher Paper For Ribs
The 3-2-1 method is a systematic method of cooking ribs that breaks the process down into three distinct phases. This technique provides structure for novice cooks, while also allowing more experienced cooks the flexibility to adjust based on preferences and specific meats.

Phase Analysis
The first phase involves 3 hours of unwrapped smoking at 225°F (107°C). During this phase, the ribs develop their signature crust and absorb maximum smoke flavor. The meat becomes firm, and the surface turns a deep reddish brown. This phase is important for creating a foundation for flavor and texture.
The second phase involves 2 hours of cooking in foil. This is where butcher paper comes into its own over foil. The paper retains moisture but still allows smoke to continue to penetrate. The ribs become tender during this stage as the collagen breaks down and turns into gelatin. The controlled environment prevents the meat from drying out during the long cooking time.
The final stage involves 1 hour of uncovered cooking to firm up the casing and baste with sauce if desired. This stage allows surface moisture to evaporate, while also creating the final texture of the casing. Some professional chefs use this time to baste the ribs with sauce, creating layers of flavor.
Adjusting for Different Cuts
Baby ribs need to be adjusted to the traditional 3-2-1 method. These smaller, more tender cuts benefit from the 2-2-1 method: 2 hours unwrapped, 2 hours wrapped, and 1 hour unwrapped. The shortened initial stage helps avoid overcooking while still allowing the crust to develop properly.
St. Louis-style ribs and baby back ribs respond well to the traditional 3-2-1 cooking method, although cooking times can vary based on thickness and personal preference. Some chefs prefer the 3-1-1 method for these cuts, reducing the wrapping time to avoid overcooking.
Stall Management
The wrap phase helps control the dreaded stall - the stage where the internal temperature stabilizes at 160-170°F (71-77°C). During the stall phase, evaporative cooling balances the heat input, allowing the temperature to remain stable for hours. Butcher paper reduces evaporation while maintaining air permeability, allowing meat to move through the stall more efficiently than unwrapped cooking.
This technique is especially effective for smoking applications that require consistent temperature and smoke output. This structured approach helps predict cooking times and manage fuel consumption.
Tips for Tender, Juicy Ribs
Achieving consistently great results requires attention to detail, not just wrapping technique. These pro tips will address common challenges and help take your rib-grinding skills to the next level.
Misting Technique
Use a proper misting schedule during the unwrapping stage. A mixture of apple cider vinegar and apple juice makes an effective misting spray that promotes bark development while adding subtle flavor. Mist every 45-60 minutes in the early stages, but avoid over-spraying as this can wash away the seasoning and slow the bark formation.
The acidity in the vinegar helps break down tough fibers, while the sugars in the juice contribute to the color and flavor of the bark. Some professional chefs add a small amount of Worcestershire sauce to the sauce to add richness to the ribs. Stop spraying after rolling the ribs to avoid affecting the effectiveness of the blotting paper.
Monitor the Temperature
The goal is to reach an internal temperature of 200°F (93°C) before removing the ribs from the pot. However, temperature alone does not tell the whole story. The meat should be tender to the touch, with minimal resistance. Properly cooked ribs should be slightly tender to the touch but not completely broken.
Use a reliable instant-read thermometer and insert the probe between the bones for an accurate reading. The probe should slide into the meat as if it were going through soft butter. If it resists, continue cooking regardless of the temperature reading.
Resting Time
Let the ribs rest for 10-15 minutes after removing them from the pot. This resting time helps the juices distribute evenly throughout the meat, preventing them from running out when slicing. Keep the ribs covered while resting to maintain heat and moisture.
Some grillers like to remove the crust during the aging process to prevent the crust from becoming soft, while others leave the crust on to retain maximum juiciness. Experiment to find your preference, but never skip the aging process altogether.
Slicing Technique
Cut the ribs perpendicular to the bone, using a sharp knife to avoid tearing the meat. A clean cut will help preserve the crust and make the ribs look more appealing. For St. Louis ribs, cut between the bones. For baby back ribs, you can cut away from the bone for a larger portion.
How Butcher Paper Affects the Texture of the Ribs and Casing
The choice of wrapping material has a significant impact on the final texture and appearance of the ribs. Understanding how butcher paper affects these characteristics helps explain why it has become a favorite method for many BBQ enthusiasts.

Preserving the bark
The breathable nature of butcher paper helps prevent excessive evaporation that often occurs when wrapping ribs in foil. When ribs are wrapped in foil, the moisture that accumulates creates a moist environment that softens the casing, making the ribs tough and unappealing. The paper allows excess moisture to escape while maintaining enough moisture to prevent drying out.
The result is a bark that retains a crisp texture while developing a more complex, rich flavor. The paper also allows the Maillard reaction to continue throughout the wrapping process, contributing to the color and flavor of the bark. This ongoing chemical reaction creates compounds that create the rich, delicious flavor that makes the bark so appealing.
Texture Balance
Butcher paper creates the perfect balance between moisture retention and texture retention. Ribs retain their structure while remaining tender enough to bite into. This balance is especially important for BBQ competitions, where judges evaluate both tenderness and texture.
The paper prevents the meat from becoming soggy, a common problem with overwrapping or oversteaming. Instead, the ribs separate neatly from the bone while still maintaining a firm texture when held. This texture is often described as having the perfect “juiciness” – tender but not mushy.
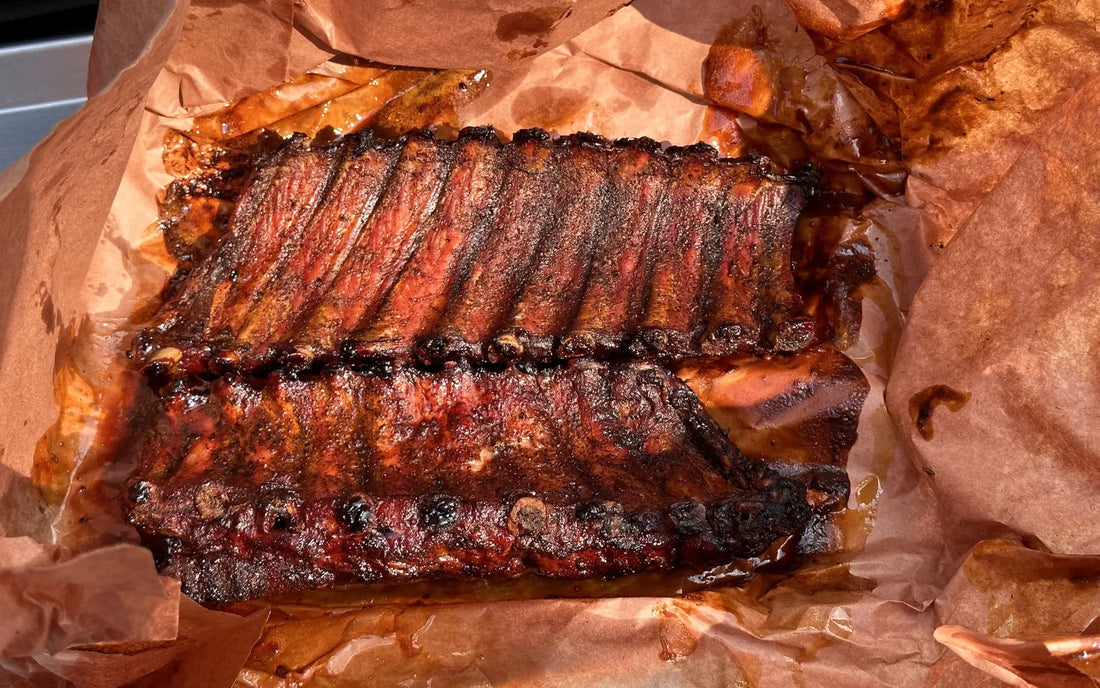
Visual appeal
Ribs wrapped in butcher paper are more visually appealing than other wrapping methods. The paper highlights the ribs’ characteristic reddish-brown color, making an impression on both judges and diners. The rib skin retains its natural texture, without being as smooth and shiny as ribs wrapped in foil.
The color continues to develop during the wrapping stage because the paper does not completely block the airflow. This allows oxidation and additional Maillard reactions to occur, deepening the color and complexity of the bark. The final product has a dark, rich appearance, signaling a well-cooked BBQ to both judges and customers.
Professional chefs often comment that ribs wrapped in paper often look better and present more appealingly than other cooking methods. The improved color and texture make the ribs stand out more, which is increasingly important in the growing social media-driven food culture.
The paper also prevents the color bleeding that often occurs when ribs are cooked unwrapped, where some areas can be darker than others due to uneven heat distribution. The controlled environment created by the paper promotes more even color development, while still preserving the natural nuances that are characteristic of artisanal BBQ.
These visual and textural improvements aren’t just aesthetic – they directly relate to flavor development and the overall eating experience. The improved crust provides more surface area for flavor compounds, while the improved texture makes each bite more delicious.
Butcher Paper, Foil, or No Wrap: Which is Better?
When it comes to smoking ribs, the wrapping method you choose can make or break your BBQ experience. Each method has its own advantages and challenges that any grilling expert should be aware of.
| Wrapping Method | Pros | Cons |
|---|---|---|
| Butcher Paper | Best bark + retains moisture well | Longer cook time, slightly softer meat |
| Foil | Very moist, faster cooking | Softer bark, less smoky flavor |
| No Wrap | Super crispy bark | Higher risk of drying out |
After years of experimenting with different wrapping methods, I've found that butcher paper always strikes the best balance. The paper allows the meat to "breathe" while protecting it from drying out, creating the perfect balance between tenderness and crustiness.
The foil method, often called the "Texas Crutch," speeds up cooking time significantly. However, the steam trapped inside creates a braising effect that softens the bark you've worked so hard to develop. While the meat becomes incredibly tender, you sacrifice that satisfying texture contrast that makes great ribs memorable.
Going without any wrap produces the most intense bark, but it requires constant attention and perfect timing. One miscalculation can leave you with dried-out meat that no amount of sauce can save.
For most home cooks, butcher paper strikes the ideal balance. It protects your ribs while preserving the bark quality that separates good ribs from great ones.

Best Butcher Paper for Ribs – How to Choose
Selecting the right butcher paper is crucial for achieving professional-quality results. Not all papers are created equal, and using the wrong type can compromise your entire cook.
Essential Qualities of the Best Butcher Paper for Ribs
FDA Food-Grade Certification
This isn't negotiable. Your butcher paper must be certified for direct food contact. Non-food-grade papers can contain harmful chemicals that transfer to your meat during the long cooking process.
Unwaxed Construction
Waxed papers melt at smoking temperatures, creating an unpleasant taste and potentially harmful fumes. Always verify that your paper is completely unwaxed before use.
Breathable Material
The paper should allow moisture to escape gradually while preventing rapid dehydration. This breathability is what gives butcher paper its advantage over foil.
Durability and Size
Look for paper that's at least 18 inches wide to accommodate full racks of ribs. The material should be strong enough to wrap tightly without tearing during handling.
Why Peach/Pink Butcher Paper Is Preferred Over White
The color difference isn't just aesthetic. Peach or pink butcher paper undergoes less processing than white paper, making it more suitable for smoking applications. The natural color indicates that fewer chemicals were used in production, and it typically handles high temperatures better than bleached white alternatives.
Pink paper also has a slightly different texture that seems to adhere better to meat surfaces, creating a more secure wrap that won't come loose during the cooking process.
Where to Buy Quality Butcher Paper
- Kimecopak.ca - Specializes in food-grade packaging materials
- Local BBQ suppliers - Often carry restaurant-quality options
- Amazon - Convenient but verify food-grade certification
- Restaurant supply stores - Usually offer bulk quantities at better prices
Beginner's Guide: Smoking or Baking Ribs with Butcher Paper
Getting started with butcher paper ribs doesn't require advanced techniques, but following the proper sequence ensures consistent results every time.
Step-by-Step Process
1. Trim Ribs
Remove the membrane from the back of the ribs and trim excess fat. Leave some fat for flavor, but remove thick sections that won't render properly.
2. Apply Dry Rub
Season generously with your favorite rub at least 30 minutes before cooking. For deeper flavor penetration, apply the rub the night before and refrigerate.
3. Smoke Unwrapped
Start cooking at 225-250°F without any wrapping. This initial phase develops the bark and allows smoke to penetrate the meat. Plan for 3-4 hours during this stage.
4. Wrap with Paper
When the internal temperature reaches 160-165°F, wrap the ribs in butcher paper. This typically happens after 3-4 hours of cooking.
5. Finish Unwrapped or Sauced
Continue cooking wrapped until the internal temperature reaches 195-203°F. If using sauce, unwrap for the final 30 minutes to set the glaze.
6. Rest & Slice
Let the ribs rest for 15-20 minutes before slicing. This allows juices to redistribute throughout the meat.
Butcher Paper Ribs in the Oven
Don't have a smoker? You can still achieve excellent results using butcher paper in your oven. Set the temperature to 275°F and follow the same wrapping process. While you won't get the same smoke flavor, the butcher paper will help maintain moisture and develop a decent bark.
Add liquid smoke to your rub or spritz the ribs with a mixture of apple juice and liquid smoke before wrapping to simulate some of that outdoor flavor.
Temperature and Timing Guidelines
- Temperature: Maintain 225-250°F throughout the cook
- Total time: 4-6 hours depending on rib thickness
- Wrap point: Internal temperature of 160-165°F
- Finish point: Internal temperature of 195-203°F
Advanced Tips from the Pitmasters
Professional pit masters have developed techniques over decades that can elevate your butcher paper ribs from good to exceptional.
Texas-Style Butcher Paper Ribs
True Texas-style ribs emphasize deep smoke penetration and rich bark development. The key is patience during the initial unwrapped phase. Many pitmasters extend this period to 4-5 hours, allowing the smoke to work its magic before wrapping.
The wrap itself becomes a tool for controlling the final texture. Some Texas pitmasters actually prefer a slightly longer wrapped phase to ensure the connective tissue breaks down completely while maintaining bark integrity.
Enriching the Wrap
Adding small amounts of lard or bone broth inside the butcher paper wrap creates an incredibly rich flavor profile. Use about 2 tablespoons of lard or 1/4 cup of warm bone broth per rack of ribs.
This technique mimics the fat rendering that occurs naturally but adds extra richness that penetrates the meat during the wrapped phase. Be careful not to add too much liquid, as this can make the paper soggy and difficult to handle.
The Pre-Wrap Spritz
Just before wrapping, lightly spritz the ribs with apple juice, beer, or a mixture of both. This moisture helps the butcher paper conform to the meat surface and prevents it from drying out during the wrapped phase.
The spritz also helps keep the paper pliable, making it easier to create a tight seal that won't come loose during handling.
Conquering the Stall
The stall zone (when internal temperature plateaus around 160°F) can be frustrating, but butcher paper helps push through this phase more efficiently than cooking unwrapped. The paper retains just enough moisture to prevent surface cooling while allowing continued temperature rise.
Some pitmasters intentionally time their wrap to coincide with the stall, using the paper as a tool to maintain momentum rather than simply protect the meat.
FAQ – Butcher Paper for Ribs
Can you use any butcher paper for smoking ribs?
No, only food-grade, unwaxed butcher paper is safe for smoking. Craft paper or waxed paper can release harmful chemicals at high temperatures.
Is white butcher paper okay?
While white butcher paper can work if it's food-grade and unwaxed, pink/peach paper is generally preferred for its superior heat resistance and chemical-free processing.
Is butcher paper safe?
Yes, when you use FDA-approved, food-safe, unwaxed butcher paper. Always verify these certifications before purchasing.
What internal temperature should I wrap at?
Wrap ribs when they reach an internal temperature of 160-165°F. This usually occurs after 3-4 hours of cooking.
What internal temperature should I finish at?
Ribs are done when they reach an internal temperature of 195-203°F. The meat should pull back from the bones and feel tender when probed.
Can you smoke ribs without wrapping?
Absolutely. Unwrapped ribs develop superior bark but require more attention to prevent drying out. This method works best for experienced cooks who can monitor the process closely.
Conclusion
Butcher paper represents the perfect compromise in the ongoing debate between bark development and moisture retention. It allows serious barbecue enthusiasts to achieve professional-quality results without the drawbacks of foil wrapping or the risks of cooking completely unwrapped.
The key to mastering butcher paper ribs lies in understanding timing, temperature control, and paper selection. With practice, you'll develop an intuitive sense for when to wrap and how to adjust your technique based on the specific conditions of each cook.
Don't be afraid to experiment with different wrapping styles and timing. Every smoker behaves differently, and what works perfectly for one setup might need adjustment for another. The journey of discovering your ideal technique is part of what makes barbecue such a rewarding pursuit.
Ready to take your ribs to the next level? Check out the eco-friendly butcher paper options available at kimecopak.ca and start your journey to masterful results. Your taste buds will thank you for switching to butcher paper.


