
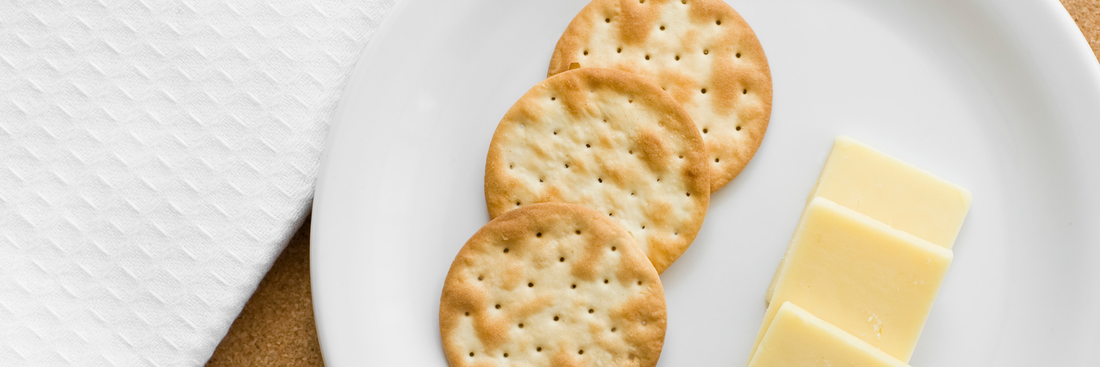
If you've ever wondered whether making crackers at home is worth the effort, let me assure you: these cheese rice crackers will convert you immediately. With their delicate crunch, intense cheese flavor, and endless customization possibilities, they're everything store-bought crackers aspire to be but never quite achieve. This straightforward recipe takes less than half an hour from start to finish, and most of that time is hands-off baking. You'll use rice flour to create a lighter texture that's naturally gluten-free friendly, combine it with your favorite cheese, and season it however your heart desires. Whether you're meal-prepping snacks for the week, preparing appetizers for a party, or just craving something crunchy and satisfying, these homemade cheese rice crackers deliver every single time.
Why Make Homemade Cheese Rice Crackers?
Once you've tasted the difference between homemade and store-bought crackers, there's really no going back. When you make cheese rice crackers at home, you're in complete control of every ingredient that goes into them. This means no mysterious preservatives, artificial flavors, or stabilizers that you can't pronounce. You know exactly what your family is eating, which brings real peace of mind. Beyond the health benefits, homemade rice crackers are surprisingly cost-effective. A single batch made with basic pantry staples costs less than premium specialty crackers from the store, yet delivers superior flavor and freshness.
The customization factor alone makes this recipe worth trying. Love extra sharp cheddar? Use it. Want to add rosemary and garlic? Go ahead. Need a completely gluten-free snack? Simply choose certified gluten-free rice flour. To understand the health implications and find more recipes, check out Are Gluten Free Crackers Healthy? Nutrition, Recipes & Best Brands. Store-bought crackers can't compete with this level of personalization.
Essential Ingredients for Cheese Rice Crackers
The beauty of this cheese rice crackers recipe lies in its simplicity. You don't need a long shopping list or hard-to-find specialty items. The foundation starts with rice flour, which creates that distinctive light, crispy texture that makes these crackers so addictive. You can use white rice flour for a milder flavor and lighter color, or brown rice flour for a nuttier taste and more nutritional value. Both work beautifully, so choose based on your preference. For the cheese component, sharp cheddar is the classic choice because its bold flavor really shines through after baking. The cheese should be finely grated so it incorporates smoothly into the dough and creates an even distribution throughout each cracker.
Butter adds richness and helps bind the ingredients together while contributing to that melt-in-your-mouth texture. If you're avoiding dairy butter, high-quality vegan butter works as a substitute, though the flavor will be slightly different. Salt is crucial for bringing out all the flavors, and you'll want to be generous here since baking tends to mute seasonings slightly. Cold water brings the dough together to the right consistency. Add it gradually so you can stop at the perfect point where the dough holds together without being sticky.
Optional Add-Ins and Flavor Variations
This is where your creativity can really shine. Fresh or dried herbs transform these crackers from simple to sophisticated. Rosemary and thyme pair beautifully with sharp cheddar, creating an earthy, aromatic cracker that's perfect alongside soups or salads. Italian seasoning blend offers a versatile option that appeals to most palates. For comprehensive ideas on what works best with crackers, both sweet and savory, check out What to Eat with Crackers: Complete Guide to Pairings & Nutrition. For spice lovers, a pinch of cayenne pepper or red pepper flakes adds pleasant heat without overwhelming the cheese flavor.
Seeds add both flavor and visual appeal. Sesame seeds create a nutty taste and attractive appearance, while poppy seeds offer subtle crunch. Everything bagel seasoning has become wildly popular for good reason—it delivers a complex flavor profile with minimal effort. Don't be afraid to experiment with cheese varieties either. Parmesan creates an intensely savory, almost nutty cracker. Gruyere offers sophisticated, slightly sweet notes. Pepper jack brings heat and creaminess. You can even combine multiple cheeses for a more complex flavor profile.

Kitchen Tools You'll Need To Make Cheese Rice Crackers
The good news is that making cheese rice crackers doesn't require any specialized or expensive equipment. You probably already have everything you need in your kitchen. A medium mixing bowl is essential for combining your ingredients. If you have a food processor, it can make quick work of mixing the dough and ensures the cheese is evenly distributed, but it's completely optional. A standard rolling pin works perfectly for flattening the dough to the right thickness. Some people prefer using a pasta machine for perfectly even thickness, but this is absolutely not necessary for great results.
For cutting your crackers, a sharp knife works fine, though a pizza cutter makes the job faster and creates cleaner edges. If you want to get creative with shapes, small cookie cutters are fun to use, especially if you're making these with kids. You'll need at least one baking sheet, though two allows you to work more efficiently. Parchment paper is highly recommended because it prevents sticking and makes cleanup incredibly easy. Finally, a fork is essential for docking the crackers before baking, which prevents them from puffing up and helps them bake evenly.
Step-by-Step: How to Make Cheese Rice Crackers
Step 1: Prepare Your Cheese Mixture
Start by grating your cheese finely using the small holes on a box grater or your food processor's grating attachment. Fine grating is important because it helps the cheese incorporate smoothly into the dough rather than leaving large chunks that might cause uneven texture. The cheese should be at room temperature when you mix it with the butter—this creates a smoother, more cohesive mixture that's easier to work with. If your butter is cold, let it sit on the counter for about thirty minutes before starting.
In your mixing bowl, combine the softened butter with the grated cheese using a fork or your hands. Mix until the two are well blended and form a paste-like consistency. This is the perfect time to add your salt and any dried seasonings like garlic powder, herbs, or paprika. Mix these thoroughly into the cheese-butter mixture so they're evenly distributed. This step ensures every cracker will have consistent flavor throughout rather than some being bland and others overly seasoned. The mixture should be smooth and spreadable, similar to a thick cream cheese consistency.
Step 2: Create the Dough
Add the rice flour to your cheese mixture all at once. Using a fork or your hands, begin working the flour into the cheese and butter. At first, the mixture will look dry and crumbly—this is completely normal. Once the flour is mostly incorporated, start adding cold water one tablespoon at a time. After each addition, mix thoroughly and assess whether you need more liquid. You're aiming for a dough that holds together when squeezed but isn't sticky or wet.
The exact amount of water you need can vary depending on the humidity in your kitchen, the moisture content of your cheese, and the type of rice flour you're using. Don't rush this step. It's better to add water gradually and get it right than to add too much and end up with sticky dough that's difficult to handle. Once the dough comes together, knead it gently in the bowl for about thirty seconds. You're not trying to develop gluten here since rice flour doesn't contain gluten, you're simply ensuring everything is evenly mixed. Form the dough into a disk, wrap it in plastic wrap, and let it rest at room temperature for ten to fifteen minutes. This rest period allows the flour to fully hydrate and makes the dough easier to roll out.
Step 3: Roll Out the Dough
Here's where patience pays off in a big way. The thinner you roll your dough, the crispier your cheese rice crackers will be. Place your dough disk between two sheets of parchment paper—this prevents sticking without adding extra flour that could make the crackers dry. Roll from the center outward, rotating the dough frequently to maintain an even thickness. You're aiming for about one-eighth inch thick, or even thinner if you can manage it. The dough should be thin enough that you can almost see through it in places.
If the dough starts to crack at the edges while rolling, don't worry. Simply pinch the cracks back together and continue. This is easier to do when the dough is still at room temperature rather than chilled. If your dough becomes too soft to handle because your kitchen is warm, pop it in the refrigerator for five to ten minutes to firm up, then continue rolling. Consistent thickness is just as important as thinness because it ensures all your crackers bake at the same rate. Thin spots will brown faster than thick spots, so take your time to get it as even as possible across the entire surface.
Step 4: Cut Your Crackers
Once your dough is rolled thin and even, remove the top sheet of parchment paper. Now you can cut your crackers into whatever shapes you prefer. For classic square crackers, use a pizza cutter or sharp knife to cut the dough into a grid pattern. Rectangles measuring about one by two inches are a good standard size, but feel free to make them larger or smaller based on your preference. If you're using cookie cutters for fun shapes, press firmly and cleanly through the dough, then use a thin spatula to transfer each shape to your parchment-lined baking sheet.
Before moving your crackers, take a fork and dock each one by pricking several holes across the surface. This crucial step prevents the crackers from puffing up too much during baking and helps them stay flat and crispy. Don't skip this step or you'll end up with pillowy, less crispy crackers. Transfer your cut crackers to the baking sheet, leaving about half an inch between each one. They won't spread much, but you want adequate air circulation. If you're making a large batch, you'll need to bake in multiple batches. Keep the remaining dough covered while the first batch bakes to prevent it from drying out.
Step 5: Bake to Perfection
Preheat your oven to 350°F (175°C) and position a rack in the center of the oven for the most even heat distribution. Slide your prepared baking sheet into the oven and set a timer for twelve minutes. At this point, open the oven and check on your crackers. They should be starting to turn golden around the edges, but the centers might still look pale. Rotate the baking sheet one hundred eighty degrees to ensure even browning, then continue baking for another four to six minutes.
Watch closely during these final minutes because crackers can go from perfectly golden to burnt quite quickly. You're looking for an overall light golden color with slightly darker edges. The crackers will still feel a bit soft when you first remove them from the oven—this is normal. As they cool, they'll crisp up significantly. If you want extra-crispy crackers, here's a pro tip: let them cool completely after the first bake, then return them to a 300°F oven for an additional five to seven minutes. This second baking drives out any remaining moisture and creates an exceptionally crunchy texture. Let the crackers cool completely on the baking sheet before transferring them to a storage container. They'll continue to crisp up during the cooling process.

Tips for Perfect Cheese Rice Crackers Every Time
After making batch after batch of these cheese rice crackers, I've discovered several tricks that guarantee success every time. First and foremost, resist the temptation to roll the dough thicker than recommended. Even if one-eighth inch seems impossibly thin, this is what creates that professional-level crispiness. Thick crackers end up more like crispy cookies than proper crackers. When working with your dough, keep everything as cold as possible if you're having trouble with stickiness. Warm dough spreads more during baking and can become greasy instead of crispy.
The docking step cannot be emphasized enough—those little fork holes are essential for even baking and proper texture. Without them, you'll get puffy crackers with an inconsistent texture. Speaking of texture, don't be shy with your seasonings. Baking mutes flavors significantly, so what tastes well-seasoned in raw dough will taste just right after baking. Many beginners under-salt their crackers and end up disappointed with bland results. Trust your instincts and season boldly.
Letting crackers cool completely before storing them is crucial for maintaining their crispiness. If you pack them while they're even slightly warm, trapped steam will make them soft. If you want to know how long your homemade goods will last, see How Long Crackers Last – Shelf Life, Storage & Signs of Spoilage. If you find that your crackers have softened after a day or two in storage, don't throw them away. Simply spread them on a baking sheet and warm them in a 300°F oven for five minutes. This refreshes their crunch beautifully.
Flavor Variations to Try
Classic Combinations
Sharp cheddar paired with fresh rosemary creates an elegant cracker that's perfect for serving with wine or adding to cheese boards. Use about one tablespoon of finely chopped fresh rosemary, or one teaspoon of dried rosemary for a full batch. The combination is aromatic without being overwhelming. Parmesan with freshly cracked black pepper is a timeless pairing that delivers sophisticated flavor with minimal effort. Use genuine Parmigiano-Reggiano if possible—the flavor is incomparably better than pre-grated versions. Finish these crackers with a sprinkle of coarse sea salt before baking for extra impact.
Everything bagel seasoning has become wildly popular, and for good reason. This blend of sesame seeds, poppy seeds, dried onion, dried garlic, and salt transforms these crackers into something truly addictive. You can buy pre-made everything bagel seasoning or make your own. Sprinkle it generously on top of the crackers just before baking, pressing gently so it adheres to the surface.
Bold & Spicy
If you enjoy heat, pepper jack cheese combined with finely diced jalapeño creates crackers with a serious kick. Use fresh jalapeños for the best flavor, removing the seeds if you want moderate heat or leaving them in if you want extra fire. Cheddar with cayenne pepper is another excellent option for those who prefer their spice without chunks. Start with just one-quarter teaspoon of cayenne for a full batch—you can always add more next time if you want it hotter. For an Asian-inspired twist, try adding sriracha and lime zest to the dough. The combination of heat, citrus brightness, and savory cheese is unexpected and absolutely delicious.
Herb Garden
Italian seasoning blend is incredibly versatile and appeals to almost everyone. This mixture typically includes basil, oregano, rosemary, and thyme, creating a well-rounded herbal flavor that pairs beautifully with most cheeses. Fresh garlic and dried herbs create a robust, savory cracker that's fantastic for dipping into hummus or serving alongside soups. If you're using fresh garlic, one clove finely minced is sufficient for a full batch. Dill and onion powder create a flavor reminiscent of sour cream and onion chips but in a much healthier format. This combination works particularly well with milder cheeses like monterey jack or mild cheddar.

Storing Your Homemade Crackers
Proper storage is essential for keeping your cheese rice crackers at their crispy best. Once the crackers have cooled completely to room temperature, transfer them to an airtight container. Glass containers with tight-fitting lids work wonderfully, as do plastic containers designed for dry goods. The key is preventing any moisture from getting to the crackers, which would make them soft and stale. At room temperature in an airtight container, your crackers will stay fresh and crispy for about one week.
If you want to extend their shelf life, you can store them in the refrigerator where they'll keep for up to two weeks. Some people worry that refrigeration will make crackers soft, but as long as your container is truly airtight, this won't be a problem. In fact, the cool, dry environment of the refrigerator can actually help preserve crispiness. For long-term storage, these crackers freeze beautifully. Place them in a freezer-safe container or heavy-duty freezer bag, removing as much air as possible. They'll maintain their quality for up to three months in the freezer.
When you're ready to eat frozen crackers, there's no need to thaw them. Simply remove as many as you want and let them sit at room temperature for about fifteen minutes, or pop them in a 300°F oven for a few minutes to refresh their crispiness. If your crackers do happen to soften during storage, don't despair. Spread them on a baking sheet and warm them in a low oven for five to ten minutes. This drives off moisture and restores much of their original texture. For packed lunches, store small portions in individual containers or small bags to maintain freshness and make portion control easy
Serving Suggestions and Pairing Ideas
These sturdy, savory crackers are incredibly versatile for serving and entertaining:
- Cheese and Charcuterie Boards: Their structure makes them the perfect vehicle for soft cheeses (brie, goat cheese), pâtés, and spreads. Pair sharp cheddar crackers with bold red wines like Cabernet Sauvignon.
- Dips: They are sturdy enough to scoop thick dips like hummus, guacamole, and warm spinach artichoke dip. They also pair well with Mediterranean (tzatziki) or Tex-Mex (salsa) flavors.
- Soups and Salads: Use them to add satisfying crunch and savory flavor by crumbling them over creamy soups (like tomato) or simple green salads.
Lunchboxes: They are a more exciting, protein-rich base for balanced snacks when paired with sliced cheese, tomatoes, and cucumber.
Nutritional Benefits of Rice-Based Crackers
While enjoyed as a savory treat, homemade rice-based crackers offer several nutritional advantages over many commercial options:
- Naturally Gluten-Free: Using rice flour makes them suitable for those with gluten sensitivities or celiac disease (ensure certified gluten-free flour is used to prevent cross-contamination).
- Digestive Comfort: Many individuals find rice-based crackers easier to digest than conventional wheat crackers.
- Nutrient Boost: The cheese provides a good source of protein and calcium.
- Sodium Control: Making them at home allows you to control the sodium content entirely, avoiding the surprisingly high salt levels found in many store-bought varieties.
- No Artificial Additives: They are made with only real, recognizable ingredients, free from artificial preservatives, colors, or flavors.
Healthier Customization: You can further enhance the profile by using brown rice flour for fiber, incorporating healthier fats (olive oil), or adding seeds (flax, chia) for omega-3s.

Frequently Asked Questions About Cheese Rice Crackers
Can I make cheese rice crackers without rice flour?
Yes, you can substitute rice flour with other flours, though this will change the final texture and flavor:
- All-Purpose Flour: Creates a more traditional, slightly less delicate cracker texture (but is not gluten-free).
- Almond Flour: Results in a richer, more tender, and crumbly cracker; requires reducing butter/liquid due to its density.
- Cassava Flour: A great gluten-free alternative that behaves similarly to rice flour, producing good crispiness and a neutral flavor.
- Oat Flour: Yields a heartier, rustic cracker with a distinct oat flavor.
Pro-Tip: Adjust the liquid content carefully, as different flours have different absorption rates. Start with less liquid than the recipe calls for, adding more gradually.
Are cheese rice crackers gluten-free?
Cheese rice crackers can be completely gluten-free, as rice flour, cheese, and most seasonings are naturally gluten-free.
However, strict vigilance is required:
- Celiac Disease/Severe Sensitivity: Look for Certified Gluten-Free rice flour and ingredients to ensure there is no cross-contamination from facilities that process wheat, barley, or rye.
- Hidden Gluten: Check labels on pre-shredded cheese (anti-caking agents) and seasoning blends (maltodextrin or other additives). Shredding block cheese yourself is the safest option.
How do I make my rice crackers extra crispy?
Achieving maximum crispiness relies on three key techniques:
- Roll it Thin: Aim for one-eighth inch thickness or thinner. The thinner the dough, the less moisture it holds.
- Dock Properly: Poke small holes (docking) across the entire dough surface to allow steam to escape during baking.
- Double-Bake Method: After the initial bake and complete cooling, return the crackers to a 300°F oven for 5–7 minutes to drive out any last traces of moisture.
Storage Tip: Always cool crackers completely before storing them in an airtight container; moving them while warm traps moisture.
Can I freeze the dough for later?
Yes, freezing the dough is an excellent make-ahead strategy.
- For Dough: Form the dough into a disk or log, wrap tightly in plastic wrap, and freeze in a freezer-safe bag for up to three months. Thaw it slowly in the refrigerator overnight.
- For Cut Crackers: Roll out and cut the shapes, arrange them on a parchment-lined sheet, and freeze until solid. Transfer frozen cut crackers to a bag and bake them straight from the freezer (add 2–3 minutes to the baking time).
What's the best cheese for rice crackers?
The best cheese depends on the desired flavor intensity:
- Sharp or Extra-Sharp Cheddar: The most popular choice. Its bold, tangy flavor holds up best against the neutral rice base. Avoid mild cheddar.
- Parmesan or Aged Cheeses: Creates intensely savory, slightly nutty, and sophisticated crackers. Use genuine Parmigiano-Reggiano.
- Gruyère: Offers a more refined, complex, and subtly sweet taste for elegant crackers.
Cheese Tip: Drier, aged cheeses work better than moist ones, as they prevent the dough from becoming too sticky and promote crisping. Finely grate the cheese for even incorporation.
Why did my crackers turn out soft instead of crispy?
Soft crackers are almost always caused by retained moisture:
- Dough Rolled Too Thick: This is the most common reason. Thicker crackers cannot dry out fully in the oven.
- Underbaking: Crackers must be uniformly golden-brown to indicate proper dryness. If they are only light tan, they are underbaked.
- Too Much Liquid: If the dough felt sticky or wet, it contained too much liquid to dry out properly during the baking time.
- Improper Cooling or Storage: Storing warm crackers or using a container that isn't completely airtight will allow moisture to infiltrate, softening the crunch.1
Fix: Soft crackers can usually be re-crisped in a low oven (around 300°F) for a few minutes.
Conclution
Now that you've got all the information you need, it's time to get into the kitchen and start experimenting. The beauty of this cheese rice crackers recipe is that it's incredibly forgiving and welcomes your personal touch. Start with the basic version to get a feel for the process and the texture you're aiming for. Then let your creativity run wild. Try different cheese combinations, experiment with herbs and spices you love, or adjust the thickness to find your perfect level of crispiness.
Don't be discouraged if your first batch isn't perfect. Like any skill, making crackers gets easier and better with practice. You'll quickly develop an intuition for the right dough consistency, rolling thickness, and baking time. Take notes on what you try so you can replicate your successes and avoid repeating mistakes. Most importantly, have fun with the process. Making food from scratch is rewarding in so many ways beyond just the final product. You're creating something with your own hands, controlling exactly what your family eats, and developing skills that will serve you for years to come.
READ MORE:


