
Apricot glaze transforms ordinary pastries into bakery-quality masterpieces with a glossy finish and extended shelf life. This versatile ingredient serves multiple purposes—from creating a protective barrier on fruit tarts to adding a sweet sheen to savory roasted meats. Whether you're brushing apricot glaze on delicate berries, sealing moisture into pound cakes, or enhancing the visual appeal of French pastries, mastering this simple technique elevates your baking game dramatically. Professional bakers rely on apricot glaze for its neutral flavor profile, smooth consistency, and ability to preserve fresh fruit arrangements without overwhelming their natural taste. In this comprehensive guide, you'll discover everything from basic apricot glaze recipes to troubleshooting tips, application techniques, and creative variations that work for both sweet and savory dishes. Read on to learn why apricot glaze remains an essential staple in professional kitchens worldwide and how you can achieve restaurant-quality results at home.
What Is Apricot Glaze?
Definition of Apricot Glaze (Nappage)
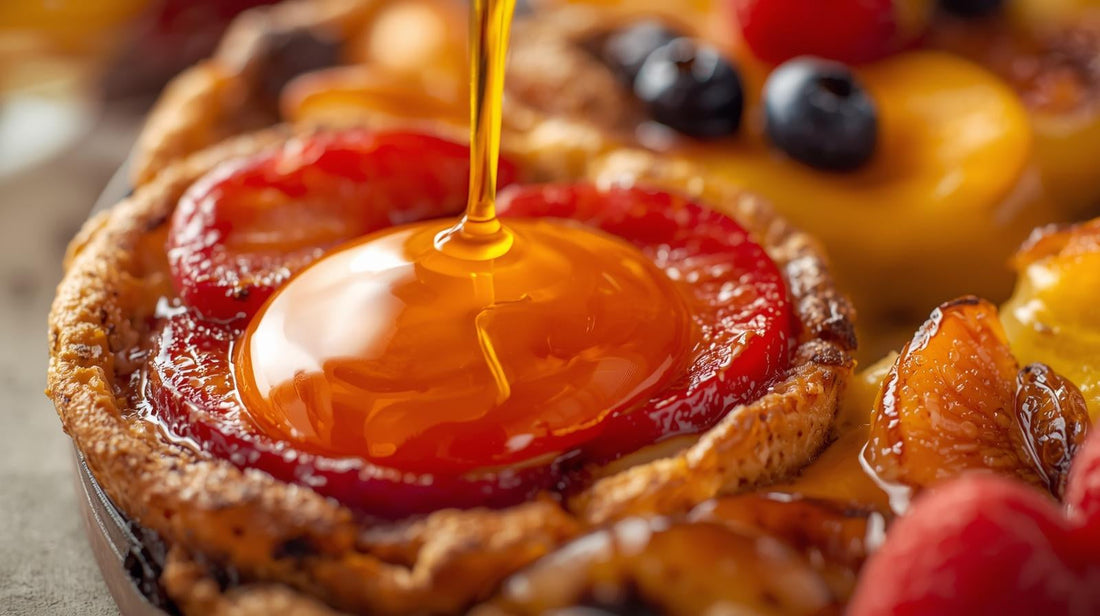
Apricot glaze, professionally known as "nappage" in French pastry terminology, is a smooth, translucent coating made primarily from apricot preserves or jam that has been heated, strained, and thinned to a brushable consistency. This glossy finish serves both aesthetic and functional purposes in pastry work, creating a protective barrier that seals in moisture while adding an attractive sheen to baked goods and fresh fruit arrangements. The term "nappage" comes from the French verb "napper," meaning "to coat" or "to glaze," reflecting its primary function in professional baking. Unlike thicker fruit spreads, apricot glaze maintains a fluid consistency when warm, allowing it to be brushed evenly across surfaces without disturbing delicate decorations. The neutral, mildly sweet flavor of apricots makes this glaze versatile enough to complement virtually any fruit or pastry without competing with or masking other flavors. Professional pastry chefs appreciate apricot glaze for its clarity and ability to enhance colors of fresh fruits while providing a subtle fruity note that enhances rather than overpowers.

Apricot Glaze vs Apricot Jam vs Jelly vs Preserves
Understanding the differences between these apricot products helps you choose the right starting material for your glaze. Apricot jam contains crushed or pureed fruit with sugar, creating a spreadable consistency with small fruit pieces throughout. Apricot preserves feature larger chunks of fruit suspended in a thick syrup, offering more texture and visible fruit pieces that require straining when making glaze. Apricot jelly is made from fruit juice only, containing no pulp or fruit pieces, resulting in a perfectly clear product that some bakers prefer for its transparency. When making apricot glaze, preserves are typically preferred because they provide rich fruit flavor and natural pectin content that helps the glaze set properly when cooled. Jam works well as a substitute and requires less straining, while jelly creates the clearest glaze but may lack depth of flavor. The key difference between these products and finished apricot glaze lies in consistency—glaze must be heated and thinned with liquid (water, liqueur, or juice) to achieve a brushable texture. Commercial nappage products sold to professional bakeries are specifically formulated for glazing, containing added pectin and glucose syrup for optimal shine and setting properties.
Why Bakers Use Apricot Glaze for Shine and Preservation
Professional bakers rely on apricot glaze for multiple technical and aesthetic reasons that go beyond simple decoration. The primary function is creating a moisture barrier that prevents fresh fruits from drying out and oxidizing, extending the presentable life of fruit tarts from hours to days when refrigerated properly. This protective coating also prevents cream fillings and cake layers from drying when exposed to air, maintaining optimal texture and freshness. The glossy, reflective finish that apricot glaze provides makes pastries more visually appealing, catching light and creating an appetizing appearance that signals quality and professionalism. From a flavor perspective, apricot's neutral sweetness enhances rather than masks the taste of other fruits—strawberries, kiwis, peaches, and berries all pair beautifully without clashing. The natural pectin in apricot preserves helps the glaze set to a firm yet flexible coating that won't run or drip once cooled, making transport and display easier. Additionally, the subtle apricot flavor adds a complementary fruity note that rounds out flavor profiles in both sweet and savory applications, from delicate fruit tarts to robust glazed ham preparations.
What to Use Apricot Glaze For
Apricot Glaze for Fruit Tarts and Fruit Pizzas
Fruit tarts represent the most classic and popular application for apricot glaze, where it serves as the finishing touch that transforms homemade desserts into bakery-worthy showpieces. After arranging fresh strawberries, kiwi slices, blueberries, raspberries, or mixed fruits on a pastry cream base, a generous coating of warm apricot glaze seals in moisture and creates that signature glossy appearance associated with French patisserie. The glaze acts as an invisible shield protecting delicate berries from oxidation, preventing strawberries from bleeding their juices into the cream and keeping kiwi slices from browning at the edges. For fruit pizzas—those popular large-scale desserts with cookie crusts and cream cheese bases topped with colorful fruit arrangements—apricot glaze performs the same protective and aesthetic functions while adding a subtle sweetness that complements the tangy cream cheese. Application timing matters significantly: brush the glaze while it's still warm enough to flow smoothly but not so hot that it melts whipped cream or softens fruit. Most professional pastry chefs apply two thin coats rather than one thick layer, allowing the first coat to set slightly before adding the second for maximum shine and protection without overwhelming the fruit's natural appearance.

Apricot Glaze for Cheesecakes, Pound Cakes, and Pastries
Beyond fruit-topped desserts, apricot glaze serves important functions when applied to the surfaces of cakes and pastries themselves. For cheesecakes, a thin layer of apricot glaze brushed over the top creates a professional finish that prevents the surface from drying out and cracking during storage while adding an elegant sheen. New York-style cheesecakes benefit particularly from this treatment, as the glaze enhances their smooth appearance without adding overwhelming sweetness. Pound cakes, bundt cakes, and loaf cakes traditionally receive a light apricot glaze coating while still slightly warm from the oven, which soaks into the top layers and creates a tender, moist crumb while the surface develops an attractive sheen. This technique is especially popular in European baking traditions, where plain butter cakes are elevated through simple finishing touches. For delicate pastries like cream puffs, eclairs, and napoleons, apricot glaze can be brushed on choux pastry shells before filling to create a moisture barrier and add subtle flavor complexity. The glaze also works beautifully on strudel, turnovers, and hand pies, where it seals seams, adds shine, and helps prevent fillings from leaking during baking when applied to edges before crimping.
Apricot Glaze for Ham, Pork, and Chicken (Sweet & Savory Glaze)
Apricot glaze transitions seamlessly from pastry kitchen to savory cooking, where its sweet-tart profile creates beautiful caramelization on roasted and grilled meats. Glazed ham represents perhaps the most iconic savory application—the apricot's natural sugars caramelize during the final roasting stages, creating a mahogany crust with complex sweet and tangy flavors that complement the salty, smoky meat. For pork roasts, chops, and tenderloin, apricot glaze applied during the last 15-20 minutes of cooking creates a glossy, flavorful crust without burning, as the fruit's natural acidity helps prevent excessive browning. Chicken preparations—whether roasted whole birds, bone-in thighs, or grilled wings—benefit from apricot glaze's ability to add both color and flavor while helping skin crisp beautifully. Many chefs enhance savory apricot glazes with complementary ingredients like Dijon mustard, soy sauce, garlic, ginger, or fresh herbs to balance the sweetness and create more complex flavor profiles. The glaze should be applied in multiple thin layers during cooking rather than one thick coating, allowing each layer to set and caramelize before adding the next. This technique builds depth of flavor and creates that desirable sticky, lacquered appearance associated with professional restaurant presentations.
Apricot Glaze for Puff Pastry, Danishes, and Croissants
Laminated doughs like puff pastry, Danish pastry, and croissants achieve that coveted bakery-quality appearance when finished with apricot glaze immediately after baking. While many home bakers use egg wash before baking for color, professional bakeries often apply apricot glaze afterward for superior shine and a more refined finish. For fruit-filled turnovers, bear claws, and fruit Danish pastries, apricot glaze serves double duty—it adds glossy appeal while complementing and enhancing the fruit filling's flavor through matching fruit notes. The glaze should be applied while pastries are still warm from the oven, allowing it to soak slightly into the flaky layers and create a thin, candy-like coating that sets as it cools. This technique is particularly effective for palmiers, where the glaze settles into the caramelized sugar layers and creates an intensely shiny, almost glass-like surface. For plain croissants and pain au chocolat, a very light coating of apricot glaze adds professional polish without making the pastry taste fruity—the key is using it sparingly and brushing gently to avoid deflating the delicate layers. Many European bakeries apply apricot glaze to virtually all their Viennoiserie (sweet breakfast pastries) as standard practice, distinguishing their products through that characteristic bakery sheen.
Apricot Glaze as a Neutral Base for Decorating Fresh Fruits
Professional pastry chefs appreciate apricot glaze as a neutral foundation that allows fresh fruits' natural colors and flavors to shine while providing the structural support needed for intricate decorative arrangements. When creating elaborate fruit displays on celebration cakes, the glaze acts as both adhesive and protective coating—fruits stay securely positioned while maintaining their fresh appearance throughout events. For competition-level pastry work and high-end restaurant desserts, where presentation is paramount, apricot glaze enables precise fruit placement without the fruits sliding or shifting during plating and service. The neutral flavor profile means that whether you're arranging tropical fruits, stone fruits, berries, or citrus, the apricot glaze won't create flavor conflicts—it simply enhances whatever fruits you're showcasing. Many pastry chefs use apricot glaze as a "glue" to attach edible flowers, gold leaf, or other delicate decorations to cake surfaces, providing secure adhesion without visible mess. For wedding cakes and special occasion desserts decorated with fresh flowers and cascading fruit arrangements, multiple thin coats of apricot glaze applied throughout the assembly process keep everything secure and beautiful. This technique requires patience and skill—each fruit piece should be dipped or brushed with glaze before placement, then the entire arrangement receives a final delicate coating once complete.
How to Make Apricot Glaze (Step-by-Step)
Ingredients for Apricot Glaze Recipe
The beauty of apricot glaze lies in its simplicity—most recipes require only two to three basic ingredients that you likely already have in your pantry. The primary ingredient is apricot preserves or jam, with most recipes calling for one cup (approximately 320 grams) as a standard starting quantity. High-quality preserves with real fruit pieces produce the best flavor and natural pectin content, though mid-range commercial brands work perfectly well for most applications. Water serves as the thinning agent, with typical recipes using 2-4 tablespoons depending on desired consistency—less water creates a thicker glaze suitable for coating cakes, while more water produces a thinner glaze ideal for delicate fruit arrangements. Some recipes incorporate granulated sugar (1-2 tablespoons) to boost sweetness and improve shine, though this is optional when starting with sweetened preserves. For enhanced flavor complexity, professional bakers often add acidic components like lemon juice (1-2 tablespoons) or liqueurs such as Grand Marnier, kirsch, or brandy (1-2 tablespoons) which thin the glaze while adding subtle depth. A small pinch of salt helps balance sweetness and intensify fruit flavors without making the glaze taste salty. Optional ingredients include vanilla extract for warmth, almond extract for nutty notes, or corn syrup for improved gloss and pliability in commercial applications.
Tools You'll Need for Making Apricot Glaze
Successful apricot glaze preparation requires minimal equipment, most of which are standard kitchen tools. A small to medium saucepan (1-2 quart capacity) provides adequate space for heating and stirring the glaze without risk of scorching. A fine-mesh strainer is essential for removing fruit chunks and creating that smooth, professional finish—look for one with tightly woven mesh that catches even small particles. A heat-resistant silicone spatula or wooden spoon allows for constant stirring without scratching cookware or melting at high temperatures. A pastry brush, preferably natural bristle or high-quality silicone, enables precise, even application—choose a 1-2 inch width for most applications, with smaller brushes reserved for detail work. A small bowl or measuring cup for straining the glaze into makes the process cleaner and easier. For professional-level smoothness, some bakers use a chinois (conical fine-mesh strainer) paired with a ladle or small pestle for pressing the preserves through thoroughly. A kitchen thermometer helps monitor temperature for optimal consistency, though it's not strictly necessary for basic preparations. For storage, have clean glass jars or airtight containers ready to preserve unused glaze. Optional but useful tools include a microwave-safe bowl for quick microwave methods and a spray bottle for commercial applications requiring even misting.
Quick Apricot Glaze Recipe (Using Preserves or Jam)
For everyday home baking needs, this streamlined recipe produces excellent results in under 10 minutes. Combine 1 cup (320g) apricot preserves or jam with 2 tablespoons water in a small saucepan over medium heat. Stir constantly as the mixture heats, breaking up any large fruit pieces with your spoon or spatula as it warms. Bring the mixture to a gentle simmer, continuing to stir for 2-3 minutes until it becomes fluid and slightly thinner—you'll notice it transforms from thick and spreadable to pourable and glossy. Remove from heat and strain immediately through a fine-mesh strainer set over a bowl, using the back of a spoon or silicone spatula to press the preserves through while catching skins and fruit chunks. For an even smoother texture, strain twice using a clean strainer each time. The resulting glaze should have a consistency similar to honey when warm—it should flow smoothly off your brush but not be watery. If too thick, return to the saucepan and whisk in additional water one teaspoon at a time until desired consistency is reached. Use the glaze immediately while still warm for easiest application, as it will thicken as it cools. This basic recipe works beautifully for fruit tarts, pastries, and simple cake glazing without any additional ingredients or complicated techniques.
Classic Apricot Glaze Recipe for Pastry Chefs
Professional pastry chefs often prefer a more refined approach that produces superior clarity and flavor balance. Begin with 1 cup (320g) high-quality apricot preserves, 3 tablespoons water, 2 tablespoons granulated sugar, and 1 tablespoon fresh lemon juice in a medium saucepan. Heat over medium-low heat, stirring constantly to dissolve the sugar completely before the mixture begins simmering. Once sugar dissolves, increase heat to medium and bring to a full simmer, cooking for 5-7 minutes while stirring frequently to prevent scorching. The extended cooking time allows excess moisture to evaporate, concentrating flavors and improving the glaze's setting properties. Watch for the mixture to reduce slightly and take on a more translucent appearance—it should coat the back of your spoon and drip in thick drops rather than running thin. Remove from heat and strain through a fine-mesh chinois or strainer, pressing firmly to extract maximum liquid while leaving behind all solids. For competition-level clarity, strain a second time through a finer strainer or cheesecloth. The finished glaze should be smooth, glossy, and completely free of lumps or fruit particles. Allow to cool for 2-3 minutes before using—it should be warm but not so hot that it melts delicate components or burns your hands during application. Store any excess in an airtight container where it will keep for up to two weeks refrigerated.
Microwave Apricot Glaze Recipe (5-Minute Method)
When time is limited or you need just a small amount of glaze, the microwave method offers speed and convenience without sacrificing quality. Place 1/2 cup (160g) apricot preserves and 1 tablespoon water in a microwave-safe bowl, stirring to combine. Microwave on high power for 30 seconds, then stir thoroughly. Continue microwaving in 15-second intervals, stirring after each, until the preserves become fully fluid and hot—typically 1-1.5 minutes total depending on your microwave's power. The mixture should be bubbling slightly and noticeably thinner than when it started. Carefully remove from the microwave (the bowl will be hot) and strain immediately through a fine-mesh strainer into another bowl, pressing the preserves through while discarding solids. If the glaze seems too thick after straining, return it to the microwave for another 10-15 seconds with an additional teaspoon of water, stirring until smooth. This method works particularly well for small projects or when you need glaze quickly without wanting to clean a saucepan. The key is working in short intervals to prevent overheating, which can cause the sugars to caramelize and darken the glaze or create an overly thick, candy-like consistency. Use immediately while warm, as microwave-prepared glaze tends to set more quickly than stovetop versions due to the concentrated heat exposure.
How to Strain Apricot Glaze for a Smooth, Clear Finish
Proper straining technique separates amateur from professional-looking results, transforming cloudy, chunky preserves into crystal-clear glaze. Immediately after cooking, while the glaze is at its hottest and most fluid, position a fine-mesh strainer over a clean bowl or measuring cup. Pour all the hot glaze into the strainer at once rather than in small batches, which allows gravity to begin the filtering process. Using the back of a silicone spatula or large spoon, press firmly against the solids in the strainer, working in circular motions to push liquid through while forcing fruit pulp through the mesh. Continue pressing and scraping for 1-2 minutes—you'll extract significantly more glaze this way than simply letting it drip through. Periodically scrape the underside of the strainer where smooth glaze accumulates, incorporating it into your bowl. For ultimate smoothness, strain a second time through a fresh, finer-mesh strainer or a cone-shaped chinois, which provides more surface area and easier pressing. Some professionals line a regular strainer with one layer of fine cheesecloth for exceptional clarity, though this absorbs more glaze and reduces yield. Discard the solids remaining in the strainer—these are mostly skins and fruit fiber that would create an uneven texture. The final strained glaze should be completely smooth, translucent, and free of any visible particles or cloudiness.
How to Brush Apricot Glaze on Fruit or Cake Surfaces
Application technique significantly impacts the final appearance, with proper brushing creating professional results while poor technique leaves streaks and uneven coverage. Use a natural bristle or high-quality silicone pastry brush sized appropriately for your project—wider brushes for large surfaces, smaller for detail work. Dip the brush into warm glaze, allowing excess to drip back into the bowl so the bristles are coated but not dripping. Working quickly while the glaze remains warm and fluid, apply using light, smooth strokes in one direction rather than back-and-forth scrubbing motions that disturb surfaces and create streaks. For fruit arrangements, start from the center and work outward, or begin with larger pieces and finish with smaller ones to avoid disturbing already-glazed areas. When coating cakes or pastries, brush from top to bottom in long, even strokes, reloading your brush as needed but being careful not to over-apply in any one area. The first coat will appear thin and may seem insufficient—resist the urge to pile on more immediately. Instead, allow the first coat to set for 3-5 minutes, then apply a second thin coat for optimal shine and coverage. Multiple thin layers always produce better results than one thick application, which can look gloppy and take too long to set. For three-dimensional fruit arrangements, gently brush from multiple angles to ensure complete coverage without disturbing the fruit's position.
Apricot Glaze Recipe Variations
Apricot Glaze with Grand Marnier or Brandy
Alcohol-enhanced apricot glaze elevates desserts with sophisticated flavor complexity that appeals to adult palates while adding professional refinement. Grand Marnier, with its orange cognac profile, pairs exceptionally well with apricot's natural flavor, creating a glaze that complements chocolate desserts, orange-flavored cakes, and berry tarts beautifully. To incorporate, prepare your basic apricot glaze recipe but replace 1-2 tablespoons of water with an equal amount of Grand Marnier, adding it after removing the mixture from heat to preserve its aromatic qualities. Brandy or cognac provides rich, warming notes that work wonderfully with stone fruit tarts, apple desserts, and holiday pastries—use the same substitution method, adjusting quantity based on desired intensity. Kirsch (cherry brandy) creates an elegant glaze for cherry clafoutis, Black Forest cake, and other cherry-based desserts, while amaretto adds almond notes that enhance peach and plum tarts. The alcohol serves multiple purposes: it thins the glaze to optimal consistency, adds flavor complexity, and helps the glaze set slightly firmer due to alcohol's quick evaporation. When working with alcohol-based glazes, apply them immediately while warm, as they tend to set faster than water-based versions. These variations are not recommended for children's desserts or when serving to those avoiding alcohol, though most alcohol content evaporates during cooking.
Apricot Glaze with Lemon Juice for Brightness
Adding fresh lemon juice to apricot glaze creates a brighter, more vibrant flavor profile that prevents cloying sweetness while enhancing fruit flavors. The acidity cuts through the preserves' natural sweetness, creating better balance and making the glaze particularly suitable for intensely sweet desserts or rich, buttery pastries. For basic preparation, add 1-2 tablespoons fresh lemon juice (never bottled, which tastes artificial) when you begin heating the preserves, allowing the acid to incorporate fully during cooking. The lemon juice serves multiple functions: it brightens flavor, thins the glaze naturally without additional water, and helps preserve color in fresh fruits by preventing oxidation. For fruits prone to browning—like apples, pears, and bananas—lemon-enhanced glaze provides extra protection against discoloration. The citrus notes complement virtually all fruits beautifully, from berries to tropical varieties, without creating flavor conflicts. Some pastry chefs prefer using half lemon juice and half water for their liquid component, creating a more pronounced citrus presence that works particularly well with strawberry tarts, lemon bars, and citrus-based desserts. You can also add a strip of lemon zest during cooking for even more intense citrus flavor—just remember to strain it out completely. This variation is ideal when you want glaze that tastes fresh and lively rather than simply sweet, and it's especially appreciated in warm weather when lighter flavors are more appealing.
Apricot Glaze with Cornstarch for a Thicker Finish
When you need apricot glaze that sets more firmly or clings to vertical surfaces without dripping, adding cornstarch creates a thicker, more stable consistency. This technique is particularly valuable for wedding cakes, elaborate pastries, and desserts that need to travel or be displayed for extended periods. To incorporate cornstarch, make a slurry by whisking 1-2 teaspoons cornstarch with 2 tablespoons cold water until completely smooth with no lumps. Prepare your basic apricot glaze recipe, then whisk in the cornstarch slurry during the last minute of cooking, continuing to stir constantly as the mixture thickens noticeably. The heat activates the cornstarch's thickening properties, creating a glaze that's still brushable when warm but sets to a firmer, gel-like consistency when cool. This version works excellently for coating the sides of cakes, where standard glaze would run down and pool at the bottom. For fruit arrangements, cornstarch-thickened glaze provides extra holding power, keeping fruits securely positioned even on sloped surfaces. The trade-off is slightly reduced shine compared to standard glaze, though the difference is minimal when properly prepared. Too much cornstarch creates an unpleasantly thick, paste-like texture, so start with less and add more only if needed. This variation also extends shelf life slightly, as the thicker consistency provides better moisture barrier protection. Allow cornstarch-thickened glaze to cool for 3-5 minutes before application, as it continues thickening as temperature drops.
Apricot-Miso or Apricot-Mustard Glaze for Savory Dishes
Transforming sweet apricot glaze into sophisticated savory glazes for meats and vegetables requires adding umami-rich or tangy components that balance the fruit's natural sweetness. For an Asian-inspired apricot-miso glaze, whisk 2 tablespoons white or yellow miso paste into warm apricot glaze along with 1 tablespoon rice vinegar, 1 teaspoon soy sauce, and a pinch of grated fresh ginger. This combination creates complex sweet-salty-umami flavors perfect for salmon, pork tenderloin, or roasted root vegetables. The miso adds depth and richness while the vinegar and soy sauce provide savory notes that prevent the glaze from tasting dessert-like. For apricot-mustard glaze ideal for ham, pork chops, and chicken, combine your basic apricot glaze with 2-3 tablespoons Dijon mustard, 1 tablespoon apple cider vinegar, and a pinch of black pepper while still warm. The mustard's pungent tang beautifully counterbalances apricot sweetness, creating a glaze that caramelizes magnificently during roasting. Additional savory variations include adding fresh herbs (rosemary, thyme, sage), garlic, red pepper flakes for heat, or Worcestershire sauce for deeper umami notes. When preparing savory glazes, reduce or eliminate any additional sugar called for in sweet versions, as the preserves provide sufficient sweetness. Apply these glazes during the final 20-30 minutes of cooking to prevent burning, brushing multiple thin layers for best caramelization and flavor development.
Vegan and Alcohol-Free Apricot Glaze Recipe Options
Creating apricot glaze that accommodates dietary restrictions or preferences requires minimal modification while maintaining excellent results. Most commercial apricot preserves are naturally vegan, containing only fruit, sugar, and pectin, though always check labels to confirm no gelatin or other animal products are included. The basic apricot glaze recipe using preserves and water is inherently vegan and requires no substitutions. For those avoiding refined sugar, look for preserves made with fruit juice, honey, or alternative sweeteners, though note that honey-based versions wouldn't be suitable for strict vegans. Alcohol-free versions simply substitute water, fruit juice (apple or white grape juice work beautifully), or non-alcoholic extracts for any liqueurs called for in enhanced recipes. Orange juice can replace Grand Marnier for similar citrus notes without alcohol, while vanilla extract diluted with water approximates brandy's warmth. For professional applications requiring neutral nappage, many commercial products are already vegan and alcohol-free, though they may contain synthetic ingredients. When preparing vegan glazes for those with multiple restrictions, avoid honey (use maple syrup or agave if additional sweetening is needed) and ensure any add-ins like vanilla extract are alcohol-free if required. The beauty of apricot glaze is its fundamental simplicity—the basic recipe naturally accommodates most dietary needs without complicated substitutions or significant formula changes.
Troubleshooting Apricot Glaze
Why Apricot Glaze Is Too Thick or Too Thin
Consistency issues represent the most common apricot glaze problems, but they're easily diagnosed and corrected. Glaze that's too thick—appearing paste-like, difficult to brush, or creating visible brushstroke marks—typically results from insufficient liquid, overcooking that evaporated too much moisture, or using preserves with particularly high pectin content. To fix thick glaze, return it to the saucepan (or microwave-safe bowl) and heat gently while whisking in additional water one teaspoon at a time until desired consistency is reached. Work slowly, as it's easier to thin glaze than to thicken it. Remember that glaze naturally thickens as it cools, so aim for a slightly thinner consistency than you want for the final result—it should flow smoothly off your brush like warm honey. Conversely, glaze that's too thin—running off fruits, not providing adequate shine, or seeming watery—results from adding too much liquid or using jam rather than preserves, which contains less pectin. To thicken runny glaze, return it to heat and simmer gently for an additional 3-5 minutes to evaporate excess moisture, stirring constantly to prevent scorching. Alternatively, add a cornstarch slurry (equal parts cornstarch and cold water) and cook briefly until thickened. Quality variations between preserve brands significantly impact final consistency, so you may need to adjust liquid ratios based on your specific product. Professional bakers often test glaze consistency on a cold plate—if it sets to a gel-like coating within 30 seconds, consistency is perfect.
How to Fix Lumpy Apricot Glaze
Lumpy glaze creates unprofessional appearances and uneven coverage, but the problem is completely preventable and fixable. Lumps typically occur when glaze hasn't been strained properly, when it's been overcooked and some sugars have crystallized, or when it's been allowed to cool and reheat multiple times. The primary solution is thorough straining—pour your glaze through a fine-mesh strainer while still hot, pressing firmly with a spatula to ensure all liquid passes through while solids remain behind. For extremely persistent lumps, strain twice using progressively finer mesh, or line your strainer with a layer of fine cheesecloth. If lumps have formed due to sugar crystallization, reheat the glaze gently with an additional tablespoon of water, whisking vigorously to dissolve the crystals back into solution. Sometimes lumps result from fruit pieces that weren't fully broken down during initial cooking—in this case, before straining, use an immersion blender to puree the mixture completely, then strain for perfectly smooth results. For prevention, stir your glaze constantly during heating to prevent hot spots where sugars can crystallize, and strain while still very hot when everything is most fluid. Store strained glaze in airtight containers to prevent skin formation on the surface, which can break apart into lumps when reheated. When reheating stored glaze, do so gently over low heat with a splash of water, stirring constantly to maintain smooth consistency throughout.
How to Make Apricot Glaze Shiny, Not Sticky
The difference between professional-looking glossy glaze and amateur sticky coating comes down to technique, temperature, and timing. Sticky glaze typically results from applying it too thickly, not allowing sufficient setting time between coats, or using glaze that's too cool and hasn't been strained properly. To achieve maximum shine without stickiness, always apply thin coats rather than one thick layer—the first coat should look almost invisible, providing just a slight sheen. Allow this first coat to set for 5-10 minutes at room temperature or 2-3 minutes in the refrigerator before applying a second coat. The second thin coat creates the glossy finish without excessive buildup. Temperature matters significantly: glaze should be warm and fluid during application but not so hot that it melts cream fillings or softens fruits. Ideally, glaze should be between 100-120°F when brushing—warm enough to flow smoothly but cool enough to begin setting quickly. Adding a small amount (1-2 teaspoons) of light corn syrup to your basic recipe can improve shine while preventing sticky texture, as corn syrup creates a more flexible, less tacky coating. For fruits that will be refrigerated, sticky texture often develops from condensation—apply glaze at room temperature and allow it to set completely before refrigerating. Once set properly, properly made apricot glaze should be dry to the touch with a glossy, glass-like appearance that doesn't transfer to fingers or leave residue on serving utensils.
Why Apricot Glaze Doesn't Set and How to Fix It
Glaze that refuses to set—remaining liquid and runny even after cooling—indicates insufficient pectin, too much liquid, or inadequate cooking time during preparation. Natural pectin in apricots helps glaze gel as it cools, but variations in preserve brands and processing methods mean pectin content varies significantly. If your glaze won't set after cooling to room temperature, the quickest fix is reheating with added commercial pectin—fruit pectin powder or liquid pectin designed for jam-making works perfectly. Add 1/2 teaspoon powdered pectin dissolved in 1 tablespoon water, bring the glaze back to a simmer for 1-2 minutes, then test again. Alternatively, adding a cornstarch slurry (1 teaspoon cornstarch mixed with 2 teaspoons cold water) provides immediate thickening without altering flavor. Return the glaze to a simmer, whisk in the slurry, and cook for
1-2 minutes until noticeably thickened. For prevention, ensure you're using preserves rather than jam (preserves contain more pectin), cook the glaze for the full recommended time to concentrate it properly, and don't add excessive liquid during preparation. Some low-sugar or "no sugar added" preserves contain less pectin and may require supplementation. Temperature also affects setting—glaze should be allowed to cool completely at room temperature rather than being rushed into the refrigerator, as gradual cooling allows pectin to activate properly. If you frequently encounter setting problems, consider investing in commercial neutral nappage, which is specifically formulated with reliable gelling properties for professional applications.
How to Adjust the Sweetness or Tartness of Apricot Glaze
Balancing sweetness and acidity in apricot glaze allows you to customize it for different applications and personal preferences. If your glaze tastes too sweet—which can happen with very sweet preserves or when additional sugar has been added—incorporate acidic components to create balance without starting over. Fresh lemon juice is the most versatile option: add 1-2 teaspoons at a time, tasting after each addition until the sweetness is properly balanced. The citrus brightens the overall flavor while cutting through cloying sweetness. For more complex tartness, try white wine vinegar or apple cider vinegar in small amounts (start with 1/2 teaspoon), which adds sharpness without citrus flavor. Conversely, if your glaze tastes too tart or lacks sweetness—common when using preserves made with less sugar or when you've added too much lemon juice—simply stir in granulated sugar 1 tablespoon at a time while the glaze is still warm, stirring until completely dissolved before tasting. Honey or agave nectar also work for adding sweetness while contributing subtle flavor complexity. For savory applications where you want to reduce sweetness significantly, add Dijon mustard, soy sauce, or balsamic vinegar, which provide savory depth that counterbalances fruit sweetness. Always make adjustments while the glaze is warm, as temperature affects flavor perception—glaze tastes less sweet when warm than when fully cooled. Keep notes on your adjustments so you can replicate successful formulas in future batches.
How to Apply Apricot Glaze Properly

When to Brush Apricot Glaze – Warm or Cool Surface
The temperature of both your glaze and the item being glazed significantly impacts the final result, with different applications requiring different approaches. For fruit tarts and arrangements, the pastry cream or custard base should be completely cool or even cold before arranging fruits, but the fruits themselves should be at room temperature—cold fruits develop condensation that prevents glaze from adhering properly. Apply warm glaze (around 100-110°F) to room-temperature fruits for best flow and adhesion. For cakes and pastries, the timing varies by type: pound cakes and loaf cakes benefit from glazing while still slightly warm from the oven (not hot, but warm to the touch), as the glaze soaks into the top layer slightly, creating moistness and flavor integration. However, layer cakes with buttercream or delicate cream fillings must be completely cool before glazing to prevent melting. Baked pastries like croissants, Danish, and puff pastry should receive glaze while still warm from the oven—the residual heat helps the glaze set quickly into a thin, candy-like coating. For savory applications, glaze should be applied to meat during the final 15-20 minutes of cooking while the surface is hot, allowing it to caramelize and create that desirable lacquered appearance. Never apply cold glaze from the refrigerator, as it won't brush smoothly and creates thick, uneven coverage. Always reheat stored glaze until fluid before use, allowing it to cool just slightly so it's warm but not scalding.
Brushing Techniques for Perfect Shine
Professional glazing technique requires a light touch, proper brush selection, and methodical application for flawless results. Choose a natural bristle pastry brush 1-2 inches wide for most applications—natural bristles hold glaze better than silicone and create smoother coverage, though high-quality silicone brushes work well for those with allergies. Load your brush by dipping it into warm glaze and gently tapping against the bowl's rim to remove excess—the bristles should be saturated but not dripping. Apply glaze using long, smooth strokes in one consistent direction rather than back-and-forth scrubbing motions that can disturb delicate surfaces or fruit arrangements. Start at one edge and work systematically across the surface, slightly overlapping each stroke to ensure complete coverage without visible lines. The first coat should be thin enough that you can still see the fruit or pastry through it—this provides a base for the second coat and seals the surface. After 3-5 minutes of setting time, apply a second thin coat using the same methodical approach, which builds to a glossy, professional finish. For three-dimensional objects or fruit arrangements, work from top to bottom, allowing gravity to assist coverage while preventing drips. Reload your brush frequently rather than trying to stretch each brushful too far, which creates thin, streaky areas. For maximum shine on important projects, some professionals apply a third ultra-thin coat after the second has set. Clean your brush between different glaze batches to prevent contamination.
Glazing Delicate Fruits Without Ruining Arrangement
Applying glaze to carefully arranged fruit without disturbing the pattern requires patience, proper technique, and sometimes alternative approaches to brushing. For extremely delicate arrangements—particularly those with soft berries like raspberries or fragile sliced fruits—consider glazing fruits individually before arranging them rather than trying to brush glaze over the completed pattern. This "dip and place" method involves holding each fruit piece with tweezers or a fork, dipping it into warm glaze, allowing excess to drip off, then positioning it on the tart. This approach provides complete, even coverage without any brushing that could shift elements. For arrangements already in place, use the lightest possible touch with your brush, barely making contact with fruit surfaces and allowing the fluid glaze to flow naturally. Work from the center outward in gentle dabbing motions rather than stroking across fruits. For particularly fragile arrangements, spray application offers the best solution—transfer warm glaze to a clean spray bottle or use a small paint sprayer, misting fine layers from 8-10 inches above the tart. This creates an even coating without any direct contact. Between spray passes, allow the glaze to set for 2-3 minutes before adding additional layers. Some professional pastry chefs glaze only certain fruits in a mixed arrangement—for example, glazing strawberries and kiwi while leaving delicate raspberries and blueberries unglazed, which still provides the protective benefits while maintaining visual variety. The key is working quickly while glaze remains fluid but having patience to apply multiple thin layers rather than rushing with thick applications.
Using Spray Bottles or Dipping Techniques in Bakeries
Commercial bakeries handling high volumes often employ efficient application methods that maintain consistency while saving time. Spray bottle application has become increasingly popular for its speed and even coverage—food-grade spray bottles or small electric paint sprayers filled with warm, well-strained glaze create a fine mist that settles evenly across surfaces without disturbing arrangements. The glaze must be perfectly smooth and properly thinned (slightly thinner than for brushing) to prevent nozzle clogging. Professional bakeries maintain spray equipment at specific temperatures using warming cabinets, ensuring consistent viscosity throughout production runs. For individual pastries like petit fours, cream puffs, or small tarts, dipping techniques prove most efficient: hold the item inverted and dip the top surface into a shallow container of warm glaze, twist slightly to encourage excess to drip off, then flip right-side up and allow to set. This creates perfectly uniform coverage in seconds. Large bakeries often have dedicated "glazing stations" with temperature-controlled glaze containers, multiple brushes at various angles, and conveyor systems for consistent application. For commercial fruit tart production, some operations use a two-stage process: a thin base coat applied via spray, followed by strategic brush application to highlight specific fruits or add extra shine to featured elements. Commercial neutral nappage, which sets more reliably than homemade versions, allows bakeries to glaze products hours before display without worrying about texture changes. Understanding these professional techniques helps home bakers scale down approaches while maintaining similar quality and efficiency.
Storage and Shelf Life of Apricot Glaze
How Long Apricot Glaze Lasts in the Refrigerator
Properly stored apricot glaze maintains quality and food safety for extended periods, making batch preparation practical and economical. Freshly made apricot glaze, once cooled to room temperature, should be transferred to clean, airtight containers—glass jars with tight-fitting lids work best as they don't absorb odors or flavors. Stored in the refrigerator at 40°F or below, homemade apricot glaze typically remains fresh for 2-3 weeks, though some sources suggest up to one month when prepared with high-quality preserves and stored in sterile containers. The high sugar content acts as a natural preservative, inhibiting bacterial growth and extending shelf life significantly. Signs of spoilage include mold growth (visible spots of any color), off odors, fermentation bubbles, or changes in color or texture beyond normal thickening. Before each use, inspect the glaze carefully and discard if any questionable signs appear. Commercial neutral nappage products often contain additional preservatives and stabilizers that extend refrigerated shelf life to several months—always check manufacturer guidance for specific products. To maximize freshness, store glaze in smaller containers rather than one large jar, which limits air exposure each time you open it. Always use clean utensils when removing glaze to prevent introducing contaminants. Room temperature storage is not recommended for homemade glaze beyond 1-2 days, as it lacks the preservatives found in commercial products. Label containers with preparation dates to track freshness accurately.

Can You Freeze Apricot Glaze?
Freezing apricot glaze offers an excellent solution for long-term storage and advance preparation, though texture changes may occur that require addressing upon thawing. Homemade apricot glaze freezes successfully for 3-6 months when properly packaged in freezer-safe containers or heavy-duty freezer bags with as much air removed as possible. Divide large batches into smaller portions—ice cube trays work brilliantly for creating individual serving sizes that can be thawed as needed. Once frozen solid, pop the glaze cubes out and transfer to labeled freezer bags for space-efficient storage. When ready to use, thaw frozen glaze in the refrigerator overnight rather than at room temperature to prevent texture separation and maintain food safety. Upon thawing, the glaze may appear slightly separated or grainy—this is normal and easily corrected by gentle reheating while whisking vigorously to re-emulsify the mixture. Some water separation may occur during freezing; simply stir it back in during reheating. If texture seems off after thawing, pass the glaze through a fine-mesh strainer and reheat with a small amount of fresh water to restore smooth consistency. Freeze glaze in its finished, strained form rather than freezing preserves and making glaze later—the cooking process changes the structure in ways that freeze and thaw more successfully. Frozen glaze maintains flavor extremely well, making it indistinguishable from fresh once properly reheated. This approach allows you to always have glaze ready for spontaneous baking projects without the need to prepare small batches each time.
How to Reheat and Reuse Stored Apricot Glaze
Properly reheating stored glaze restores its fluid consistency and usable texture while maintaining quality and safety. Remove refrigerated glaze from the container and place it in a small saucepan over low heat, stirring frequently as it warms. The glaze will initially appear very thick, almost solid, but will gradually liquify as heat penetrates. Add 1-2 teaspoons of water if the glaze seems excessively thick or doesn't return to proper consistency with heat alone—this compensates for moisture loss during storage. Heat only until the glaze becomes fluid and brushable, approximately 100-110°F, avoiding excessive temperatures that can darken the color or alter flavor. For small quantities, microwave reheating works efficiently: place glaze in a microwave-safe bowl and heat in 15-20 second intervals, stirring between each, until smooth and warm. If the reheated glaze appears grainy or separated, whisk vigorously while warm, which usually resolves texture issues. For persistent problems, strain the reheated glaze through a fine-mesh sieve to remove any crystallized bits. You can reheat the same batch of glaze multiple times throughout its shelf life, though each reheating cycle may require slight water additions to maintain optimal consistency. Never return used glaze that has contacted raw fruits or other foods back to your main storage container—this introduces bacteria that accelerate spoilage. Instead, prepare only what you need, or accept that any excess applied during a project should be discarded. Some texture degradation occurs with multiple reheating cycles, so glaze used in highly visible applications should ideally be freshly made or frozen rather than refrigerated and reheated multiple times.
Apricot Glaze for Professional and Commercial Use
Making Apricot Glaze in Bulk for Bakeries
High-volume production requires adjusting techniques and scaling recipes while maintaining the consistency and quality that customers expect. Professional bakeries typically prepare apricot glaze in 1-2 quart batches, using large heavy-bottomed pots that distribute heat evenly and prevent scorching. The basic ratio remains the same—approximately 3:1 preserves to liquid—but commercial production often incorporates additional stabilizers like glucose syrup or corn syrup (1-2 tablespoons per quart) to improve shine and extend working time. Large-scale preparation requires constant stirring and careful temperature monitoring to prevent hot spots that can burn the glaze or create uneven consistency. Industrial chinois strainers or mechanical food mills expedite straining large quantities, pressing maximum glaze through while efficiently removing solids. Many bakeries maintain glaze at serving temperature throughout production shifts using professional warming equipment—countertop warmers, bain-maries, or specialized glaze warming pots that maintain 100-110°F without scorching. Batch preparation schedules should account for shelf life: preparing 2-3 days' worth prevents waste while ensuring freshness. Cost efficiency comes from buying commercial-size containers of preserves and streamlining workflow so one staff member can prepare glaze for multiple stations. Some bakeries prepare neutral base glaze in bulk, then customize smaller portions with flavoring additions (citrus, liqueurs, spices) for different applications. Quality control measures—testing each batch for proper consistency, color, and flavor—ensure customer satisfaction and product consistency across multiple production days.
Neutral Nappage and Pectin NH Alternatives
Understanding professional glazing products helps serious home bakers and small bakeries achieve commercial-quality results. Neutral nappage (sometimes called "mirror glaze" or "neutral glaze") is a commercial product specifically formulated for pastry work, containing fruit base (often apricot), glucose syrup, sugar, pectin, and preservatives. Unlike homemade apricot glaze, neutral nappage is completely transparent to clear, allowing the natural colors of fruits to show through without any golden tint. It sets more reliably, remains more stable during temperature fluctuations, and has significantly longer shelf life than homemade versions. Pectin NH (nappage) is a specialized reversible pectin that can be melted, set, remelted, and reset multiple times without losing its gelling properties—a huge advantage for professional applications. To use commercial nappage, warm it gently until fluid (following manufacturer instructions), apply like homemade glaze, and it sets quickly to a firm yet flexible coating. These products are available through restaurant supply stores and online specialty retailers. For home bakers seeking similar results without commercial products, adding fruit pectin powder to homemade glaze approximates some of nappage's improved setting properties. Combine 1 tablespoon pectin powder with 2 tablespoons sugar, whisk into your basic glaze recipe during cooking, and bring to a full boil for 1 minute—this creates a firmer set with better stability. While not identical to commercial nappage, this modification significantly improves homemade glaze performance for special occasions or when reliability is paramount.
Using Ready-Made Apricot Glaze Products
Commercial ready-made apricot glazes offer convenience and consistency, though understanding their differences from homemade versions helps you choose appropriately. Supermarket "apricot glaze" products, typically found near baking supplies, are essentially apricot preserves with added pectin and glucose, requiring dilution with water and straining before use—they offer minimal advantage over starting with quality preserves. Professional bakery supply products like Ancel, Sosa, or Bake'n Joy neutral nappage provide superior performance, coming pre-strained and formulated for optimal glazing properties. These commercial products require only gentle warming before use, saving significant time in high-volume operations. The trade-offs include higher cost per ounce, presence of preservatives and stabilizers, and sometimes slightly artificial flavor compared to homemade versions using quality preserves. For special events, competitions, or when consistency is critical, commercial products provide reliability that justifies their premium price. Many professionals use both: commercial nappage for high-stakes applications and homemade glaze for everyday production where slight variations are acceptable. When selecting commercial products, read labels carefully—"neutral" versions without fruit color work best for showcasing vibrant fruits, while "apricot" versions add golden tones that some prefer for classic tarts. Restaurant supply stores often sell commercial nappage in 1-2 pound containers at better per-unit prices than retail packaging. Consider commercial products an investment in convenience and reliability rather than a replacement for learning proper glaze-making technique, which remains valuable knowledge for any serious baker.
Nutritional Information of Apricot Glaze
Calories and Sugar Content in Apricot Glaze
Understanding apricot glaze's nutritional profile helps with dietary planning and menu labeling requirements for commercial operations. A typical tablespoon (approximately 20 grams) of homemade apricot glaze contains 40-50 calories, with virtually all calories coming from carbohydrates in the form of sugars. The sugar content ranges from 10-13 grams per tablespoon, depending on the preserves used and whether additional sugar was added during preparation. For context, a fruit tart serving typically receives 1-2 tablespoons of glaze total, adding 40-100 calories and 10-26 grams of sugar to the dessert. These numbers are comparable to a thin layer of frosting or a drizzle of honey. Apricot glaze contains negligible amounts of fat, protein, and fiber, as the straining process removes most fruit solids while retaining the sugar-rich liquid. Small amounts of vitamin A and potassium from apricots survive processing, though not in nutritionally significant quantities. For those monitoring sugar intake, the glaze's primary dietary concern is its high glycemic load—essentially pure sugar that rapidly impacts blood glucose. Sugar-free preserves can create lower-sugar glaze, though they may require pectin supplementation for proper setting and won't taste identical to traditional versions. Commercial neutral nappage often contains additional glucose or corn syrup, potentially increasing calorie and sugar content slightly beyond homemade versions. When calculating nutritional information for recipes, account for the fact that some glaze drips off or remains in the brush, so not all prepared glaze contributes to the final product's nutrition.
Common Additives and Allergens to Note
Both homemade and commercial apricot glazes may contain ingredients that concern people with allergies or dietary restrictions. Basic homemade glaze made from preserves, water, and lemon juice is naturally free from major allergens, containing no dairy, eggs, nuts, soy, or gluten. However, some commercial preserves contain unexpected additives—always read labels carefully. Pectin, the primary gelling agent, is typically derived from citrus peels or apples and is not an allergen for most people. Some commercial preserves and glazes contain citric acid (usually corn-derived), natural flavors (which could theoretically contain allergen traces), and potassium sorbate or sodium benzoate as preservatives. Glucose syrup and corn syrup, common in commercial products, pose concerns for those avoiding corn derivatives. For alcohol-sensitive individuals, recipes calling for liqueurs present obvious issues, and while most alcohol evaporates during cooking, traces may remain. Sulfites, sometimes used in dried apricots, rarely appear in preserves but should be checked by those with sulfite sensitivity. Commercial neutral nappage may contain various stabilizers, emulsifiers, and preservatives—ingredients lists can include substances like carrageenan, xanthan gum, or modified food starch. For food service operations, proper allergen labeling requires listing all ingredients in the preserves and any additions made during glaze preparation. Cross-contamination can occur if the same equipment is used for nut-containing preparations, relevant for bakeries serving customers with severe allergies. When in doubt, making glaze from scratch using clearly labeled simple preserves provides the most control and transparency for those managing dietary restrictions.
Related Recipes Using Apricot Glaze
Fruit Tart with Apricot Glaze Recipe
A classic French fruit tart showcases apricot glaze at its finest, combining buttery pastry, silky cream filling, and jewel-like glazed fruits. Begin with a fully baked 9-10 inch sweet tart shell (pâte sucrée) cooled completely. Prepare vanilla pastry cream by whisking 2 cups whole milk, 1/2 cup sugar, 1/4 cup cornstarch, pinch of salt, and 4 egg yolks in a saucepan, cooking while stirring constantly until thick and bubbling. Remove from heat, stir in 2 tablespoons butter and 1 teaspoon vanilla extract, then press plastic wrap directly onto the surface and refrigerate until cold. Spread the cooled pastry cream evenly in the tart shell. Arrange assorted fresh fruits decoratively—concentric circles of sliced strawberries, kiwi rounds, blueberries, raspberries, and mandarin segments create stunning visual impact. Prepare apricot glaze and brush generously over all fruits while still warm, working carefully to avoid disturbing the arrangement. Apply a second thin coat after 5 minutes for maximum shine. Refrigerate the finished tart for at least 30 minutes to set the glaze before serving. The tart keeps refrigerated for up to 24 hours, though the glaze protects fruits and maintains visual appeal longer than unglazed versions. For variations, customize the fruit selection seasonally—summer stone fruits, autumn figs and grapes, or tropical fruits all work beautifully. This dessert demonstrates apricot glaze's primary purpose: transforming simple components into an elegant, professional-looking creation that tastes as amazing as it looks.

Apricot-Glazed Cheesecake Recipe
Elevate traditional cheesecake with a subtle apricot glaze that adds professional polish and helps prevent surface cracking. Prepare your favorite cheesecake recipe—a basic version includes 24 oz cream cheese (room temperature), 1 cup sugar, 3 eggs, 1 cup sour cream, 1 tablespoon vanilla extract, and a graham cracker crust—baking in a water bath at 325°F until just set. Cool completely in the pan, then refrigerate for at least 4 hours. Before glazing, ensure the cheesecake surface is cold and dry—pat gently with paper towels if condensation has formed. Prepare apricot glaze and allow it to cool to lukewarm (not hot, which could melt the cheesecake). Using a soft pastry brush, apply a thin, even coat across the entire top surface, working from center outward. The glaze should be barely visible, adding sheen without pooling. Refrigerate for 15 minutes, then apply an optional second coat if desired. For enhanced presentation, arrange thin fruit slices (peaches, apricots, or berries) in a decorative pattern on top, then glaze again to secure them. The apricot glaze complements cheesecake's tangy richness beautifully while sealing the surface to prevent drying. This technique works for any cheesecake style—New York, Japanese, no-bake—and can be applied to the top only or to sides as well for completely protected, bakery-style presentation. The subtle apricot flavor enhances without overwhelming the cheesecake itself, and the glossy finish signals quality and care in preparation.
Apricot-Glazed Ham or Pork Roast Recipe
Transform holiday ham or pork roast into a stunning centerpiece with multiple layers of caramelized apricot glaze. Start with a 8-10 pound fully cooked spiral ham or a 4-5 pound boneless pork loin roast. For ham, score the surface in a diamond pattern and stud with whole cloves if desired. For pork, season with salt, pepper, and herbs, then sear all sides in a hot pan before roasting. Place meat in a roasting pan and roast at 325°F—ham until warmed through (about 15 minutes per pound), pork until internal temperature reaches 145°F. Prepare apricot glaze and enhance for savory application: add 3 tablespoons Dijon mustard, 2 tablespoons apple cider vinegar, 1 tablespoon soy sauce, and 1 teaspoon black pepper. During the final 30 minutes of cooking, brush a generous coat of glaze over the meat. After 10 minutes, apply a second coat. Continue applying coats every 10 minutes—typically 3-4 total—allowing each to caramelize slightly before adding the next. The glaze builds into a thick, shiny, mahogany coating with incredible depth of flavor. Remove meat from oven and tent with foil for 10 minutes before carving. The combination of sweet apricot, tangy mustard, and caramelized edges creates irresistible flavor that balances the rich meat perfectly. Serve with remaining glaze on the side for those who want extra. This technique works equally well for pork chops, chicken, or even salmon.
Apricot-Glazed Chicken Wings Recipe
Restaurant-quality chicken wings are easily achieved at home using apricot glaze for sweet-sticky coating. Start with 3 pounds chicken wings separated into drumettes and flats, patted completely dry. Toss with 1 tablespoon baking powder (not baking soda), 1 teaspoon salt, and 1/2 teaspoon black pepper—the baking powder helps skin crisp beautifully. Arrange in a single layer on wire racks set over baking sheets and refrigerate uncovered for 1 hour to dry surfaces further. Roast at 425°F for 45-50 minutes, flipping halfway, until deeply golden and crispy. While wings cook, prepare apricot glaze and customize for savory application: add 2 tablespoons sriracha or chili garlic sauce, 1 tablespoon rice vinegar, 2 teaspoons soy sauce, and 1 teaspoon grated fresh ginger. For enhanced depth, stir in 1 tablespoon of the wing drippings from the pan. When wings are done, transfer to a large bowl and pour half the warm glaze over them, tossing to coat completely. Return glazed wings to the racks and roast for an additional 5 minutes to set the glaze. Remove and toss with remaining glaze for a double-glazed finish. The result is wings with crispy skin, tender meat, and intensely flavorful sweet-spicy-savory coating that rivals any restaurant version. Garnish with toasted sesame seeds and sliced scallions. This technique works for game day, parties, or weeknight dinners—the apricot provides natural sweetness and stickiness that makes wings utterly addictive while balancing spicy and savory elements perfectly.
FAQs About Apricot Glaze
What Is Apricot Glaze Made Of?
Apricot glaze consists primarily of apricot preserves or jam that has been heated with liquid (typically water, though fruit juice or liqueur work as well) until fluid, then strained to remove fruit chunks and skins. The basic ratio is approximately 1 cup preserves to 2-4 tablespoons liquid, resulting in a smooth, brushable coating. Some recipes include additional sugar for sweetness, lemon juice for brightness, or cornstarch for thicker consistency. Commercial neutral nappage contains apricot base, glucose syrup, sugar, pectin, and preservatives for extended shelf life and reliable performance. The key characteristic that distinguishes glaze from regular preserves is its smooth, lump-free texture achieved through straining and its thinner, brushable consistency achieved through heating with liquid. Professional versions may include stabilizers and emulsifiers for improved shine and setting properties.
Can I Use Jam Instead of Preserves for Apricot Glaze?
Yes, apricot jam works perfectly well for making glaze and may actually be preferable for some applications. Jam contains crushed or pureed fruit with smaller pieces compared to preserves' larger chunks, meaning it requires less cooking time and less aggressive straining to achieve smooth consistency. The resulting glaze may be slightly thinner due to jam's lower pectin content, so you might need to use slightly less water or cook it a bit longer to achieve proper consistency. The flavor difference between jam-based and preserve-based glaze is minimal—both produce that characteristic mild apricot taste that complements other fruits and pastries. Avoid using jelly for most applications, as it lacks the body and flavor depth of jam or preserves, though it does create the clearest, most transparent glaze for applications where clarity is paramount. Regardless of which you choose, ensure it's a quality product with real fruit content rather than high-fructose corn syrup-based spreads labeled as "fruit spread."
How Do You Make Apricot Glaze for a Fruit Tart?
For fruit tarts, combine 1 cup apricot preserves with 2 tablespoons water and 1 tablespoon fresh lemon juice in a small saucepan over medium heat. Stir constantly until the mixture comes to a simmer and becomes fluid, about 3-5 minutes. Remove from heat and immediately strain through a fine-mesh sieve into a bowl, pressing firmly with a spatula to extract all liquid while catching solids. Allow the glaze to cool for 2-3 minutes until it's warm but not scalding—test temperature on the inside of your wrist like baby formula. Using a soft pastry brush, apply a thin coat over the arranged fruits, working quickly while glaze remains fluid. Allow this first coat to set for 5 minutes, then apply a second thin coat for optimal shine. The tart can be served immediately or refrigerated for up to 24 hours, with the glaze protecting fruits and maintaining their fresh appearance.
What Is the Difference Between Apricot Glaze and Jelly?
Apricot glaze and apricot jelly are fundamentally different products with different purposes. Apricot jelly is made from fruit juice only, containing no pulp or fruit pieces, and is designed as a spread for toast and sandwiches. It has a firm, sliceable consistency when cold due to high pectin content. Apricot glaze is made from preserves or jam that's been heated with liquid and strained, creating a brushable coating designed for pastry work. Glaze is fluid when warm and sets to a thin, glossy coating when cool, while jelly remains firm at all temperatures. Flavor-wise, glaze has more depth due to its fruit base, while jelly tastes cleaner and more purely sweet. You can make glaze from jelly by heating it with water until thinned to brushable consistency, though it may lack the rich flavor of preserve-based glaze. Many professional bakers actually prefer preserve-based glaze specifically because it has more character than jelly-based versions.
How to Make Apricot Glaze Set Properly?
Ensuring proper setting requires attention to pectin content, cooking time, and cooling conditions. Use preserves rather than jam when possible, as preserves typically contain more natural pectin. Cook the glaze mixture for the full recommended time (usually 5-7 minutes at a simmer) to concentrate it properly—undercooked glaze won't set. Don't add excessive water; start with less liquid than you think you need, as you can always thin it but can't easily thicken it once diluted. If your glaze won't set despite proper preparation, add commercial fruit pectin: dissolve 1/2 teaspoon powdered pectin in 1 tablespoon water, stir into the glaze, bring back to a simmer for 1-2 minutes, then test again. Alternatively, add a cornstarch slurry for immediate thickening. Allow the glazed item to set at room temperature for 10-15 minutes before refrigerating—rushing to the refrigerator can prevent proper gel formation. Quality matters: low-sugar or "light" preserves contain less pectin and may not set reliably without supplementation. Finally, apply thin coats rather than thick layers, as thin applications set faster and more completely than heavy ones.
Can I Use Apricot Glaze on Meat or Vegetables?
Absolutely—apricot glaze transitions beautifully to savory applications when enhanced with appropriate ingredients. For meats like ham, pork, chicken, or even salmon, modify basic apricot glaze by adding Dijon mustard (2-3 tablespoons per cup of glaze), vinegar or citrus juice for acidity, soy sauce for umami depth, and spices like black pepper, garlic powder, or red pepper flakes. This creates balance between sweet and savory that complements rather than clashes with meat's natural flavors. Apply during the final 20-30 minutes of cooking, brushing multiple thin coats that build into a caramelized, lacquered finish. For vegetables, especially roasted root vegetables, Brussels sprouts, or carrots, apricot glaze adds beautiful color and sweet notes that enhance natural vegetable sugars. The key to successful savory applications is balancing the fruit's sweetness with acidic, salty, or spicy components so the final flavor profile is complex rather than simply sweet. Apricot's relatively neutral fruit flavor makes it more versatile for savory use than strongly flavored fruit glazes like raspberry or cherry.
How Long Does Apricot Glaze Last After Making It?
Freshly made apricot glaze stored properly in an airtight container in the refrigerator stays fresh for 2-3 weeks, with some sources suggesting up to one month for glaze made with high-quality preserves in sterile containers. The high sugar content acts as a natural preservative, inhibiting bacterial growth significantly. At room temperature, homemade glaze keeps for only 1-2 days before quality and safety decline. For longer storage, freeze glaze in portions for 3-6 months—thaw in the refrigerator overnight and reheat gently with a splash of water to restore texture. Commercial neutral nappage products often last several months refrigerated due to added preservatives. Always check for signs of spoilage (mold, off odors, fermentation) before using stored glaze, and label containers with preparation dates for easy tracking. Use clean utensils when removing portions to prevent contamination that shortens shelf life.
Can I Make Apricot Glaze Without Sugar or Alcohol?
Yes, apricot glaze can easily be made without added sugar or alcohol while maintaining excellent functionality. Most recipes don't require additional sugar beyond what's already in the preserves, so simply omit any called-for granulated sugar—the preserves provide sufficient sweetness for both flavor and glazing properties. For reduced-sugar versions, use preserves made with fruit juice or alternative sweeteners, though note these may contain less pectin and require supplementation for proper setting. To make alcohol-free glaze, simply substitute water, fruit juice (apple or white grape work beautifully), or non-alcoholic extracts for any liqueur called for in enhanced recipes. Orange juice can replace Grand Marnier for similar citrus notes, while diluted vanilla extract approximates brandy's warmth without alcohol content. The basic apricot glaze recipe using only preserves and water is naturally free from added alcohol and can be made without additional sugar, making it suitable for children, those avoiding alcohol for any reason, and anyone monitoring sugar intake. For completely sugar-free versions, specialty sugar-free preserves exist, though they rely on alternative sweeteners and may taste and behave differently than traditional versions. These typically require pectin supplementation to achieve proper glazing consistency and may not produce the same glossy finish as sugar-based versions.
Final Tips for Perfect Apricot Glaze Every Time
Mastering apricot glaze comes down to understanding a few key principles that ensure consistent, professional results. Always use quality preserves as your foundation—real fruit content and natural pectin make all the difference in flavor and texture. Strain thoroughly while the glaze is hot for smooth, lump-free results, pressing firmly to extract maximum liquid while removing all solids. Temperature matters significantly: apply warm glaze to achieve smooth flow and coverage, but allow it to cool slightly so it's not scalding, which can damage delicate components. Multiple thin coats always produce superior results compared to single thick applications—patience in layering creates that enviable glossy finish without stickiness or heaviness. Practice your brushing technique using light, directional strokes rather than scrubbing motions that disturb surfaces and create streaks.
Adjust consistency to match your specific application: thinner for delicate fruit arrangements, thicker for coating cake surfaces, and enhanced with mustard or vinegar for savory dishes. Don't be afraid to customize with citrus juice, liqueurs, or extracts to complement your specific dessert or dish. Store glaze properly in airtight containers refrigerated, and reheat gently with added water as needed to restore optimal consistency. Most importantly, remember that apricot glaze serves dual purposes—it protects and preserves while enhancing visual appeal, making it a true workhorse ingredient that elevates both everyday baking and special occasion desserts from homemade to professional quality. With these techniques and understanding, you'll achieve bakery-worthy results that impress family, friends, and customers alike.


