
Learning how to pack pear butter in a jar is the key to keeping your homemade pear butter smooth, flavorful, and shelf-stable for months. Whether you’re new to canning pear butter in jars or looking for the best way to jar pear butter safely, this step-by-step guide covers everything — from sterilizing jars for pear butter to hot-packing pear butter into jars and achieving the perfect headspace for pear butter jars. Read on to discover how to seal pear butter jars correctly, prevent spoilage, and enjoy a pantry full of golden, spiced pear butter anytime.
Tools & Equipment You Need to Pack Pear Butter in a Jar
Having the right tools makes packing pear butter in jars safer, faster, and more efficient. Essential equipment falls into three categories: jars and closures, specialized packing tools, and processing equipment. Investing in quality tools pays dividends through years of reliable use, with most canning equipment lasting decades when properly maintained.

Mason jars, lids, bands: sizes to use when packing pear butter in a jar
Mason jars designed for home canning are the gold standard for packing pear butter. Half-pint (8 oz) and pint (16 oz) jars work best for pear butter, with half-pints ideal for gift-giving or single servings. Ball and Kerr brands dominate the market, offering consistent quality and readily available replacement parts. Each jar requires a flat metal lid with sealing compound and a threaded metal band to secure it during processing.
Modern two-piece lids should be used only once for canning, though bands can be reused indefinitely if free from rust or dents. The National Center for Home Food Preservation emphasizes using jars specifically manufactured for home canning—mayonnaise or pickle jars lack the tempered glass necessary to withstand processing temperatures. Before packing pear butter, inspect each jar for chips, cracks, or scratches along the rim, as these defects prevent proper sealing. Jars should be washed in hot, soapy water and kept warm until filled. Most pear butter recipes yield 6-8 half-pints or 3-4 pints per batch, so having 12-15 jars on hand accommodates variations in batch size.
Canning funnel, jar lifter, bubble freer and other packing tools for pear butter in a jar
Specialized canning tools transform packing pear butter from frustrating to straightforward. A wide-mouth canning funnel prevents spills and keeps jar rims clean—crucial for achieving proper seals. The funnel's wide opening accommodates thick pear butter while directing it cleanly into jars. Jar lifters with rubber-coated grips safely remove hot jars from boiling water without burning hands or dropping jars. These tools cost $3-8 each and dramatically improve safety.
A bubble remover/headspace measuring tool serves dual purposes: the plastic spatula end releases trapped air bubbles, while the notched opposite end measures precise headspace. Many canners also appreciate a magnetic lid lifter for retrieving lids from hot water without contamination. A clean kitchen towel or paper towels are essential for wiping jar rims before applying lids—even tiny residue can prevent sealing. Some packers use a ladle with a pour spout for better control when transferring hot pear butter. A timer with clear digital display ensures accurate processing times. While basic spoons and cloths work in a pinch, purpose-built tools reduce errors and make the packing process significantly more enjoyable, particularly when processing multiple batches consecutively.
Boiling water canner vs. steam canner vs. pressure canner for packing pear butter in a jar
Selecting the appropriate canner for pear butter depends on understanding pH levels and processing requirements. Pear butter qualifies as a high-acid food (pH below 4.6) when prepared with proper lemon juice or citric acid ratios, making it safe for boiling water bath canning. A boiling water canner—essentially a large, deep pot with a rack—submerges jars in 212°F (100°C) water for the specified processing time, typically 10-15 minutes for pear butter depending on jar size and altitude.
Steam canners offer a faster alternative, approved by the USDA for high-acid foods in recent years. These devices process jars using atmospheric steam rather than boiling water, requiring less energy and water while achieving identical safety results for processing times up to 45 minutes. Pressure canners, while unnecessary for pear butter, can also process high-acid foods using the boiling water method (without pressurizing). According to Ball's Complete Book of Home Preserving, any canner must be deep enough to cover jar tops with 1-2 inches of water plus additional space for boiling. For packing pear butter in jars, a 21-quart boiling water canner accommodates 7 pint jars or 9 half-pint jars per batch. Altitude affects processing time—add 5 minutes for elevations above 3,000 feet and 10 minutes above 6,000 feet according to USDA guidelines.
Ingredients & Batch Yield: How Much Pears per Jar When You Pack Pear Butter in a Jar
Understanding ingredient ratios and expected yields prevents waste and ensures sufficient supplies before beginning. Accurate measurements contribute to both safety and quality when packing pear butter in jars.
Estimating pears to jars: pounds of pears per half-pint/pint when packing pear butter in a jar
Fresh pear quantities vary based on cooking method and final consistency desired. Generally, 6-8 pounds of fresh pears yield approximately 4-5 pints or 8-10 half-pints of finished pear butter after cooking down. The dramatic volume reduction occurs because pears contain 84% water by weight, which evaporates during the long, slow cooking process that concentrates flavors and creates the characteristic spreadable texture.
Bartlett, Bosc, and Anjou pears work particularly well for butter due to their soft flesh and natural sweetness. Approximately 2-3 medium pears equal one pound. When calculating batch sizes, account for 15-20% waste from peeling, coring, and removing bruised sections. A helpful rule of thumb: plan on 1.5-2 pounds fresh pears per finished half-pint jar. Those packing large batches should weigh fruit after preparation rather than relying on whole fruit estimates. According to University Extension research on fruit preservation, cooking time affects final yield more than initial fruit quantity—longer cooking produces thicker butter but lower yields. Many experienced canners prepare slightly more than needed, refrigerating any excess in covered containers for immediate use rather than processing partially-filled jars, which risks improper sealing and safety concerns.
Sugar, spices, lemon juice — recipe ratios for pear butter you will pack in jars
Pear butter recipes balance sweetness, acidity, and flavor complexity while maintaining food safety. A standard ratio uses 8 pounds prepared pears, 4-6 cups sugar (depending on pear sweetness and personal preference), 1/4 cup lemon juice, and optional spices. The lemon juice proves essential beyond flavor—it lowers pH to safe canning levels, typically achieving pH 3.5-4.0. Never omit or reduce lemon juice, as insufficient acidity creates botulism risk.
Sugar serves multiple preservation functions: it enhances flavor, contributes to spreading consistency, and acts as a preservative through osmotic pressure that inhibits microbial growth. While some recipes reduce sugar, dramatic reductions require testing for safety and may produce runny butter. Common spice additions include 2-3 teaspoons cinnamon, 1 teaspoon nutmeg, 1/2 teaspoon allspice, and 1/4 teaspoon cloves per 8-pound batch. The National Center for Home Food Preservation recommends following tested recipes exactly for first batches, adjusting spices only after understanding baseline results. Vanilla extract (1-2 teaspoons) can be added after cooking but before packing in jars. Some innovative canners incorporate 2 tablespoons bourbon, 1/4 cup maple syrup, or 1 teaspoon ginger, though acid levels must remain constant regardless of flavor variations to ensure safe processing when packing pear butter in jars.
Safety First: Food Safety Rules When You Pack Pear Butter in a Jar
Food safety protocols prevent illness and ensure shelf stability when packing pear butter in jars. Following tested guidelines from authoritative sources like the USDA and university extensions protects both makers and consumers.

Sterilizing jars and lids before you pack pear butter in a jar
Sterilization eliminates microorganisms that could cause spoilage or illness. For processing times of 10 minutes or longer, the USDA states that sterilization isn't technically required—the processing itself sterilizes jars. However, keeping jars hot remains essential to prevent thermal shock when filling with hot pear butter. Wash jars in hot, soapy water or run through a dishwasher cycle, then keep them in simmering (180°F/82°C) water until needed.
Never boil jars in water, as excessive temperatures can cause thermal shock. Some canners place clean jars in a 200°F (93°C) oven for 20 minutes instead. For lids, modern manufacturers recommend warming (not boiling) in hot water to soften the sealing compound—check specific brand instructions, as formulations have changed in recent years. Ball and Kerr lids since 2020 use a different compound that doesn't require preheating, though warming remains harmless. According to Simple Bites' canning safety research, the most critical factor isn't sterilization temperature but rather ensuring jars remain hot when filled. Cold jars filled with hot pear butter can crack from thermal shock, wasting both containers and product. Maintaining jar temperature between 180-200°F until the moment of filling prevents this common problem when packing pear butter in jars.
Why you must fill hot jars with hot pear butter when packing pears into jars
Temperature consistency during filling proves critical for several reasons. Hot pear butter (190-200°F) poured into hot jars prevents thermal shock that cracks glass. Ball's research on canning science demonstrates that cold jars create temperature differentials exceeding 100°F, frequently causing breakage. Beyond preventing breakage, hot-packing creates conditions that facilitate proper vacuum sealing during cooling.
The hot-pack method drives air from food tissue, resulting in better color retention and fewer floating fruit pieces. As jars cool after processing, contents contract while lid sealing compound softens and forms an airtight seal. This process requires starting temperatures above 180°F. Cold packing—filling cold jars with cold or room-temperature food—isn't recommended for pear butter because dense fruit butters trap air pockets that prevent proper heat penetration during processing. Inadequate heat penetration means potentially dangerous bacteria survive. The University of Georgia's National Center for Home Food Preservation specifies that fruit butters must always be hot-packed due to their thick consistency. Hot packing also reduces processing time compared to raw-pack methods, saving energy and preserving better texture. Keeping pear butter at 185-195°F on the stove while filling jars ensures each jar receives properly heated product, maintaining food safety standards when packing pear butter in jars.
Packing Methods: Hot-Pack vs Raw-Pack When You Pack Pear Butter in a Jar
Understanding packing methods helps canners choose appropriate techniques for different foods. While multiple methods exist, pear butter requires specific approaches for optimal safety and quality.
Hot-packing pear butter in a jar — what it is and when to use hot pack
Hot-packing involves filling jars with food that has been cooked and remains near boiling temperature. For pear butter, this means ladling butter that's been cooked to finished consistency and maintained at 190-200°F directly into hot jars. Hot-packing represents the only acceptable method for fruit butters due to their dense texture and low acidity relative to other preserved fruits.
The technique offers multiple advantages documented by Tasting Table's canning experts: better color retention, improved texture consistency, and enhanced flavor development. Hot pear butter flows easily into jars, settling around curves and filling completely without air pockets that could harbor bacteria. The high temperature also expands jar contents, forcing out excess air before processing. During cooking, enzymes that cause browning and flavor deterioration become deactivated, preserving the butter's appealing golden color. Hot-packing creates a product with firmer texture upon cooling compared to raw-pack alternatives. Most importantly, hot-packing ensures the entire jar contents reach temperatures sufficient to destroy harmful microorganisms during processing. Research from land-grant universities confirms that hot-packed pear butter requires shorter processing times than hypothetically raw-packed equivalents while achieving superior microbial kill rates. For these reasons, all tested pear butter recipes specify hot-pack methodology when packing pear butter in jars.

Raw-pack (cold pack) for fruit butters — pros/cons when packing pear butter in a jar
Raw-packing, also called cold-packing, involves filling jars with uncooked or minimally cooked food before processing. While suitable for certain fruits like peaches, berries, or tomatoes, this method proves impractical and potentially unsafe for pear butter. Understanding why helps canners recognize when raw-packing appropriately applies to other preservation projects.
Raw-pack advantages for suitable foods include less prep time, better texture for delicate fruits, and slightly higher vitamin retention since food isn't cooked twice. However, Mother Earth News' preservation research explains these benefits don't transfer to fruit butters. Pear butter requires extensive cooking to achieve spreadable consistency—the defining characteristic comes from evaporating water and concentrating sugars through prolonged heat. Raw pears contain too much moisture and maintain firm texture that doesn't spread. Attempting to raw-pack would produce chunky fruit in liquid rather than smooth butter. More critically, raw-packed dense foods don't allow heat penetration needed for safe processing. The USDA explicitly states fruit butters must be hot-packed due to their thickness preventing heat from reaching jar centers during processing. Cold spots remain below temperatures necessary to destroy spoilage organisms and pathogens. While raw-pack works for whole or halved fruits with high natural acidity, it's inappropriate for concentrated products like butters, which require hot-pack methodology exclusively when packing pear butter in jars.
Step-by-Step: How to Pack Pear Butter in a Jar
Following a systematic process ensures consistent results when packing pear butter in jars. Each step builds on previous ones, creating the conditions necessary for proper sealing and long-term preservation.

Step 1: Prepare and cook pear butter to final consistency for packing in jars
Begin by washing 8 pounds of pears thoroughly, then peel, core, and cut into chunks. Place prepared pears in a large, heavy-bottomed pot with 1 cup water to prevent sticking. Cook over medium heat until fruit softens completely, approximately 20-30 minutes. Mash or blend until smooth—an immersion blender works efficiently for this task, though food mills or potato mashers suffice.
Add 4-6 cups sugar, 1/4 cup lemon juice, and desired spices to the pureed pears. Continue cooking over low-medium heat, stirring frequently to prevent scorching. The mixture should bubble gently, reducing volume by approximately 40-50% over 1-2 hours. Pear butter reaches proper consistency when it mounds on a spoon without running, and a spoonful placed on a chilled plate doesn't form a watery ring around edges. The color deepens to rich caramel or amber during cooking. According to food science research, achieving 200-205°F internal temperature indicates sufficient sugar concentration for preservation. Many experienced canners note that pear butter continues thickening slightly during cooling and storage, so avoid overcooking to an overly stiff consistency. The finished butter should coat a spoon thickly but still pour slowly—think warm caramel sauce rather than paste. Once desired consistency is reached, reduce heat to maintain temperature around 190-195°F while preparing jars.
Step 2: Keep the pear butter hot and prepare your jars for filling (hot jars)
Maintaining temperature prevents bacterial growth and ensures successful sealing. Keep finished pear butter on the stove at 185-195°F, stirring occasionally to prevent surface cooling or scorching. If the butter drops below 180°F, increase heat slightly but avoid boiling, which can cause excessive thickening or caramelization.
While butter stays hot, prepare jars by removing them from hot water or oven one at a time using jar lifters. Place each hot jar on a clean towel or wooden cutting board—never directly on cold countertops, which can cause thermal shock and cracking. Simple Bites' canning tutorials emphasize working with one or two jars at a time rather than removing all jars simultaneously, which allows them to cool prematurely. Place a canning funnel in the first jar's mouth to guide filling. Have lids warming in a small saucepan of hot (not boiling) water, bands nearby, and a clean damp cloth for wiping rims. Organize workspace efficiently: hot jars within easy reach of the stove, towels for handling jars, headspace measuring tool, and bubble remover easily accessible. This assembly-line approach minimizes time jars spend cooling before filling. Begin ladling immediately after positioning the funnel—speed matters when working with hot jars to maintain that critical temperature differential between container and contents necessary for proper packing of pear butter in jars.
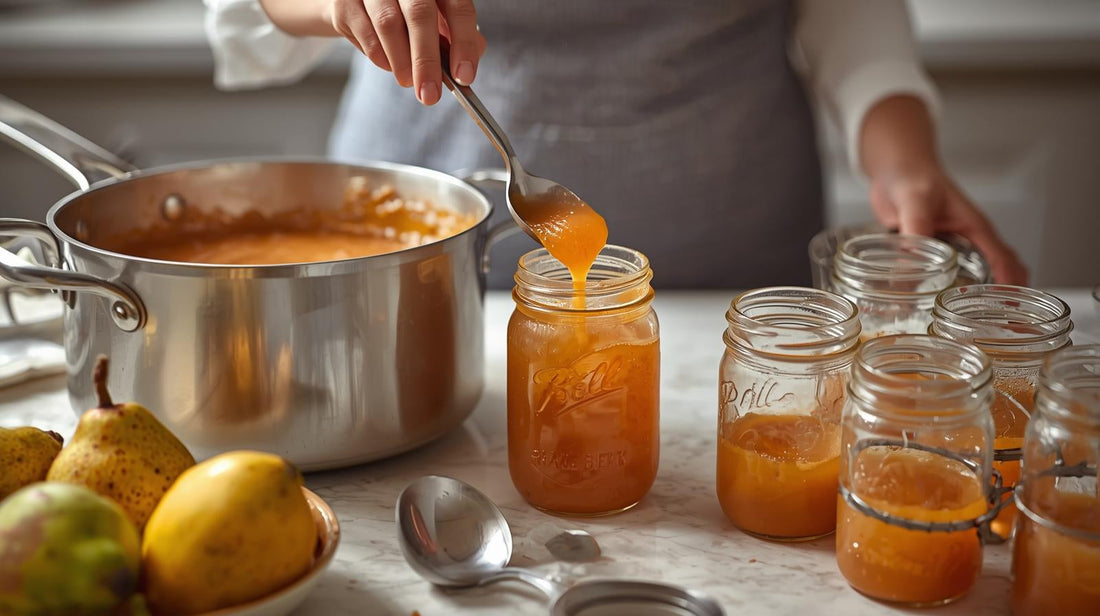
Step 3: Use a funnel and ladle — how to ladle pear butter into jar when packing pear butter in a jar
Position a wide-mouth canning funnel firmly in the first hot jar, ensuring it sits flat against the rim. Using a ladle with 4-8 ounce capacity, scoop hot pear butter from the pot and pour steadily into the funnel. The funnel directs the flow and prevents splashes that could leave residue on threads or rims. Pour slowly enough that butter doesn't splash but quickly enough to maintain temperature.
Thick pear butter may require gentle encouragement with a spatula to flow through the funnel. Some canners angle the ladle slightly to create a continuous pour rather than dumping all at once. Fill jars systematically—complete one jar through final sealing before starting another, or fill all jars before processing, depending on batch size and available work space. When ladling, avoid stirring up sediment from the pot's bottom if any darkening or settling has occurred, though properly cooked pear butter typically maintains consistent texture. If butter cools and thickens noticeably during filling, return the pot to heat briefly, stirring to restore fluidity. The goal is smooth, controlled filling that maintains jar and butter temperature while keeping jar exteriors and rims clean for proper sealing when packing pear butter in jars.
Step 4: Leave correct headspace when packing pear butter in a jar (recommended 1/4 in)
Headspace—the gap between food surface and jar rim—critically affects sealing and safety. For pear butter, maintain 1/4 inch headspace as specified in tested recipes. This measurement isn't arbitrary; it's calculated to allow for food expansion during processing while providing sufficient space for vacuum formation during cooling.
Use the notched end of a bubble remover tool or a small ruler to measure headspace accurately. The 1/4-inch notch should reach from the jar rim to just touching the butter's surface. Insufficient headspace (overfilling) can cause butter to contact the lid during processing, preventing proper sealing or forcing butter past the seal—a problem called siphoning. Attainable Sustainable's canning research shows that even 1/8 inch too little headspace doubles seal failure rates. Conversely, excessive headspace (more than 1/2 inch) prevents proper vacuum formation, also leading to seal failures. The increased air volume doesn't evacuate completely during processing, leaving insufficient vacuum to pull the lid down firmly. Thick products like pear butter especially require precise headspace because their density prevents them from settling during processing. After filling to approximately 1/4 inch, use the bubble remover to verify measurement before proceeding. Adjust by adding small amounts of butter if needed or carefully spooning out excess. Accurate headspace represents one of the most important technical aspects when packing pear butter in jars.
Step 5: Remove air bubbles and adjust headspace when packing pear butter in a jar
Air bubbles trapped in thick pear butter create pockets where bacteria can survive processing temperatures. After filling each jar to proper headspace, insert a bubble remover tool—a thin, flat plastic spatula—between jar wall and butter. Slowly slide the tool down one side, moving it gently back and forth to release trapped air. Repeat around the jar's circumference at least 3-4 times, inserting the tool at different points.
Katie Gets Creative's canning guides note that thick fruit butters trap more air than thinner products like jam, making this step particularly crucial. Watch for bubbles rising as the tool moves through the butter. Sometimes removing bubbles causes the butter level to drop as air escapes and butter settles. After bubble removal, recheck headspace—add more hot butter if necessary to restore the 1/4 inch measurement. Don't skip this step even if no visible bubbles appear; dense butter often conceals air pockets invisible at the surface. The tool's thin profile allows it to slide easily without disturbing butter texture or creating new air pockets. Some canners use wooden chopsticks or plastic knives, though purpose-built bubble removers work more efficiently. This process takes only 20-30 seconds per jar but significantly impacts final product quality and safety by ensuring uniform heat penetration during processing when packing pear butter in jars.
Step 6: Wipe rims, place lids, screw bands fingertip tight when packing pear butter in a jar
Rim cleanliness directly determines sealing success. Even microscopic butter residue prevents the lid's sealing compound from contacting glass uniformly, creating gaps where air can enter. Dampen a clean cloth or paper towel with warm water, folding it to create a clean edge. Wipe the jar rim completely, rotating the jar while maintaining gentle pressure against the rim's flat surface and the threads. Check for any sticky residue and rewipe if necessary.
According to Attainable Sustainable's troubleshooting research, rim residue causes approximately 60% of seal failures in fruit butter canning. After confirming rim cleanliness, remove a lid from hot water using a magnetic lifter or tongs, shaking off excess water. Center the lid on the jar rim, sealing compound side down. The lid should lie flat without tilting. Place a band over the lid and screw it down using just fingertips—this is "fingertip tight." Tighten only until resistance is felt, then stop. Over-tightening prevents air from escaping during processing, paradoxically causing seal failures. Under-tightening allows water to enter jars during processing. The fingertip tight standard means snug but not forcefully cranked down. Avoid using tools or excessive force. The band serves only to hold the lid in position; the vacuum created during cooling actually forms the seal. Proper rim preparation and band tightening significantly improve sealing success when packing pear butter in jars.
Step 7: Process jars in boiling water bath — processing time guidance for packing pear butter in a jar (e.g., 10–15 minutes depending on recipe/jar size)
Processing destroys spoilage organisms and creates the vacuum seal that preserves pear butter. Using jar lifters, carefully lower filled jars into the canner, which should contain simmering water. Arrange jars so they don't touch each other or tip. The water level must cover jar tops by 1-2 inches—add boiling water from a kettle if needed to achieve proper depth.
Place the canner lid on and increase heat to high. When water reaches a full rolling boil, set a timer for the recipe-specified processing time. The Grateful Girl Cooks' tested recipes indicate 10 minutes for half-pint jars and 15 minutes for pint jars at altitudes below 1,000 feet. Maintain active boiling throughout—adjust heat if necessary, but don't count time when water drops below boiling. High-altitude locations require additional processing time: add 5 minutes above 3,000 feet, 10 minutes above 6,000 feet, and 15 minutes above 8,000 feet according to USDA altitude adjustment tables. Never reduce processing time below recipe specifications, as this risks inadequate heat penetration. Avoid opening the canner during processing, which drops temperature and requires restarting timing. Gentle boiling suffices—violent boiling wastes energy without improving safety. Processing times represent scientifically tested minimums to ensure product safety when packing pear butter in jars.
Step 8: Remove jars, cool, check seals — how to finish packing pear butter in a jar
When processing completes, turn off heat and remove the canner lid, tilting it away to direct steam safely away from your face. Let jars rest in the canner for 5 minutes—this prevents thermal shock from sudden temperature changes. Using jar lifters, carefully remove jars one at a time, keeping them upright. Place on a towel-lined surface away from drafts, maintaining several inches between jars to allow air circulation.
The Grateful Girl Cooks' cooling protocols emphasize avoiding temperature extremes during this phase. Don't retighten bands, wipe jars, or disturb them during cooling. Within minutes, distinctive "ping" sounds indicate lids sealing as vacuum forms. Let jars cool undisturbed for 12-24 hours. After cooling completely, test seals by pressing the lid center—properly sealed lids remain concave and don't flex when pressed. Alternatively, try lifting jars by their lids (holding the lid, not the band); sealed lids support the jar's weight. Remove bands, label jars with contents and date, then store in a cool, dark, dry location. Sealed jars of pear butter remain safe for 12-18 months, though quality peaks within one year. Unsealed jars should be refrigerated immediately and consumed within 3 weeks or reprocessed within 24 hours using new lids if desired. This final quality check ensures only properly preserved jars enter storage when packing pear butter in jars.
Common Packing & Canning Issues When You Pack Pear Butter in a Jar (and fixes)
Even experienced canners occasionally encounter problems. Understanding common issues and their solutions builds troubleshooting skills and prevents future mistakes.
Why jars might not seal when packing pear butter in a jar (rim residue, improper headspace, band tightness)
Seal failures frustrate home canners but typically result from preventable causes. Rim residue represents the most frequent culprit—even invisible butter film prevents lid compound from contacting glass completely. Always wipe rims with a clean, damp cloth after filling, checking for any sticky feeling along the rim and threads. Reusable cloths should be rinsed frequently during batch processing to avoid transferring residue between jars.
Improper headspace causes seal failures through two mechanisms: overfilling forces butter between lid and rim during processing, preventing compound contact; underfilling creates excessive air volume that doesn't evacuate completely, preventing adequate vacuum formation. Band tightness also affects sealing—over-tightened bands prevent air escape during processing, while loose bands allow water entry. Damaged jars with chips or cracks can't seal regardless of proper technique. Lid defects, though rare with quality brands, occasionally occur; compound separation, dents, or manufacturing flaws prevent sealing. Using old-style lids beyond their shelf life causes failures as sealing compound degrades. Temperature issues also contribute: cold jars or insufficiently heated butter fail to create adequate vacuum. Finally, insufficient processing time means contents don't heat enough to expand and drive out air. Most seal failures trace to technique rather than equipment—maintaining cleanliness, measuring accurately, and following tested procedures prevents the majority of problems when packing pear butter in jars.
Preventing siphoning, cloudiness, or separated butter when packing pear butter in a jar
Siphoning occurs when butter leaks from jars during or after processing, creating sticky residue and potentially compromising seals. This problem usually results from overfilling (insufficient headspace), fluctuating processing temperatures, or removing jars from the canner too quickly. Maintaining steady boiling and letting jars rest 5 minutes before removal significantly reduces siphoning. Some butter loss doesn't necessarily indicate seal failure—check seals after cooling rather than assuming lost jars.
Cloudiness in pear butter typically indicates undercooking or separation of fruit solids from liquid. Cooking butter to proper consistency—thick enough to mound on a spoon—prevents this issue. Adding pectin or cooking longer reduces separation. Separation can also occur during storage if butter wasn't cooked thick enough initially or if stored in excessively warm locations. While aesthetically unappealing, separated butter remains safe if properly sealed; simply stir before using. Color changes, particularly darkening at the top of jars, result from oxidation of fruit pigments—this proves more common when excessive headspace traps too much air. Using proper headspace and processing immediately after filling minimizes oxidation. Some darkening naturally occurs during long storage but doesn't indicate spoilage if seals remain intact. Crystallization sometimes appears as white spots or grittiness, caused by sugar concentration; warming and stirring resolves this texture issue when packing pear butter in jars.
What to do with unsealed jars after packing pear butter in a jar
Discovering unsealed jars after cooling requires immediate action to prevent food waste and maintain safety. First, verify the seal failure—press the lid center to confirm it flexes upward rather than remaining firmly concave. Remove the band and check that the lid lifts easily. Don't assume a jar failed simply because you didn't hear a ping; some jars seal silently.
For confirmed seal failures, choose one of three options: refrigerate and use within 3 weeks, reprocess within 24 hours, or freeze for longer storage. Refrigeration suits jars you'll consume quickly—transferred to clean containers with tight lids, pear butter keeps well chilled. Reprocessing works if acting quickly: remove the lid, check rim for damage, wipe clean, add a new lid (never reuse lids), and process for the full original time. Note that reprocessing may further darken butter and soften texture slightly. Freezing works well for longer storage—transfer butter to freezer-safe containers leaving 1-inch headspace for expansion, or use the jar with a plastic freezer lid rather than canning lid. Frozen pear butter maintains quality for 8-12 months. Never attempt to simply replace the lid and refrigerate without reprocessing—unprocessed butter won't have been heated sufficiently to destroy spoilage organisms. Examine reprocessed or refrigerated butter regularly for off odors, mold, or fermentation signs. While seal failures disappoint, they rarely indicate broader batch problems when packing pear butter in jars.
Storage & Shelf Life After You Pack Pear Butter in a Jar
Proper storage maximizes shelf life and maintains quality. Understanding storage requirements helps home canners enjoy their preserved pear butter at peak flavor for many months.
Pantry storage recommendations for pear butter packed in jars
Sealed jars of pear butter thrive in cool, dark, dry storage conditions. Ideal temperatures range from 50-70°F (10-21°C)—basements, pantries, or interior closets work well. Avoid areas with temperature fluctuations like garages or attics, which accelerate quality loss. Light exposure degrades color and flavor, so store jars in dark locations or inside boxes. Maintain moderate humidity levels; excessive moisture rusts bands and dampness indicates conditions prone to mold.
Research from food science programs shows properly processed and stored pear butter maintains optimal quality for 12 months and remains safe for 18-24 months when seals stay intact. Quality indicators include color (rich golden-amber that gradually darkens), texture (smooth spreading consistency), and flavor (balanced sweet-tart without fermented notes). Before using any stored jar, inspect for safety signs: the lid should remain firmly sealed and concave, contents should look uniformly colored without mold or foam, and opening should release normal fruit aroma rather than off odors. Discard without tasting if seals have failed, mold appears, contents look unusually dark or separated, or odors seem fermented or rancid. Dating jars at packing helps track age—rotate stock using older jars first. Though canned butter technically remains safe indefinitely while sealed, texture becomes grainy and flavors mute after 24 months. Most home canners report best eating quality within the first 12-15 months when packing pear butter in jars.
Refrigeration after opening and freezer options for jars of pear butter
Once opened, pear butter requires refrigeration to prevent mold and fermentation. Transfer opened jars immediately to the refrigerator, replacing canning lids with plastic storage lids if desired—bands and metal lids rust when exposed to refrigerator humidity. Opened pear butter remains safe for 3-4 weeks when refrigerated at 35-40°F (2-4°C). Always use clean utensils to remove butter, preventing contamination that shortens shelf life.
Mold typically appears first at exposed surfaces where butter contacts air. Check opened jars regularly and discard if any mold develops—don't simply scrape it off, as mold roots extend deeper than visible surface growth. Freezing provides long-term storage alternatives. Transfer pear butter to freezer-safe containers or use canning jars with straight sides and plastic freezer lids, leaving 1-inch headspace for expansion. Frozen pear butter maintains quality for 10-12 months at 0°F (-18°C) or below. Thaw overnight in the refrigerator rather than at room temperature for best texture. Freeze in portion sizes matching typical use—half-pint containers work well for families using butter within 1-2 weeks. Some texture softening occurs after freezing due to ice crystal formation breaking down cell structure, but flavor remains excellent. For gift-giving, include refrigeration and use-by recommendations with each jar. Properly stored opened or frozen pear butter retains the delicious flavor developed during cooking and careful packing in jars.
Labelling, Batch Tracking & Gift Presentation When You Pack Pear Butter in a Jar
Professional labeling and tracking systems benefit both personal use and gift-giving. These practices ensure safety, support troubleshooting, and create appealing presentations when sharing homemade pear butter.
Labeling date, batch, ingredients and allergen notes for pear butter packed in jars
Comprehensive labeling serves multiple purposes beyond simple identification. At minimum, every jar should display the contents name, packing date, and batch number if producing multiple batches. Date formats like "Pear Butter - Oct 2025" or "10/28/25" help track age for rotation. Write directly on lids using permanent markers, or use adhesive labels on jar sides for better visibility. Include key ingredients, especially when creating flavor variations—"Spiced Pear Butter (cinnamon, nutmeg, cloves)" or "Bourbon Vanilla Pear Butter" helps distinguish jars in storage.
Allergen information becomes critical when gifting pear butter to others. While pears rarely cause allergies, added ingredients may: note if butter contains tree nuts, dairy, or alcohol. Some recipes incorporate almond extract or coconut sugar, requiring disclosure for sensitive individuals. For commercial-style gifts, include a complete ingredient list in descending order by weight: "Ingredients: Pears, sugar, lemon juice, cinnamon, nutmeg." Processing method notes like "Water bath canned 10 min" support troubleshooting if problems arise. Storage instructions benefit gift recipients unfamiliar with home canning: "Store unopened in cool, dark place. Refrigerate after opening and use within 3 weeks." Batch numbers like "2025-43" (year and batch number) allow tracing all jars from a single cooking session if quality issues emerge. Maintaining a separate canning log correlating batch numbers with detailed production notes creates accountability and supports continuous improvement when packing pear butter in jars.
Gift jar tips and hygiene when packing pear butter in a jar
Presentation transforms homemade pear butter from pantry staples into memorable gifts. After jars cool and seal, remove bands and wash jars with warm, soapy water to remove any sticky residue from processing. Dry thoroughly and polish with a clean cloth for sparkling presentation. Bands can be cleaned and replaced if giving jars with bands attached, though many canners prefer presenting jars without bands to showcase the sealed lid.
Decorative options abound: fabric squares cut with pinking shears and secured with twine or ribbon create classic country charm. Labeled kraft paper circles affixed to lids with baker's twine offer rustic appeal. Printable labels designed in word processors or design software produce professional results—include decorative borders, ingredient lists, and usage suggestions. Some gifters attach recipe cards showing ways to use pear butter: spread on toast, swirled in oatmeal, glazed on pork chops, or paired with cheese. Small wooden spreaders or vintage spoons tied to jars add thoughtful touches. Presentation boxes or baskets elevate multiple-jar gifts.
Hygiene considerations ensure gift safety: never give jars with failed seals, and carefully inspect each jar before gifting. Package jars to prevent breakage during transport—bubble wrap, cardboard dividers, or nestling in shredded paper protects glass. Include "best by" dates based on conservative estimates—suggest using within 12 months even though properly canned butter lasts longer. For non-canners receiving gifts, include brief instructions about checking seals and proper storage. Thoughtful presentation demonstrates pride in craftsmanship while ensuring recipients enjoy safely preserved pear butter packed with care in jars.
Scaling Up: How to Pack Pear Butter in a Jar for Small Batches vs. Large Batches
Adjusting production scale requires planning to maintain efficiency and quality. Understanding differences between small and large batch processing helps canners optimize their workflow.

Assembly line suggestions: stagger heating, canner capacity and timing when packing many jars of pear butter
Large-scale production benefits from systematic workflow organization. When processing 20+ jars, stagger tasks to maintain continuous productivity. Start by preparing double batches of pear butter in separate pots—while one batch cooks down, prepare fruit for the next batch. This approach maximizes stove capacity and ensures hot butter remains available for filling.
Canner capacity determines batch size: a 21-quart boiling water canner holds 7 pint jars or 9 half-pint jars per load. Rather than waiting for one canner load to complete before starting another, some large-scale canners use two canners simultaneously, filling one while the other processes. This doubles throughput but requires careful timing and attention. Create physical stations for different tasks: a preparation area for washing and cutting pears, a cooking station with multiple pots, a filling station with jars and funnels arranged assembly-line style, and a canner area with cooling racks nearby. Keep detailed time logs tracking when each canner load starts and finishes.
Enlist helpers for large batches—assign roles like jar preparation, filling, rim wiping, and lid placement to different people working together. Communication becomes critical: designate one person as the "coordinator" tracking timing and directing workflow. Prepare all equipment before beginning: wash all jars, measure all sugar and spices, juice sufficient lemons, and organize tools. Front-loaded preparation prevents mid-batch scrambling. For very large operations (50+ jars), consider renting or borrowing additional canners. Many experienced large-batch canners report that producing 40 jars takes only about twice as long as producing 10 jars when systems are properly organized for packing pear butter in jars efficiently.
Yield & pantry cost analysis when packing pear butter in a jar
Understanding economics helps justify time investment and optimize ingredient purchasing. Calculate both monetary costs and time investment when evaluating home canning value. For a typical batch yielding 8 half-pint jars, ingredient costs break down approximately: 8 pounds pears at $1.50/pound = $12.00, sugar (4 cups) = $1.20, lemon juice = $0.50, spices = $1.00, for a total of $14.70 in ingredients. Jars (if purchased new) add $8-12 per dozen, though reusable jars eliminate this cost for subsequent batches. Lids cost $2-3 per dozen.
Per-jar cost totals approximately $2.25-2.75 for ingredients and supplies, compared to $6-8 for commercial fruit butters of equivalent quality. Home-canned pear butter costs 60-70% less than store-bought alternatives while typically offering superior flavor and customization. Time investment runs 2.5-3.5 hours for an 8-jar batch including prep, cooking, and processing. This translates to roughly 20-25 minutes per jar of hands-on time. Large batches improve efficiency: doubling to 16 jars adds only about 45-60 minutes of additional time, reducing per-jar time investment to 12-15 minutes.
Purchasing pears in bulk during peak season (September-October in most regions) minimizes costs—some orchards offer "seconds" with cosmetic imperfections at 40-50% discounts, perfectly suitable for butter. Calculate pantry value by multiplying jars produced by retail equivalents: 16 jars at $7 each represents $112 retail value versus approximately $40-50 actual investment, yielding $60-70 in savings plus the satisfaction of homemade quality. These economics become particularly favorable when packing pear butter in jars from home-grown fruit, essentially creating free preserves aside from sugar and processing supplies.
Variation Recipes & Flavor Ideas to Pack in a Jar
Creative flavoring transforms basic pear butter into gourmet spreads. Understanding safe modification guidelines allows customization while maintaining preservation safety.
Adjusting sugar and acid for safety and taste when packing flavored pear butter in a jar
Flavor variations add interest but must respect food safety boundaries. Lemon juice quantity cannot be reduced—the 1/4 cup per 8-pound batch represents the minimum acid needed to achieve safe pH levels for water bath processing. However, acid can be increased without safety concerns, and some flavor profiles benefit from additional tartness. Lime juice, orange juice (with zest), or combinations create different citrus notes while maintaining acidity.
Sugar adjustments require more caution. Reducing sugar by up to 25% is generally safe but produces runnier butter with shorter shelf life. Significant sugar reduction (more than 1/3) requires alternative preservation methods like freezing rather than canning, as sugar contributes to preservation through osmotic pressure. Adding sugar beyond recipe amounts is safe but produces overly sweet, candy-like results. Alternative sweeteners present challenges: honey can replace up to half the sugar but changes flavor significantly and requires pH testing. Maple syrup, agave, and coconut sugar work in small proportions (replacing 25% or less of sugar) but affect consistency and may require adjusted cooking times.
Spice variations offer unlimited creativity without safety concerns: try cardamom and ginger for chai-spiced butter, star anise and black pepper for complex warmth, or vanilla bean and cinnamon for classic appeal. Bourbon, rum, or whiskey (2-4 tablespoons per batch) add sophisticated notes—add alcohol after cooking but before packing to preserve flavor. Salted caramel pear butter incorporates 1 teaspoon flaked sea salt and extra sugar cooked to deeper caramelization. Always follow tested base recipes for cooking times and processing, modifying only flavoring ingredients when packing creative variations of pear butter in jars.
Troubleshooting Checklist — Quick Reference for Interns Learning How to Pack Pear Butter in a Jar
A systematic troubleshooting guide helps identify and resolve common problems efficiently. This quick-reference checklist serves as a training tool for new canners and a refresher for experienced preservers.
Before Processing:
- ☐ Jars inspected for chips, cracks, or damage
- ☐ Jars washed and kept hot (180-200°F)
- ☐ Lids warmed according to manufacturer instructions
- ☐ Pear butter cooked to proper consistency (mounds on spoon, 200-205°F)
- ☐ Pear butter maintained at 185-195°F during filling
- ☐ Work area organized with all tools accessible
During Filling:
- ☐ Funnel positioned properly to prevent rim contamination
- ☐ Hot butter ladled into hot jars
- ☐ Headspace measured at 1/4 inch after filling
- ☐ Bubble remover used around jar circumference 3-4 times
- ☐ Headspace rechecked and adjusted after bubble removal
- ☐ Rims wiped thoroughly with clean, damp cloth
- ☐ Lids centered on jars, sealing compound down
- ☐ Bands tightened fingertip-tight only
During Processing:
- ☐ Water level covers jar tops by 1-2 inches
- ☐ Water reaches full rolling boil before starting timer
- ☐ Boiling maintained throughout processing time
- ☐ Processing time adjusted for altitude if necessary
- ☐ Timer set accurately (10 min half-pints, 15 min pints at 0-1,000 ft)
- ☐ Canner lid remained on during processing
After Processing:
- ☐ Jars rested 5 minutes in canner before removal
- ☐ Jars placed on towels away from drafts
- ☐ Jars undisturbed during 12-24 hour cooling period
- ☐ Seals checked by pressing lid center (should not flex)
- ☐ Sealed jars labeled with contents and date
- ☐ Unsealed jars refrigerated or reprocessed within 24 hours
Storage & Quality Checks:
- ☐ Sealed jars stored in cool (50-70°F), dark location
- ☐ Jars inspected before use for intact seals
- ☐ Contents checked for normal color, texture, aroma
- ☐ Any jars with failed seals, mold, or off odors discarded
- ☐ Opened jars refrigerated and used within 3 weeks
This checklist format works well laminated and posted in canning areas, supporting consistent quality when training new staff or volunteers in packing pear butter in jars.
Appendix: Equipment Checklists, Template Canning Log & SOP for How to Pack Pear Butter in a Jar
Documentation and standardized procedures ensure consistency across batches and operators. These resources support training programs and quality control.
SOP: Step-by-step printable SOP for interns: how to pack pear butter in a jar (condensed 1-page)
Standard Operating Procedure: Packing Pear Butter in Jars
Purpose: To safely pack and process pear butter in mason jars for shelf-stable storage.
Equipment Required:
- Boiling water canner with rack
- Half-pint or pint mason jars with new lids and bands
- Canning funnel, jar lifter, bubble remover, headspace tool
- Ladle, clean cloths, timer
Procedure:
- Prepare butter: Cook pear butter to proper consistency (mounds on spoon, 200-205°F). Keep hot on stove at 185-195°F.
- Prepare jars: Wash jars in hot, soapy water. Keep hot in simmering water or oven at 200°F. Warm lids in hot water.
- Fill jars: Remove one hot jar at a time. Place funnel in jar. Ladle hot butter into jar, leaving 1/4-inch headspace.
- Remove bubbles: Insert bubble remover tool around jar interior 3-4 times to release trapped air. Recheck and adjust headspace.
- Seal jars: Wipe rim with clean, damp cloth. Center lid on jar. Screw band fingertip-tight.
- Process: Place jars in canner with water covering tops by 1-2 inches. Bring to full boil. Process 10 minutes (half-pints) or 15 minutes (pints) at 0-1,000 ft elevation. Add time for higher altitudes.
- Cool: Turn off heat. Let jars rest 5 minutes. Remove to towel-lined surface. Cool undisturbed 12-24 hours.
- Check seals: Press lid center—should not flex. Label sealed jars. Refrigerate unsealed jars and use within 3 weeks.
Critical Control Points:
- Maintain butter temperature 185-195°F during filling
- Measure 1/4-inch headspace precisely
- Wipe rims thoroughly before sealing
- Process for full time at active boil
- Verify seals before storage
Storage: Cool, dark, dry location. Best quality within 12 months.
This condensed SOP format fits on a single laminated page for easy reference in production areas when packing pear butter in jars.
Canning log template: batch#, jars filled, processing time, canner type, operator initials
Detailed record-keeping supports quality control and troubleshooting. A standardized canning log captures essential information for each batch.
Pear Butter Canning Log
| Batch # | Date | Pear Variety | Lbs Pears | Sugar (cups) | Recipe Variations | Jars Filled (size) | Processing Time | Canner Type | Altitude Adj. | Operator | Seal Success | Notes |
|---|---|---|---|---|---|---|---|---|---|---|---|---|
| 2025-01 | 10/15 | Bartlett | 8 | 5 | Classic spiced | 8 half-pints | 10 min | BWB | None | JM | 8/8 | Perfect batch |
| 2025-02 | 10/22 | Bosc | 16 | 9 | Bourbon vanilla | 15 half-pints | 10 min | BWB | None | JM | 14/15 | 1 jar failed—rim residue |
| 2025-03 | 10/28 | Mixed | 8 | 4.5 | Low sugar | 7 half-pints | 10 min | Steam | None | AS | 7/7 | Slightly runnier texture |
Log Instructions:
- Assign sequential batch numbers annually (Year-Number format)
- Record all recipe modifications under "Recipe Variations"
- Note processing time actually used, not just recipe specification
- Document canner type: BWB (boiling water bath), Steam, or PC (pressure canner)
- Include altitude adjustments applied
- Operator initials support accountability and training assessment
- Seal success ratio identifies technique issues requiring correction
- Notes section captures quality observations, problems, or lessons learned
Maintain logs in binders or digital spreadsheets. Review periodically to identify patterns—recurring seal failures, successful recipe variations, or seasonal differences in fruit quality. Logs prove invaluable when troubleshooting problems weeks or months after production, allowing correlation of storage issues with processing variables. For commercial or community canning operations, logs provide essential documentation demonstrating proper procedures when packing pear butter in jars.
FAQ: People Also Ask — Quick Answers on How to Pack Pear Butter in a Jar
Frequently asked questions address common concerns for new and experienced canners. These concise answers provide quick guidance on key topics.
Can you can pear butter in jars? (Yes — water bath processing with recipe-specific times)
Yes, pear butter can absolutely be safely canned in jars using the boiling water bath method. Pear butter qualifies as a high-acid food when prepared with proper ratios of lemon juice or citric acid, achieving pH levels below 4.6 that prevent botulism growth. The Jam Jar Kitchen and other reputable canning resources confirm that tested pear butter recipes processed in boiling water baths for specified times (typically 10-15 minutes depending on jar size) create shelf-stable products safe for pantry storage.
The key to safe canning lies in following tested recipes exactly, particularly regarding acid content and processing times. University extension services and organizations like the National Center for Home Food Preservation provide scientifically validated recipes ensuring safety. Unlike pressure canning required for low-acid foods like vegetables and meats, pear butter's acidity allows the simpler water bath method. Always use recipes from reliable sources rather than adapting online recipes without testing, verify processing times for your altitude, and confirm seals before storage. When properly canned following tested guidelines, pear butter remains safely preserved for 12-18 months, making it an excellent candidate for home food preservation when packing pear butter in jars.
How much headspace for pear butter in a jar? (Typically 1/4 inch recommended)
The recommended headspace for pear butter is 1/4 inch (6mm), measured from the jar rim to the butter surface. This specific measurement isn't arbitrary—it's calculated to allow proper vacuum formation during cooling while preventing overflow during processing. Attainable Sustainable's canning research emphasizes that precise headspace measurement represents one of the most critical factors for successful sealing.
The 1/4-inch specification applies to most fruit butters due to their thick consistency and minimal expansion during processing. Too little headspace (overfilling) causes butter to contact the lid or force past the seal during heating, preventing proper sealing or causing siphoning. Excessive headspace (more than 1/2 inch) creates too much air volume that doesn't evacuate completely, preventing adequate vacuum formation needed to pull lids down firmly. Use the notched measuring end of a bubble remover tool or a small ruler to verify accurate headspace after filling. Because thick pear butter may settle slightly when bubbles are removed, always check headspace a second time after bubble removal and add more hot butter if needed to restore the 1/4-inch measurement. This small detail significantly impacts sealing success when packing pear butter in jars.
Do you hot pack or raw pack pear butter in a jar? (Fruit butters are usually hot-packed; hot pack improves shelf life and quality)
Pear butter must be hot-packed—this is not optional. Hot-packing means filling jars with butter that has been fully cooked to final consistency and maintained at 185-195°F during the filling process. The National Center for Home Food Preservation (nchfp.uga.edu) explicitly states that fruit butters require hot-pack methods due to their dense texture, which prevents adequate heat penetration if raw-packed.
Raw-packing (filling jars with cold or room-temperature food) works for certain high-acid fruits like peaches or berries, but proves both impractical and unsafe for fruit butters. Pear butter by definition requires extensive cooking to achieve its characteristic smooth, spreadable consistency—raw pears contain too much water and maintain firm texture unsuitable for butter. More critically, the thick, dense nature of cooked butter prevents heat from reaching jar centers during processing if packed cold. This creates cold spots where dangerous bacteria survive processing. Hot-packing offers multiple advantages: it drives air from the product for better color retention, reduces processing time needed, improves texture consistency, and most importantly, ensures the entire jar contents reach safe temperatures during processing. The slightly longer preparation time required for hot-packing pays dividends in safety and quality when packing pear butter in jars.
How long to process pear butter jars? (Commonly 10–15 minutes in boiling water bath depending on jar size and recipe; always follow tested recipe)
Processing times for pear butter vary based on jar size and altitude. At elevations below 1,000 feet, half-pint jars typically process for 10 minutes, while pint jars require 15 minutes in a boiling water bath at full rolling boil. The Grateful Girl Cooks' tested recipes align with USDA guidelines for these standard times, which have been scientifically validated to ensure complete heat penetration and pathogen destruction.
Altitude significantly affects processing requirements because water boils at lower temperatures at higher elevations, reducing processing effectiveness. Add 5 minutes to processing time for altitudes between 1,001-3,000 feet, 10 minutes for 3,001-6,000 feet, 15 minutes for 6,001-8,000 feet, and 20 minutes above 8,000 feet. Never reduce processing times below recipe specifications—insufficient processing risks food safety. Some recipes specify slightly longer times based on specific formulations or testing protocols; always follow the exact time specified in your chosen recipe. Processing time begins only when water returns to a full rolling boil after jars are added. If water stops boiling during processing, bring it back to a boil and restart timing. Using a reliable timer prevents errors. These scientifically determined processing times ensure safety and quality when packing pear butter in jars.
How do you sterilize jars before packing pear butter in a jar? (Wash, keep hot in simmering water or in oven if instructed; follow USDA/extension guidance)
Jar sterilization protocols have evolved based on modern food science research. For processing times of 10 minutes or longer—which includes all pear butter recipes—the USDA states that pre-sterilization isn't technically required because processing itself sterilizes jars. However, jars must be clean and kept hot to prevent thermal shock when filled with hot butter. Wash jars thoroughly in hot, soapy water or run through a dishwasher cycle, then keep them in simmering water (180-200°F) until ready to fill.
Alternative methods include placing clean jars in a 200°F oven for 20 minutes, though the hot water method offers easier temperature control. Never boil jars, as excessive temperatures can cause thermal shock. For lids, modern formulations (Ball/Kerr brands since 2020) don't require boiling—simply warming in hot water suffices, though always check manufacturer instructions as formulations vary by brand and year. The critical factor isn't sterilization temperature but rather maintaining jar temperature at filling time. Cold jars filled with hot butter can crack from thermal shock, wasting both containers and product. Keep jars at 180-200°F and remove them one at a time immediately before filling to maintain proper temperature differential. This approach aligns with current USDA and university extension guidance for safely packing pear butter in jars.
Final Thoughts
Mastering how to pack pear butter in a jar combines art and science—creativity in flavoring balanced with precise technique for safety. This comprehensive guide provides the knowledge foundation needed for confident home canning. Start with small batches using tested recipes, develop systematic workflows, and don't be discouraged by occasional seal failures. Each batch builds skills and understanding. The reward—jars of golden, aromatic pear butter lining pantry shelves—justifies the effort. Whether enjoying toast slathered with homemade spread or gifting jars that showcase preservation expertise, properly packed pear butter represents a delicious connection to seasonal abundance and time-honored food preservation traditions.
Read More:


